아두이노에 적외선 수신 모듈을 붙이고, 리모콘 콘트로로를 붙여 보려고 했다.
적외선 수신 센서는 artrobot과 같은 다양한 여러 업체에서 살 수 있다. 나는 artrobot에서 송신 모듈이랑 같이 해서 통으로 샀다.
fritzing 파일로 그려본 그림이다. (적외선 수신 센서 그림이 없어서, 온도계 그림으로 대체했다 ㅎㅎ)

fritzing 파일은 다음에서 다운받을 수 있다.
 ir-example.fz
실제 빵판에 구현해보았다.

동료로부터 IRremote.h와 IRremote.cpp 소스(Ken's Library)를 받았는데. 헉...
내가 가지고 있는 삼성, LG 리모콘으로는 인식이 안되었다.


소스를 보니, nec와 소니, rc5, rc6만 된다.
자료를 찾아보니. 요즘 나온 삼성꺼는 NEC와 약간다르다고 한다.
(참고)
http://cafe.naver.com/arduinostory.cafe?iframe_url=/ArticleRead.nhn%3Farticleid=4487&

해당 파일 내용이 너무 좋아서 올려본다.
이 자료는 내가 만든것이 아닌. 시니어컴에서 만든 자료이다. ^^;; 링크걸기가 어려워서 이렇게 파일을 업로드했다.
 009_ATmega128_리모콘[1].pdf
이 그림을 보니 NEC와 약간 내용이 다르다. 우선 내용을 읽는 ms가 다르다.


decodeNEC 함수를 복사해서 decodeSamsung 함수로 만들었다.
// if normal packet receives, arduino can get 32 (8bit * 4) bit value.
// (custom code 2ea + data code 2ea)
long IRrecv::decodeSamsung(decode_results *results) {
long data = 0;
int offset = 1; // Skip first space
// Initial mark
if (!MATCH_MARK(results->rawbuf[offset], 4500)) {
return ERR;
}
offset++;
Serial.println("knight-1");
// Check for repeat
if (irparams.rawlen == 4 &&
MATCH_SPACE(results->rawbuf[offset], NEC_RPT_SPACE) &&
MATCH_MARK(results->rawbuf[offset+1], NEC_BIT_MARK)) {
results->bits = 0;
results->value = REPEAT;
results->decode_type = NEC;
return DECODED;
}
Serial.println("knight-2");
if (irparams.rawlen < 2 * 32 + 4) {
return ERR;
}
Serial.println("knight-3");
// Initial space
if (!MATCH_SPACE(results->rawbuf[offset], 4500)) {
return ERR;
}
offset++;
Serial.println("knight-4");
for (int i = 0; i < 32; i++) {
if (!MATCH_MARK(results->rawbuf[offset], NEC_BIT_MARK)) {
return ERR;
}
offset++;
if (MATCH_SPACE(results->rawbuf[offset], NEC_ONE_SPACE)) {
data = (data << 1) | 1;
}
else if (MATCH_SPACE(results->rawbuf[offset], 600)) {
data <<= 1;
}
else {
return ERR;
}
offset++;
}
Serial.println("knight-5" );
// Success
results->bits = 32;
results->value = data;
results->decode_type = SAMSUNG;
return DECODED;
}
// knight end
그리고, 동작하는 pde 소스는 다음과 같다.
삼성 리모콘, LG 리모콘 모두 동작이 된다. 나는 삼성 리모콘의 전원과 LG 리코콘의 전원에 해당되는 키를 누르면 켜졌다가 안켜졌다가 하거나, 깜박깜박하는 것으로 마무리를 지었다.
#include <IRremote.h>
int RECV_PIN = 11;
IRrecv irrecv(RECV_PIN);
decode_results results;
boolean isLight = false;
void setup() {
Serial.begin(9600);
irrecv.enableIRIn();
pinMode(3, OUTPUT);
}
void loop() {
if (irrecv.decode(&results)) {
Serial.println(results.value);
// samsung remocon (power)
if (results.value == 0xE0E040BF) {
toggleLight();
}
// lg remocon (power)
if (results.value == 0xB4B40CF3) {
shinyLight();
}
irrecv.resume();
Serial.println("Attempting dumping");
irrecv.dump(&results);
}
}
void toggleLight() {
isLight = !isLight;
if (isLight) {
Serial.println("turn on");
digitalWrite(3, HIGH);
} else {
Serial.println("turn off");
digitalWrite(3, LOW);
}
}
void shinyLight() {
Serial.println("shiny");
for (int i = 0 ; i < 2 ; i++) {
digitalWrite(3, HIGH);
delay(500);
digitalWrite(3, LOW);
delay(500);
}
}
전체 소스는 다음과 같다.
디버깅을 위해서
#define DEBUG 을 header 파일에 선언해서 디버깅을 하도록 한다. 많은 도움이 있었다.
Testing mark 4550 vs 4500: 69 <= 91 <= 116
knight-1
knight-2
knight-3
Testing space 4450 vs 4500: 66 <= 89 <= 111
knight-4
Testing mark 550 vs 560: 9 <= 11 <= 17
Testing space 1650 vs 1600: 22 <= 33 <= 38
Testing mark 600 vs 560: 9 <= 12 <= 17
Testing space 500 vs 1600: 22 <= 10 <= 38
Testing space 500 vs 600: 7 <= 10 <= 13
Testing mark 600 vs 560: 9 <= 12 <= 17
Testing space 1650 vs 1600: 22 <= 33 <= 38
Testing mark 600 vs 560: 9 <= 12 <= 17
Testing space 1600 vs 1600: 22 <= 32 <= 38
Testing mark 600 vs 560: 9 <= 12 <= 17
Testing space 550 vs 1600: 22 <= 11 <= 38
Testing space 550 vs 600: 7 <= 11 <= 13
Testing mark 550 vs 560: 9 <= 11 <= 17
Testing space 1650 vs 1600: 22 <= 33 <= 38
Testing mark 600 vs 560: 9 <= 12 <= 17
Testing space 500 vs 1600: 22 <= 10 <= 38
Testing space 500 vs 600: 7 <= 10 <= 13
Testing mark 600 vs 560: 9 <= 12 <= 17
Testing space 1650 vs 1600: 22 <= 33 <= 38
Testing mark 600 vs 560: 9 <= 12 <= 17
Testing space 1650 vs 1600: 22 <= 33 <= 38
Testing mark 550 vs 560: 9 <= 11 <= 17
Testing space 550 vs 1600: 22 <= 11 <= 38
Testing space 550 vs 600: 7 <= 11 <= 13
Testing mark 600 vs 560: 9 <= 12 <= 17
Testing space 1600 vs 1600: 22 <= 32 <= 38
Testing mark 600 vs 560: 9 <= 12 <= 17
Testing space 550 vs 1600: 22 <= 11 <= 38
Testing space 550 vs 600: 7 <= 11 <= 13
Testing mark 550 vs 560: 9 <= 11 <= 17
Testing space 550 vs 1600: 22 <= 11 <= 38
Testing space 550 vs 600: 7 <= 11 <= 13
Testing mark 600 vs 560: 9 <= 12 <= 17
Testing space 500 vs 1600: 22 <= 10 <= 38
Testing space 500 vs 600: 7 <= 10 <= 13
Testing mark 600 vs 560: 9 <= 12 <= 17
Testing space 500 vs 1600: 22 <= 10 <= 38
Testing space 500 vs 600: 7 <= 10 <= 13
Testing mark 600 vs 560: 9 <= 12 <= 17
Testing space 550 vs 1600: 22 <= 11 <= 38
Testing space 550 vs 600: 7 <= 11 <= 13
Testing mark 550 vs 560: 9 <= 11 <= 17
Testing space 550 vs 1600: 22 <= 11 <= 38
Testing space 550 vs 600: 7 <= 11 <= 13
Testing mark 600 vs 560: 9 <= 12 <= 17
Testing space 1600 vs 1600: 22 <= 32 <= 38
Testing mark 600 vs 560: 9 <= 12 <= 17
Testing space 1650 vs 1600: 22 <= 33 <= 38
Testing mark 600 vs 560: 9 <= 12 <= 17
Testing space 500 vs 1600: 22 <= 10 <= 38
Testing space 500 vs 600: 7 <= 10 <= 13
Testing mark 600 vs 560: 9 <= 12 <= 17
Testing space 500 vs 1600: 22 <= 10 <= 38
Testing space 500 vs 600: 7 <= 10 <= 13
Testing mark 600 vs 560: 9 <= 12 <= 17
Testing space 1650 vs 1600: 22 <= 33 <= 38
Testing mark 600 vs 560: 9 <= 12 <= 17
Testing space 1650 vs 1600: 22 <= 33 <= 38
Testing mark 550 vs 560: 9 <= 11 <= 17
Testing space 1650 vs 1600: 22 <= 33 <= 38
Testing mark 600 vs 560: 9 <= 12 <= 17
Testing space 1650 vs 1600: 22 <= 33 <= 38
Testing mark 550 vs 560: 9 <= 11 <= 17
Testing space 550 vs 1600: 22 <= 11 <= 38
Testing space 550 vs 600: 7 <= 11 <= 13
Testing mark 600 vs 560: 9 <= 12 <= 17
Testing space 500 vs 1600: 22 <= 10 <= 38
Testing space 500 vs 600: 7 <= 10 <= 13
Testing mark 600 vs 560: 9 <= 12 <= 17
Testing space 1650 vs 1600: 22 <= 33 <= 38
Testing mark 550 vs 560: 9 <= 11 <= 17
Testing space 1650 vs 1600: 22 <= 33 <= 38
knight-5
3031698675
shiny
Attempting dumping
B4B40CF3 (32 bits)
Raw (68): 15180 4550 -4450 550 -1650 600 -500 600 -1650 600 -1600 600 -550 550 -1650 600 -500 600 -550 550 -1650 600 -500 600 -1650 600 -1650 550 -550 600 -1600 600 -550 550 -550 600 -500 600 -500 600 -550 550 -550 600 -1600 600 -1650 600 -500 600 -500 600 -1650 600 -1650 550 -1650 600 -1650 550 -550 600 -500 600 -1650 550 -1650 600
* 근데..
좀더 찾아보니. 이미 소스는 이미 github에 다 있었다. 아래 주소를 참조하면 왠만한 모든 리모콘의 IR을 동작시킬 수 있을 것이다. 이거 다운로드해서 그냥 쓸 껄... 하지만, IR에 대해서 이해도를 높였다는 것이 중요하니까~ ^^
https://github.com/targettio/Arduino-IR-remote
이번에 아두이노를 하면서 시행착오가 있었다. ㅎㅎ 우선 전혀 IR에 대해서 몰랐는데. 이것저것 공부할 수 있어서 좋았다.
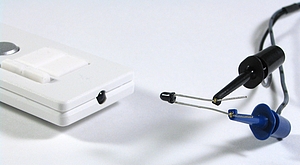
원래는 이렇게 오실로스코프를 이용해서 리모콘이 전달하는 파동을 찾아서 정보를 얻도록 하는 것이다.

좋은 공부가 될만한 레퍼런스를 적어본다.
http://www.zovirl.com/2008/11/12/building-a-universal-remote-with-an-arduino/
http://www.arcfn.com/2009/08/multi-protocol-infrared-remote-library.html
http://luckylarry.co.uk/arduino-projects/arduino-redefining-the-tv-remote/
http://www.matlabinuse.com/index.php?mid=Arduino_with_MATLAB&document_srl=2751
'아두이노' 카테고리의 다른 글
| [아두이노] 프로세싱(Processing) 과 아두이노(arduino)를 연동해보기 (3) | 2011.12.08 |
|---|---|
| 아두이노 Arduino 1.0 Release (0) | 2011.12.02 |
| 아두이노 전자파(정확히 말하면 전자기파) 측정기 (EMF Detector) 소스 공유 (5) | 2011.11.03 |
| 7 segment (fnd) 정리 (0) | 2011.11.03 |
| 아두이노(arduino)에서 time 사용하기 (0) | 2011.11.01 |


