자주 쓰는 MySQL 명령어 정리

# root암호설정 - root로 로그인하여 해야함
% mysqladmin -u root password '변경암호'
% mysqladmin -u root -p기존암호 password '변경암호'


root암호변경설정
PLEASE REMEMBER TO SET A PASSWORD FOR THE MySQL root USER !
This is done with:
/usr/bin/mysqladmin -u root -p password 'new-password'
/usr/bin/mysqladmin -u root -h ns.moyiza.net -p password 'new-password'


DB작업
DB생성: mysql> create database DB명 ( or % mysqladmin -u root -p create DB명 )
DB삭제: mysql> drop database DB명
DB사용: mysql> use DB명 (엄밀히 말하자면, 사용할 'default database'를 선택하는 것이다.)
DB변경: mysql> alter database db명 DEFAULT CHARACTER SET charset (4.1이상에서만 available)

MySQL 연결
mysql -u 사용자 -p DB명 ( or % mysqladmin -u root -p drop DB명 )

데이터파일 실행(sql*loader기능)
mysql>load data infile "데이터파일" into table 테이블명 ;
데이터파일에서 컬럼구분은 탭문자, Null값은 /n로 입력
데이터파일의 위치는 /home/kang/load.txt 와 같이 절대경로로 지정할것.

질의 파일 실행
쉘프롬프트상에서
mysql -u 사용자 -p DB명 < 질의파일
or
mysql프롬프트상에서
mysql> source 질의파일

쉘프롬프트상에서 질의 실행
moyiza@nero board]$ mysql mysql -u root -pxxxx -e
>        "INSERT INTO db VALUES(
>        'localhost', 'aaa', 'aaa',
>        'Y', 'Y', 'Y', 'Y', 'Y', 'Y', 'Y', 'Y', 'Y', 'Y')"


사용자 생성 & 사용자에게 DB할당
shell> mysql --user=root -p mysql

mysql> INSERT INTO user VALUES('localhost','사용자',PASSWORD('비밀번호'),'Y','Y','Y','Y','Y','Y','Y','Y','Y','Y','Y','Y','Y','Y');
mysql> INSERT INTO user VALUES('%','사용자',PASSWORD('비밀번호'),'Y','Y','Y','Y','Y','Y','Y','Y','Y','Y','Y','Y','Y','Y');

mysql> INSERT INTO db(Host,Db,User,Select_priv,Insert_priv,Update_priv,Delete_priv,Create_priv,Drop_priv) VALUES ('localhost','DB명','사용자','Y','Y','Y','Y','Y','Y');
mysql> INSERT INTO db(Host,Db,User,Select_priv,Insert_priv,Update_priv,Delete_priv,Create_priv,Drop_priv) VALUES('%','DB명','사용자','Y','Y','Y','Y','Y','Y');

mysql> FLUSH PRIVILEGES; (or shell prompt: mysqladmin -u root -pxxxx reload)

CASE 2: GRANT명령을 이용한 사용자 생성(이 방법이 권장된다)
kang이라는 DB를 만들고, 이 DB를 아래에서 나열된 권한을 가진 kang이라는 사용자를 생성
create database kang;
grant SELECT,INSERT,UPDATE,DELETE,CREATE,DROP on kang.* to kang@localhost identified by 'kang';
grant SELECT,INSERT,UPDATE,DELETE,CREATE,DROP on kang.* to kang@'%' identified by 'kang';

mysql> create database kang;
Query OK, 1 row affected (0.00 sec)

mysql> grant SELECT,INSERT,UPDATE,DELETE,CREATE,DROP on kang.* to kang@localhost identified by 'kang';
Query OK, 0 rows affected (0.00 sec)

mysql> grant SELECT,INSERT,UPDATE,DELETE,CREATE,DROP on kang.* to kang@'%' identified by 'kang';
Query OK, 0 rows affected (0.01 sec)

mysql>

여러가지 명령정리
mysql> show variables;                               서버의 variables(설정사항)출력
mysql> show variables like 'have_inno%'                   조건에 맞는 variables만 출력
mysql> show databases;                               database목록
mysql> show tables;                                 현재DB의 테이블목록(temporary table은 출력하지 않음)
mysql> show tables from db명;                          지정된 db명이 소유한 테이블목록
mysql> show tables like 'mem%';                         조건에 맞는 테이블목록만 출력
mysql> show index from 테이블명;                        인덱스 보기
mysql> show columns from 테이블명;                       테이블구조(describe 테이블명, explain 테이블명)
mysql> show table status;                             현재 DB의 테이블들의 상태(row수,table type,row길이,..)
mysql> show table status from db명;                      지정된 DB의 테이블들의 상태(row수,table type,row길이,..)
mysql> show create table 테이블명;                       해당 테이블 생성 SQL문 출력
mysql> rename table 테이블1 to 테이블2;                   테이블명 변경(ALTER TABLE 테이블1 RENAME TO 테이블2)
mysql> rename table 테이블1 to 테이블2, 테이블3 to 테이블4;      rename multiple tables
mysql> rename table db1명.테이블명 to db2명.테이블명;          테이블을 다른 DB로 이동
mysql> alter table 테이블명 add 컬럼명 데이터타입;            컬럼추가
mysql> alter table 테이블명 del 컬럼명;                   컬럼제거
mysql> alter table 테이블명 modify 컬럼명 컬럼타입;           컬럼명에 지정된 컬럼타입의 변경
mysql> alter table 테이블명 change old컬럼명 new컬럼명 컬럼타입   컬럼명 변경
mysql> alter table 테이블명 type=innodb;                   테이블type변경
mysql> create table 테이블명(..) type=heap min_rows=10000;       10000row를 수용할 수 있을 만큼 메모리할당(heap type이므로)
mysql> select version();                             MySQL서버버전 출력
mysql> create table 테이블2 as select * from 테이블1;          테이블1과 동일한 테이블 생성(with 데이터, as는 생략가능)
mysql> create table 테이블2 as select * from 테이블1 where 1=2;   테이블1과 동일한 구조의 테이블 생성(without 데이터, 1=2는 0으로 할수도 있다.)
mysql> insert into 테이블2 select * from 테이블1;             테이블1의 데이터를 테이블2에 insert


테이블이 존재여부 파악
DROP TABLE IF EXISTS 테이블명;
CREATE TABLE 테이블명 (...);
프로그래밍 언어에서 COUNT(*)를 사용하여 질의가 성공하면 테이블이 존재함을 파악할 수 있다.
ISAM, MyISAM의 경우 COUNT(*)가 최적화되어 상관없으나, BDB, InnoDB의 경우 full scan이 발생하므로 사용하지 마라.
대신 select * from 테이블명 where 0; 을 사용하라. 질의가 성공하면 테이블이 존재하는 것이고, 아니면 존재하지 않는 것이다.


접속
mysql {-h 접속호스트} -u 사용자 -p 사용DB
-h로 다른 서버에 존재하는 MySQL접속시 다음과 같이 MySQL DB에 설정해줘야 한다.
mysql> INSERT INTO user VALUES('접근을 허용할 호스트ip','사용자',PASSWORD('비밀번호'),'Y','Y','Y','Y','Y','Y','Y','Y','Y','Y','Y','Y','Y','Y');
mysql> INSERT INTO db(Host,Db,User,Select_priv,Insert_priv,Update_priv,Delete_priv,Create_priv,Drop_priv) VALUES('접근을 허용할 호스트ip','사용DB','사용자','Y','Y','Y','Y','Y','Y');
mysql> FLUSH PRIVILEGES; or 쉴프롬프트상에서 % mysqladmin -u root -p flush-privileges


검색조건(where)
regular expression을 지원하다니 신기하군..
mysql> select * from work where 열명 regexp "정규표현식";


백업 & 복구
mysqldump {-h 호스트} -u 사용자 -p DB명 > 백업파일
mysql {-h 호스트} -u 사용자 -p DB명 < 백업파일

mysqldump -u root -p --opt db_moyiza > moyiza.sql
mysqldump -u root -p --opt db_board | mysql ---host=remote-host -C database (상이한 머쉰)
mysql -u moyiza -p db_moyiza < moyiza.sql

mysqldump -u root -p --opt db_moyiza | mysql ---host=ns.moyiza.net -C db_moyiza

테이블 생성구문만을 화면에서 보려면 다음과 같이 --no-data를 사용한다. 테이블명을 생략하면 모든 테이블 출력
mysqldump -u 유저명 -p --no-data db명 테이블명

테이블 검사
isamchk

오라클 sysdate와 동일
insert into test values('12', now());

유닉스 time()함수 리턴값 사용
FROM_UNIXTIME(954788684)
UNIX_TIMESTAMP("2001-04-04 :04:04:04")

MySQL 디폴트 DB&로그파일 위치
/var/lib/mysql
/var/lib디렉토리는 여러 프로세스들이 사용하는 데이터를 저장하는 일종의 파일시스템상의 데이터베이스라고 볼 수 있다.

replace
해당 레코드 존재하면 update하고, 존재하지 않는다면 insert한다.(insert문법과 동일)
replace into test values('maddog','kang myung gyu')'

explain
explain 질의문: 지정한 질의문이 어떻게 실행될 건지를 보여줌
mysql> explain select u.uid, u.name, a.name from sm_user u, sm_addr a where u.uid=a.uid;
+-------+------+-----------------+-----------------+---------+-------+------+-------+
| table | type | possible_keys  | key         | key_len | ref  | rows | Extra |
+-------+------+-----------------+-----------------+---------+-------+------+-------+
| u   | ALL | PRIMARY      | NULL        |   NULL | NULL | 370 |     |
| a   | ref | sm_addr_uid_idx | sm_addr_uid_idx |    11 | u.uid |  11 |     |
+-------+------+-----------------+-----------------+---------+-------+------+-------+
2 rows in set (0.01 sec)


temporary table
크기가 큰 테이블에 있는 subset에 대한 질의라면 subset을 temporary table에 저장한 후 질의하는 것이 더 빠를 경우가 있다.
temporary table는 세션내에서만 유효하고(현재 사용자만이 볼수 있다는 뜻), 세션종료시 자동적으로 drop된다.

create temporary table (...);
create temporary table (...) type=heap;     디스크가 아닌 메모리에 테이블 생성

존재하는 permanent table의 테이블명과 동일하게 생성할 수 있으며,
temporary table은 permanent table보다 우선시되어 처리된다.
4.0.7의 감마버전에서 테스트하면 결과는 약간 달라진다. 버그인건지..

mysql> create table test (id varchar(10));
Query OK, 0 rows affected (0.01 sec)

mysql> insert into test values('moyiza');
Query OK, 1 row affected (0.00 sec)

mysql> create temporary table test(id varchar(10));
Query OK, 0 rows affected (0.00 sec)

mysql> select * from test;
Empty set (0.00 sec)

mysql> drop table test;
Query OK, 0 rows affected (0.00 sec)

mysql> select * from test;
+----------+
| id     |
+----------+
| moyiza |
+----------+
1 row in set (0.00 sec)


Table Type에 다른 Files on Disk

ISAM  .frm (definition) .ISD (data) .ISM (indexes)
MyISAM .frm (definition) .MYD (data) .MYI (indexes)
MERGE .frm (definition) .MRG (list of constituent MyISAM table names)
HEAP  .frm (definition)
BDB   .frm (definition) .db (data and indexes)
InnoDB .frm (definition)

보통 mysqldump를 사용하여 백업을 수행하여 다른 DB서버에 데이터를 restore하면 된다.
MySQL은 별다른 작업없이 데이터파일을 단순히 복사(copy)하는 것만으로도 다른 서버에
DB을 이동시킬 수 있다. 하지만, 이런 방식이 지원되지 않는 table type도 있다.

ISAM: machine-dependent format하기때문에..
BDB : .db파일에 이미 테이블위치가 encode되어 있기때문에..
MyISAM, InnoDB, MERGE :가능(machine-independent format)

별다른 지정을 하지 않았다면 디폴트 TABLE type이 MyISAM이므로, 무난히 migration할 수 있다.
floating-point컬럼(FLOAT,DOUBLE)이 있다면 이러한 방식이 실패할 수 도 있다.

쉘에서는 mysql이 되는데 PHP에서 mysql.sock error를 내면서 MySQL이 안되는 경우
mysql.sock은 /tmp 아니면 /var/lib/mysql에 생기게 된다.
나의 경우, /var/lib/mysql에 mysql.sock파일이 있는데 PHP에서는 /tmp에서 찾으려하면서 에러를 발생했다.
/usr/bin/safe_mysqld파일에서 다음과 같이 수정한다.
주석(#)이 달린 것이 원래것이고 그 밑에 있는것이 수정한 것이다.

# MYSQL_UNIX_PORT=${MYSQL_UNIX_PORT:-/var/lib/mysql/mysql.sock}
MYSQL_UNIX_PORT=${MYSQL_UNIX_PORT:-/tmp/mysql.sock}

위와 같이 하니 /usr/bin/mysql이 /var/lib/mysql/mysql.sock에서 소켓파일을 찾으려 했다.
socket file을 지정하는 --socket이라는 옵션으로 다음과 같이 지정하면 된다.

mysql --socket=/tmp/mysql.sock -u moyiza -p db_test

하지만 mysql실행시마다 이렇게 써줘야한다는 것이 상당히 귀찮다. 옵션이 바로 적용되게 설정하자.
mysql은 설정사항을 다음 3가지 파일에서 검색한다.

/etc/my.cnf        global options(MySQL 전체적으로 사용되는 옵션 정의)
mysql-data-dir/my.cnf 특정 DB에 적용되는 option (/var/lib/mysql/my.cnf)
~/.my.cnf         사용자 각각의 설정('~'문자는 사용자의 홈디렉토리는 의미)

/usr/share/mysql디렉토리에 예제가 있으므로 참고한다.
소켓파일의 지정은 다음줄을 넣어주면 된다.

socket       = /tmp/mysql.sock


== /etc/my.cnf예 ==
# The following options will be passed to all MySQL clients
[client]
#password     = your_password
port        = 3306
socket       = /tmp/mysql.sock

# Here follows entries for some specific programs

# The MySQL server
[mysqld]
port        = 3306
socket       = /tmp/mysql.sock


MySQL에서 통계처리시
orderby, groupby 는 sort_buffer를 늘여준다.(show variables)

live table(smslog)에서 모든 질의를 처리하지 말고 summary table에 질의결과를 저장해 재질의 처리한다.
summary table이 heap-type table가 가능한지 확인할 것.

INSERT INTO tblTemp2 (fldID) SELECT tblTemp1.fldOrder_ID FROM tblTemp1 WHERE
   tblTemp1.fldOrder_ID > 100;


join이 subselect보다 빠르다.
join시 사용되는 컬럼은 동일한 column type과 길이를 가져야만 최적의 속도를 보장한다.
즉, 동일 column type이지만 길이가 다르다면(char(11), char(10)), 동일한 컬럼도메인으로 변경해주는 것이 좋다.
where의 in은 optimize되어 있으므로 빠르다
insert,select는 동시에 수행가능하다.(어떻게?)
explain으로 질의과정 점검


varchar to/from char
conversion varchar를 char로 변경할 경우 모든 컬럼타입을 동시에 변경해야 한다.
반대의 경우, 하나만 char->charchar변경시 다른 모든 컬럼도 varchar로 변경됨
참.. 특이하구만..

mysql> CREATE TABLE chartbl (name VARCHAR(40), address VARCHAR(80));
Query OK, 0 rows affected (0.05 sec)

mysql> desc chartbl;
+---------+-------------+------+-----+---------+-------+
| Field  | Type     | Null | Key | Default | Extra |
+---------+-------------+------+-----+---------+-------+
| name   | varchar(40) | YES |   | NULL   |     |
| address | varchar(80) | YES |   | NULL   |     |
+---------+-------------+------+-----+---------+-------+
2 rows in set (0.03 sec)

mysql> alter table chartbl modify name char(40);
Query OK, 0 rows affected (0.02 sec)
Records: 0 Duplicates: 0 Warnings: 0

mysql> desc chartbl;
+---------+-------------+------+-----+---------+-------+
| Field  | Type     | Null | Key | Default | Extra |
+---------+-------------+------+-----+---------+-------+
| name   | varchar(40) | YES |   | NULL   |     |
| address | varchar(80) | YES |   | NULL   |     |
+---------+-------------+------+-----+---------+-------+
2 rows in set (0.00 sec)

mysql> alter table chartbl modify name char(40), modify address char(80);
Query OK, 0 rows affected (0.01 sec)
Records: 0 Duplicates: 0 Warnings: 0

mysql> desc chartbl;
+---------+----------+------+-----+---------+-------+
| Field  | Type   | Null | Key | Default | Extra |
+---------+----------+------+-----+---------+-------+
| name   | char(40) | YES |   | NULL   |     |
| address | char(80) | YES |   | NULL   |     |
+---------+----------+------+-----+---------+-------+
2 rows in set (0.00 sec)

mysql>


"For each article, find the dealer(s) with the most expensive price."

표준안
   SELECT article, dealer, price
   FROM  shop s1
   WHERE price=(SELECT MAX(s2.price)
             FROM shop s2
             WHERE s1.article = s2.article);

수정안(최적화)
   CREATE TEMPORARY TABLE tmp (
         article INT(4) UNSIGNED ZEROFILL DEFAULT '0000' NOT NULL,
         price  DOUBLE(16,2)         DEFAULT '0.00' NOT NULL);

   LOCK TABLES shop read;

   INSERT INTO tmp SELECT article, MAX(price) FROM shop GROUP BY article;

   SELECT shop.article, dealer, shop.price FROM shop, tmp
   WHERE shop.article=tmp.article AND shop.price=tmp.price;

   UNLOCK TABLES;

   DROP TABLE tmp;


========================================================
MySQL 특성정리
========================================================
primary key, foreign key지원
index 지원(15개컬럼, 256byte까지)
MySQL에서의 Stored Script개념 => SQL server language
commit-rollback개념 => lock tables(lock table test write -> 트랜잭션.. -> unlock tables)
컬럼명길이: 64자까지, 컬럼 Alias: 256자까지
not case-sensitive: keywords, functions, column, index명
case-sensitive: database, table, alias명
키워드,함수명은 대소문자구별이 없지만, db명과 table명은 Unix계열이라면 case-sensitive하다.
(이는 오브젝트명이 OS의 fs에 따라 저장되기 때문이다. 서버의 lower_case_table_names 변수를
1로 설정하면 오브젝트명은 모두 소문자로 저장되므로 유닉스-윈도간 호환성을 높일 수 있다.

지원되지 않는 부분:
Stored Procedure(5.0이상부터 지원된다고 함)
View(5.0이상부터 지원된다고 함)
Trigger(5.0이상부터 지원된다고 함)
subquery(4.1이상부터 지원된다고 함)
union, union all(4.0이상부터 지원됨)

[테이블 type에 따른 인덱스 특성]
Index Characteristic        ISAM   MyISAM         HEAP     BDB           InnoDB
NULL values allowed         No    Yes           As of 4.0.2 Yes           Yes
Columns per index          16    16            16       16            16
Indexes per table          16    32            32       31            32
Maximum index row size (bytes) 256   500           500      500/1024        500/1024
Index column prefixes allowed  Yes   Yes           Yes      Yes           No
BLOB/TEXT indexes allowed     No    Yes(255 bytes max) No       Yes (255 bytes max) No


인덱스 생성
- alter table을 이용한 인덱스 생성이 더 flexible함
- 인덱스명은 생략가능

ALTER TABLE 테이블명 ADD INDEX 인덱스명 (인덱스컬럼);
ALTER TABLE 테이블명 ADD UNIQUE 인덱스명 (인덱스컬럼);
ALTER TABLE 테이블명 ADD PRIMARY KEY (인덱스컬럼);
ALTER TABLE 테이블명 ADD FULLTEXT (인덱스컬럼);

CREATE INDEX 인덱스명 ON 테이블명 (인덱스컬럼);
CREATE UNIQUE INDEX 인덱스명 ON 테이블명 (인덱스컬럼);
CREATE FULLTEXT INDEX 인덱스명 ON 테이블명 (인덱스컬럼);

unique인덱스와 primary key인덱스와의 차이
unique은 null허용하지만, primary key는 null허용 안함
unique은 하나의 테이블에 여러개 올 수 있지만, primary key는 하나만 존재

테이블생성시 지정
CREATE TABLE 테이블명
(
... column declarations ...
INDEX 인덱스명 (인덱스컬럼),
UNIQUE 인덱스명 (인덱스컬럼),
PRIMARY KEY (인덱스컬럼),
FULLTEXT 인덱스명 (인덱스컬럼),
...

);


index prefix 생성
- 컬럼의 전체길이중 일부만 인덱스로 사용
- supported for ISAM, MyISAM, HEAP, and BDB tables, but not for InnoDB tables
- 지정되는 길이는 byte단위가 아닌 charater단위이므로, multi-byte character일 경우 주의
- blob, text 컬럼타입일 경우, index prefix 가 유용(255 길이까지 가능)

CREATE TABLE 테이블명
(
name CHAR(30) NOT NULL,
address CHAR(60) NOT NULL,
INDEX (name(10),address(10))
);


인덱스 삭제
DROP INDEX 인덱스명 ON 테이블명;
ALTER TABLE 테이블명 DROP INDEX 인덱스명;
ALTER TABLE 테이블명 DROP PRIMARY KEY;


outer join

[MySQL]
left outer joing : SELECT t1.*, t2.* FROM t1 LEFT OUTER JOIN t2 ON t1.i1 = t2.i2;
right outer joing: SELECT t1.*, t2.* FROM t1 RIGHT OUTER JOIN t2 ON t1.i1 = t2.i2;

[Oracle]
left outer joing : SELECT t1.*, t2.* FROM t1, t2 where t1.i1 = t2.i2(+);
right outer joing: SELECT t1.*, t2.* FROM t1, t2 where t1.i1(+) = t2.i2;

SELECT
student.name, student.student_id,
event.date, event.event_id, event.type
FROM
student, event
LEFT JOIN score ON student.student_id = score.student_id
       AND event.event_id = score.event_id
WHERE
score.score IS NULL
ORDER BY
student.student_id, event.event_id;


:= 문장을 이용한 변수의 설정

현재 moyiza의 데이터베이스강좌게시판에 등록된 총 게시물은 43개이다. 43개의 강좌를 읽은 수(hit수)는 각각 다르다.
평균 hit수를 구해 보자.

mysql> select @total_hit := sum(hit), @total_record := count(*) from zetyx_board_database;
+------------------------+---------------------------+
| @total_hit := sum(hit) | @total_record := count(*) |
+------------------------+---------------------------+
|             3705 |                43 |
+------------------------+---------------------------+
1 row in set (0.00 sec)

mysql> select @total_hit/@total_record as 평균HIT;
+-----------------+
| 평균HIT      |
+-----------------+
| 86.162790697674 |
+-----------------+
1 row in set (0.00 sec)


select substring(subject from 9) from zetyx_board_database where substring(subject, 1, 8) = '[ORACLE]';


보통 상용DBMS들이 row-level locking을 지원한다. 쉽게 말해 레코드단위로 락킹한다는 말이다.
반면, MySQL의 MyISAM 테이블타입은 table-level locking을 사용한다.
쉽게 말하면, insert, update, delete작업은 전체 테이블에 락을 걸고 처리된다는 것이다.
row-level락보다 비효율적이지만,.. MySQL은 빠르기 때문에 이 단점이 상쇄된다.

Compressed MyISAM(packed MyISAM)
정적인 테이블데이터는 압축하여 20-60%정도의 공간을 절약할 수 있다.
Production데이터를 CD로 받아서 차후 디스크에 풀지 않고 CD자체로 바로 사용할 수도 있다.
gzip등으로 백업받으면 이를 푸는 과정이 필요할 것이다.
% myisampack moyiza.myi

데이터베이스 게시판의 Merge Table에 좀 더 자세한 내용을 적어 두었다.


RAID Table
1개의 테이블은 OS상에 3개의 파일로 구성된다.
스키마파일(.frm), data파일(.myd), index파일(.myi)
MySQL의 RAID테이블은 데이터파일(.myd)을 여러개의 파일들로 구성하는 것이다.

create table raid_test (...)
type=myisam raid_type=striped raid_chunks=4 raid_chunsize=8

테이블을 4개의 데이터파일로 나누고, 8kb단위로(8kb stripe) 라운드로빈 방식으로 write가 이루어진다.

This article comes from moyiza.net (Leave this line as is)

Posted by '김용환'
,

자바 로그 관련

java core 2007. 1. 2. 23:25


자바로 로그에 대한 좋은 설명과 예제가 있었음


http://www.javapractices.com/Topic143.cjp


Home | web4j | Poll | Feedback | Source Code | Links
Logging messages
Topic :

Java's logging facility (see Sun's overview and API ) has two parts : a configuration file, and an API for using logging services. It has impressive flexibility. Log entries can be sent to these destinations, as either simple text or as XML :
  • the console
  • a file
  • a stream
  • memory
  • a TCP socket on a remote host
The Level class defines seven levels of logging enlightenment :
  • FINEST, FINER, FINE, CONFIG, INFO, WARNING, SEVERE
  • ALL and OFF are defined values as well
Here is one style of using these Levels in code, which may be modified as desired :
  • upon startup, use CONFIG to log configuration parameters
  • during normal operation, use INFO to log high-level "heartbeat" information
  • when bugs or critical conditions occur, use SEVERE
  • debugging information might default to FINE, with FINER and FINEST used occasionally, according to taste.
There is flexibility in how logging levels can be changed at runtime, without the need for a restart :
  • simply change the configuration file and call LogManager.readConfiguration.
  • or, change the level in the body of your code, using the logging API ; for example, one might automatically increase the logging level in response to unexpected events
Levels are attached to these items :
  • an originating logging request (from a single line of code)
  • a Logger (usually attached to the package containing the above line of code)
  • a Handler (attached to an application)
The flow of execution for a particular logging request usually proceeds as follows :

logging request of some level is made to logger attached to current package
if the request level is too low for that package's logger {
   discard it
}
otherwise {
   cycle through all handlers {
      if the request level is too low for that handler {
         discard it
      }
      otherwise {
         log the request
      }
   }
}

Here is an example of a logging configuration file :

# Properties file which configures the operation of the JDK
# logging facility.

# The system will look for this config file, first using
# a System property specified at startup:
#
# >java -Djava.util.logging.config.file=myLoggingConfigFilePath
#
# If this property is not specified, then the config file is
# retrieved from its default location at:
#
# JDK_HOME/jre/lib/logging.properties

# Global logging properties.
# ------------------------------------------
# The set of handlers to be loaded upon startup.
# Comma-separated list of class names.
# (? LogManager docs say no comma here, but JDK example has comma.)
handlers=java.util.logging.FileHandler, java.util.logging.ConsoleHandler

# Default global logging level.
# Loggers and Handlers may override this level
.level=INFO

# Loggers
# ------------------------------------------
# Loggers are usually attached to packages.
# Here, the level for each package is specified.
# The global level is used by default, so levels
# specified here simply act as an override.
myapp.ui.level=ALL
myapp.business.level=CONFIG
myapp.data.level=SEVERE

# Handlers
# -----------------------------------------

# --- ConsoleHandler ---
# Override of global logging level
java.util.logging.ConsoleHandler.level=SEVERE
java.util.logging.ConsoleHandler.formatter=java.util.logging.SimpleFormatter

# --- FileHandler ---
# Override of global logging level
java.util.logging.FileHandler.level=ALL

# Naming style for the output file:
# (The output file is placed in the directory
# defined by the "user.home" System property.)
java.util.logging.FileHandler.pattern=%h/java%u.log

# Limiting size of output file in bytes:
java.util.logging.FileHandler.limit=50000

# Number of output files to cycle through, by appending an
# integer to the base file name:
java.util.logging.FileHandler.count=1

# Style of output (Simple or XML):
java.util.logging.FileHandler.formatter=java.util.logging.SimpleFormatter

An application should likely centralize the naming policy for Loggers, since switching naming styles becomes a simple edit in one method, instead of a large number of edits spread throughout the application. Reasons to alter the naming policy might include :

  • in a shared environment, adding an application name to the Logger name can help distinguish one application's entries from others
  • adding application version information might be beneficial for debugging
Here is an example of using the logging API :
package myapp.business;

import java.util.logging.*;

/**
* Demonstrate Java's logging facilities, in conjunction
* with a logging config file.
*/
public final class SimpleLogger {

  public static void main(String argv[]) {
    SimpleLogger thing = new SimpleLogger();
    thing.doSomething();
  }

  public void doSomething() {
    //Log messages, one for each level
    //The actual logging output depends on the configured
    //level for this package. Calls to "inapplicable"
    //messages are inexpensive.
    fLogger.finest("this is finest");
    fLogger.finer("this is finer");
    fLogger.fine("this is fine");
    fLogger.config("this is config");
    fLogger.info("this is info");
    fLogger.warning("this is a warning");
    fLogger.severe("this is severe");

    //In the above style, the name of the class and
    //method which has generated a message is placed
    //in the output on a best-efforts basis only.
    //To ensure that this information is always
    //included, use the following "precise log"
    //style instead :
    fLogger.logp(Level.INFO, this.getClass().toString(), "doSomething", "blah");

    //For the very common task of logging exceptions, there is a
    //method which takes a Throwable :
    Throwable ex = new IllegalArgumentException("Some exception text");
    fLogger.log(Level.SEVERE, "Some message", ex);

    //There are convenience methods for exiting and
    //entering a method, which are at Level.FINER :
    fLogger.exiting(this.getClass().toString(), "doSomething");

    //Display user.home directory, if desired.
    //(This is the directory where the log files are generated.)
    //System.out.println("user.home dir: " + System.getProperty("user.home") );
  }

  // PRIVATE //

  //This logger will inherit the config of its parent, and add
  //any further config as an override. A simple style is to use
  //all config of the parent except, perhaps, for logging level.

  //This style uses a hard-coded literal and should likely be avoided:
  //private static final Logger fLogger = Logger.getLogger("myapp.business");

  //This style has no hard-coded literals, but forces the logger
  //to be non-static.
  //private final Logger fLogger=Logger.getLogger(this.getClass().getPackage().getName());

  //This style uses a static field, but hard-codes a class literal.
  //This is probably acceptable.
  private static final Logger fLogger =
                     Logger.getLogger(SimpleLogger.class.getPackage().getName());
} 


Example Run 1 , using the config file defined above :

>java -Djava.util.logging.config.file=C:\Temp\logging.properties
-cp . myapp.business.SimpleLogger

ConsoleHandler is configured to show only SEVERE messages :

Jan 8, 2003 10:43:47 AM myapp.business.SimpleLogger doSomething
SEVERE: this is severe
Jan 8, 2003 10:43:47 AM myapp.business.SimpleLogger doSomething
SEVERE: Some message
java.lang.IllegalArgumentException: Some exception text
        at myapp.business.SimpleLogger.doSomething(SimpleLogger.java:39)
        at myapp.business.SimpleLogger.main(SimpleLogger.java:13)

While the FileHandler shows ALL that is sent to it :

Jan 8, 2003 10:43:46 AM myapp.business.SimpleLogger doSomething
CONFIG: this is config
Jan 8, 2003 10:43:47 AM myapp.business.SimpleLogger doSomething
INFO: this is info
Jan 8, 2003 10:43:47 AM myapp.business.SimpleLogger doSomething
WARNING: this is a warning
Jan 8, 2003 10:43:47 AM myapp.business.SimpleLogger doSomething
SEVERE: this is severe
Jan 8, 2003 10:43:47 AM class myapp.business.SimpleLogger doSomething
INFO: blah
Jan 8, 2003 10:43:47 AM myapp.business.SimpleLogger doSomething
SEVERE: Some message
java.lang.IllegalArgumentException: Some exception text
 at myapp.business.SimpleLogger.doSomething(SimpleLogger.java:39)
 at myapp.business.SimpleLogger.main(SimpleLogger.java:13)
 

Example Run 2, showing the ConsoleHandler output, using the logging.properties file which ships with the JDK, and which logs only INFO level and above :

>java -cp . myapp.business.SimpleLogger

Jan 8, 2003 10:52:31 AM myapp.business.SimpleLogger doSomething
INFO: this is info
Jan 8, 2003 10:52:31 AM myapp.business.SimpleLogger doSomething
WARNING: this is a warning
Jan 8, 2003 10:52:31 AM myapp.business.SimpleLogger doSomething
SEVERE: this is severe
Jan 8, 2003 10:52:31 AM class myapp.business.SimpleLogger doSomething
INFO: blah
Jan 8, 2003 10:52:31 AM myapp.business.SimpleLogger doSomething
SEVERE: Some message
java.lang.IllegalArgumentException: Some exception text
        at myapp.business.SimpleLogger.doSomething(SimpleLogger.java:39)
        at myapp.business.SimpleLogger.main(SimpleLogger.java:13)

Would you use this technique?

Yes   No   Undecided   
Add your comment to this Topic :
Comment :
 
© 2006 John O'Hanley (Canada) | Source Code | Contact | Sponsor This Site | License | RSS
Over 53,000 unique IPs (and 106,000 sessions) last month.
- In Memoriam : Bill Dirani -


Posted by '김용환'
,

http://www.inetmedia.co.uk/sony/Sonylaptop.html#modules


Sony PCG-FX501

Linux Install Guide

This is written specifically for redhat 7.2. You will need to recompile the kernel(don't worry, instructions on howto will follow). I have indicated the problems and solutions as I found them.

First the steps involved

0. Repartition Hard disk on Laptop

1. Install Redhat

2. Add modules to redhat install to allow recompile of kernel

3. Get the new Kernel

4. Reboot and copy new kernel source/kernel config to laptop

5. Compile kernel using config and source

6. Modify Lilo.conf

7. Give it a try

8. Modify the network card setup

Use partition Magic or similar to repartition your laptop, to allow dual boot of winXP and Linux. For this example, the 20Gb hard disk was split into a 6Gb partition for XP and a 14Gb partition for Redhat Linux. The choice is yours.

Back to Index

Install redhat 7.2 from the cdrom. Select everything you desire exactly as a standard install. note. Things will go more smoothly if you select the developers workstation, however the following assumes that you have chosen the standard laptop setup.

note: you will notice that when you reboot, you will see a kernel panic with output similar to below

Back to Index

First you need to ensure you have 5 additional "modules" installed(note if you did a developer workstation install you can skip this step)

Insert the redhat cd1 cdrom and reboot, this should result in the "boot:" prompt.

Next select Enter, or just wait 20 seconds or so and it will automatically start the setup program.

Next select your language(English)

Next select Keyboard Model, Layout and deadkeys as desired(or leave the defaults)

Next select your mouse

You should now be presented with a choice of installation type. In this case you should choose upgrade and select Next

Next you should be presented with a check box, saying "Customize packages to be upgraded". Select(or tick) this box

. Next select the boot laoder - I recommend Lilo here as it is well documented and easier for Nubbies...

On the same screen on the INstall Boot Loader record on:- select /dev/hda Master Boot Record (MBR)

Note: On some newsgroups for various other sony laptops I have seen a recommendation to use /dev/hda1 FIrst sector of boot partition. However, the MBR has been seen to work on my laptop.

Also, note that the /hda and /hda1 may be different on your laptop, depending on your configuration.

Accept the defaults in the remaining Partitin section(unless you know what you are doing) and select Next to go to the next page

Next you should select the following 5 components under the Tree View:-

Development\Languages\gcc

Development\Languages\gcc-C++

Development\System\kernel-headers

Development\System\kernel-source - note this is not required, but helps to have it on your system just in case

Develpement\Tools\patch


Select Next and continue

The "About to upgrade" screen appears, select Next if you are happy to proceed.

Various "preparing to install bars should appear, sit back enjoy/

At the prompt, insert cd2 from the redhat collection.

You will receive a "No kernel packages were installed...." message box, select OK.

Next you have the option to create a boot disk, select next

note you can skip this step, its your call.

Finally you reach the Congratulation screen, remove the boot floppy, the redhat cd2 cdrom and select EXIT to reboot

Back to Index

Next You need to obtain a download of the Kernel. At this time, the only kernel images that I have tested are 2.4.16 and 2.4.17. I have not tested any other version at this time. The kernel image is available from the following link ftp://www.kernel.org/pub/linux/kernel/v2.4/. The file to download is linux-2.4.16.tar.gz. You can use later versions of the kernel, but this version is known good and has been running on my laptop for 2 months now.

Back to Index

In order to get the downloaded file onto the laptop, there are a mix of methods, the one used here is to copy the kernel image onto the windows partition(any other suggestions here greatly appreciated) and then use the redhat cd to boot to a working console prompt. The instructions follow:-

Start windows, then copy the kernel source to "c:\temp".

At this point you reboot using cd1 from the redhat cd collection

This should result in the following ommand prompt:

boot:

At this command prompt type:

linux rescue

And press return

Next select your language and press OK

Next select your keyboard and press OK

You should see a "Running anaconda - please wait"

You will now see a "Rescue" dialogue box that indicates that it will try to find your redhat image and mount it under the directory /mnt/sysimage. Select Continue and press return

This should have found your redhat image, if not, time to visit some newsgroups, however if it does, note the following in the Rescue dialogue box "chroot /mnt/sysimage" - you will need this command to generally make your life easier.

Select OK

12. Congratulations, you now have a shell(ie a command prompt for DOS people)

13. You can now run the following command

chroot /mnt/sysimage

Note: All this command is doing is basically setting the root of the tree to a directory two steps down from the root. This is useful if you are doing any compiling, as you will be doing in just a few minutes.

Next create a directory to temporarily store the kernel source. For this I created a directory as follows:-

cd /usr

mkdir kernelsrc

cd /kernelsrc

Next copy the kernel image from the windows partition using the following commands:

mkdir /cdrive

mount -t vfat /dev/hda1 /cdrive

cd /cdrive/temp

cp * /kernelsrc

Next uncompress the file as follows:-

gunzip linux-2.4.16.tar.gz

Which should uncompress the file. List the file name in the directory to verify as follows:-

ls -al

which produces the follwing output. Notice the .gz extension has gone

-rw--r--r- 1 scott scott 129699840 Nov 27 10:56 linux-2.4.16.tar

Next untar the file as follows: this will create a directory strucuture below the existing directory

tar -xvf linux-2.4.16.tar

If you now do an "ls -al" you will notice the original file, plus a directory call "linux"

Next type:-

cd linux

ls -al

Back to Index

So far so good, you are now ready to start the steps towards your new kernel. Here are the commands, but don't do all of them yet, I will take you through each of them.

make menuconfig

make mrproper

make dep

make bzImage

make modules

make modules_install

cp /usr/kernelsrc/linux/arch/i386/boot/bzImage /boot/vmlinuz-2.4.16

lilo

During menuconfig, you are prompted to include certain items directly into the kernel. You must find and choose all of the following:- Note, I have a copy of my config, which you can copy into the /usr/kernelsrc/linux directory instead of doing this step. Then type "make menuconfig" then select "Load an Alternate Configuration File", and choose the file "sonyPCG-FX501". Then save the new configuration and exit. If you do this, then miss the following steps.

....work to be done here, incomplete..... should use file above for now.......

Next you can now start the compile process

make dep

make bzImage

make modules

make modules_install

You can verify the modules have been correctly copied, using the following:

cd /lib/modules

ls -al

You should see two directories, 2.4.7-10 and the newly created 2.4.16, congrats.

Next you must copy the new boot image to the correct location. Don't skip this step!

cp /usr/kernelsrc/linux/arch/i386/boot/bzImage /boot/vmlinuz-2.4.16

This sets puts the boot image exactly where it is needed.

Next create a ramdisk image of the kernel

mkinitrd /boot/vmlinuz-2.4.16.img 2.4.16

Next, edit the /etc/lilo.conf file and add the following at the end of the file:-

image=/boot/vmlinuz-2.4.16
label=linux-2.4.16
initrd=/boot/initrd-2.4.16
append= " nobiospnp mem=nopentium"
read-only
root=/dev/hda3


Note, hda3 may be different on your laptop.

Back to Index

Finally, run the following commands:

cd /etc

lilo

This command "lilo" is essential and is often forgotten. It basically tells the OS the exact physical location on the hard disk where the new kernel image lies.

Back to Index

That should be it. Now reboot and choose the linux-2.4.16 option on the lilo screen and you should have a working version of redhat on your Sony......

Back to Index

Once you have logged in, edit the file /etc/modules.conf and add the following line below the "alias eth0 8130too" line

options 8139too io=0x1800 irq=10

For simplicity, reboot and this should enable the network. Note you may need to check that the above settings are correct on your laptop, to do this, simply use Preferences,Information, PCI and search through for "Ethernet Controller: Realteck Semiconductor Co." - below this line will be your io and irq settings, though I doubt they will be different from above.

Any emails on your success appreciated.

Back to Index - Nothing more here

.


Posted by '김용환'
,


http://phpschool.com/gnuboard4/bbs/board.php?bo_table=tipntech&wr_id=16204&sca=%BC%B3%C4%A1%2F%BC%B3%C1%A4&page=11


안녕하세요~
얼마전 회사에서 삼바 서버를 설치할 필요가 있었습니다.
여러 곳의 문서를 참고했지만..틀린 부분도 많고 해서 설치에 어려움이 많았습니다.

삼바 설치 하는 법을 간략하게 정리해 보았습니다.

많은 도움 되셨으면 합니다. 틀린 부분 있으면 많은 지적 부탁드립니다.

참고로 RedHat Linux 7.2 에서 설치 해 보았습니다.

***********************************
&nbsp;&nbsp;&nbsp;&nbsp;&nbsp;&nbsp;&nbsp;&nbsp;Samba 서버 설치
***********************************

1. 삼바 소스(samba2.2.7a.tar.gz)를 다운로드 합니다.
http://kr.samba.org/samba/download.html

2. 적당한 곳에 소스파일을 옮깁니다. (예: /usr/local/src)

3. 압축을 풉니다.
shell>tar zxvf samba2.2.7a.tar.gz

4. 압축 푼 삼바 폴더 내 source 디렉토리로 이동 한 후.
./configure (기본적으로 /usr/local/samba/ 라는 폴더가 prefix 로 잡혀 있습니다.)
make
make install

5. 삼바 환경설정 파일인 smb.conf 는 소스로 설치시 자동 복사가 되지 않기에,
삼바소스(여기서는 /usr/local/src/samba2.2.7a)의 examples 디렉토리에 있는 smb.conf.default 파일을
/usr/local/samba/lib/smb.conf 파일로 복사해 주세요
(기본 설치시 smb.conf path가 /usr/local/samba/lib/ 입니다.)

6. 삼바 소스 디렉토리 내의 packaging/RedHat 하위 디렉토리에 있는 삼바 구동 스크립트 파일인 smb.init를 /usr/sbin/samba 파일과 /etc/rc.d/init.d/samba 파일로 복사합니다.
삼바구동에 필요한 데몬파일 smbd,nmbd 파일을 /usr/sbin 디렉토리로 복사합니다.

7. /etc/rc.d/init.d/samba 파일을 vi 로 열어서 편집합니다.
CONFIG=/usr/local/samba/lib/smb.conf 로 변경하고 저장, vi 종료합니다.

8. 복잡한 smb.conf 파일을 웹상에서 핸들링 가능한 swat 을 이용하기 위해(SWAT 설정)
/etc/xinetd.d/swat 이라는 파일을 생성하고..아래와 같은 내용을 집어 넣습니다.

## /etc/xinetd.d/swat
service swat
{
disable = no
port = 901
socket_type = stream
wait = no
user = root
server = /usr/local/samba/bin/swat
log_on_failure += USERID
}

위의 server 항목은 swat 실행 파일이 위치한 경로를 지정해 주면 됩니다.
삼바 설치된 디렉토리에서 찾으니 저는 /usr/local/samba/bin 아래에 있더군요.

9. xinetd 데몬 재기동
shell>/etc/init.d/xinted restart
OK라는 표시가 나와야 합니다. swat은 samba 데몬과는 상관없다고 합니다.

samba 데몬을 재기동 시키기 위해선..
/etc/init.d/sambar restart 하시면 됩니다.
ps -ef | grep smbd
ps -ef | grep nmbd 하시면 smbd -D 이런 식으로 나오면 정상 기동 된 것입니다.

데몬이 기동되지 않는 것은 주로 경로 설정 부분이니..위의 내용을 잘 읽어보고 하시기 바랍니다.

나머지는 웹브라우저에서 http://해당 IP:901/ 하신 후 , 아이디에 root, 서버 root 비밀번호 입력하신 후 설정하시면 됩니다.


swat 설정에 관한 부분은 여러가지 문서가 많이 있더군요..검색해서 보시면 금방 아실 수 있을듯 합니다.

samba 서버 설치, 구동 부분의 문서가 체계화 되어 있지 않는것 같아 정리해 보았습니다.


Posted by '김용환'
,

ifdown ifup ifconfig

c or linux 2006. 11. 17. 23:14


http://kin.naver.com/db/detail.php?d1id=1&dir_id=10202&eid=/D5lRaU0UWxKALWM3h7jdPvXfNsf46RT&qb=ZXRoMCBpZmNvbmZpZyBkaGNw


윈도우에서 콘솔화면에서 현재 랜카드를 DHCP로 사용하고 있는 중에는..
ipconfig /renew, ipconfig /release 이렇게 하면..
아이피 주소를 새로 할당 받고, 아이피를 해제 하는데..
프로그래밍에서는 ipReleaseAddress, ipRenewAddress 함수가 존재하는데..
리눅스에서는 윈도우에서 처럼 지원하는게 있나요?
service network restart 이런거 말고요..
리눅스 프로그래밍에서 사용할 수 있는 함수나..
리눅스 터미널에서 사용 가능한 방법 좀 알려주세요..


service (/etc/init.d/network) network restart 명령어는 말 그대로 network 데몬을 재시작하는 명령어입니다.

DHCP로 할당이 되어 있다면 시작을 하면서 IP주소를 DHCP서버로부터 받아 오지요


이 방법이 아니면 (만약 eth0 이 꽂아져 있는 랜카드라면)

# ifdown eth0

# ifup eth0

명령어를 수행하시면 다시 받아 오는 역할을 하구요.


파일은

/etc/sysconfig/network-scripts/ifcfg-eth0 (1,2,3,4,) 을 vi 로 여시고 수정하시고 위에 ifdown, ifup 명령어를 수행하시면 됩니다.


network 상태를 보는 명령어는

# ifconfig 이구요 (ipconfig 와 비슷하죠?)

# ifconfig -a 하시면 전체 인터페이스에 대한 결과를 보여 줍니다.


장비에 랜선이 제대로 연결되어 있는 지를 보는 명령어는

# mii-tools 라고 치시면 됩니다.


Posted by '김용환'
,

shift에 대해서.

java core 2006. 11. 16. 03:06


이번에 자바코딩을 하다가 제가 문득 잊고 사는 것을 하나 배웠지요.


하나는 바로 operator precedent (연산자 우선순위)구요.

저도 모르게 + 연산자가 우선순위가 높다라는 사실을 늘 잊어버린적이 많죠..  14개 연산자 등급중 4위라는 사실입니다.. ㅡ.ㅡ;


a & 0xFF00 >> 8 + 1* 2
=> 연산순서
(1)  1 * 2
(2)  8 + 1 * 2
(3) 0xFF00 >> 8 + 1* 2
(4) a & 0xFF00 >> 8 + 1 * 2

이렇게 됩니다.~


까먹지 않기 위해서 다시 공부합니다~

우선순위 연산자
1 . () []
2 ! ~ ++ --
3 * / %
4 + -
5 < < >> >>>
6 < &$60;= > >=
7 == !=
8 &
9  
10 ㅣ
11 &&
12 ㅣㅣ
13 ?:
14 = += -= * = /= %= &= = ㅣ= <<= >>= 


또 하나는 바로 쉬프트 연산입니다.
쉬프트 연산중 자바의 특성과 관련된 쉬프트가 있습니다. 즉, 최상위비트(Left Most bit )가 1일때 (즉, 음수) 쉬프트연산을 우측으로 할 지를 잘 결정해야 할 것 같더라구요.

즉,

 
shift는 총 3가지 종류가 있는데, left shift, right shift, zero fill right shfit가 있습니다.

-----------------------------


public class Shift {
    public static void main(String[] args) {
        int b, c;
        int a = 0xFF000000;
        b = a << 1;
        c = a >> 1;
       
        System.out.println("b:" + Integer.toHexString(b));
        System.out.println("c:" + Integer.toHexString(c));
    }
}

결과
b:fe000000
c:ff800000

------------------------------


public class Shift {
    public static void main(String[] args) {
        int b, c;
        int a = 0xFF000000;
        b = a << 1;
        c = a >>> 1;
       
        System.out.println("b:" + Integer.toHexString(b));
        System.out.println("c:" + Integer.toHexString(c));
    }
}

결과
b:fe000000
c:7f800000


c언어의 경우는 다음과 같이 테스트를 해볼 수 있지요.

int main()
{
    int b;
    int c;
    int a = 0xFF000000;
    b = a << 1;
    c = a >> 1;
   
    printf("b:%x\n", b);
    printf("c:%x\n", c);
}

b:fe000000
c:ff800000


근데 말이져..

c언어에서. 자바의 >>> 연산자가 따로 없는 듯 하네요... 저한테 c책이 없는데, 확인해 볼 길이 없네요.


즉, shift 연산을 할 때, arithmetic 값이 아닌, logical 값일때에 대한 shift는 c언어에서 따로 제공하는 것은 없지 않을까란 생각이 듭니다. 즉 c언어는 2의 보수표현의 arithmetic값에 치중되어 있지 않나 생각이 들어요.

예문을 보면, 원하는 것은 eF80000 값인데, 이 값으로 한번에 변환시켤 줄 수 있는 방법이 떠오르지 않네요. 늘, 코더가 저걸 생각하고, (a >> 1) & 0xeffffffff 이렇게 하는 수 밖에 없지 않나 생각드네요..


혹시 다른 방법 있으면 멀까요?


Posted by '김용환'
,
Posted by '김용환'
,
[리뷰] UltraVNC로 원격 제어를 간편하게!
정상호
06/02/02
 
 
1.강력한 원격제어 툴 UltraVNC

 원격 제어의 간단한 정의는 멀리 있는 장치를 그곳을 방문하지 않고도 제어 할 수 있다는 정도로 정리할 수 있다. 원격 제어는 다양한 분야에서 널리 사용되고 있으며, PC 분야에서도 이러한 원격 제어를 위한 다양한 소프트웨어가 출시되어 있다.

 필자가 이번에 소개할 UltraVNC도 원격 소프트웨어의 일종으로 멀리 떨어져 있는 PC를 간단하고 편리하게 제어할 수 있는 기능을 가지고 있다. VNC란 "Virtual Network Computing"의 약자이며, UltraVNC는 Server 컴퓨터에서 원격 접속한 컴퓨터 모니터로 실시간 캡쳐된 화면을 전송해주는 것은 물론 제어할 수 있는 기능도 제공한다.

 이렇게 상대방의 컴퓨터에 접속해 실시간으로 보면서 프로그램들을 제어할 수 있으므로 컴퓨터 엔지니어들이 많이 사용했었고, 최근에는 컴퓨터 A/S 업체에서도 원격 서비스를 하고 있다.

 더불어 컴퓨터 관련 업무에 종사하지 않는 일반 사용자라도 한번쯤은 원격 접속의 필요성을 느낄 수 있다. 가령 컴맹인 친구가 프로그램 실행법을 가르쳐 달라고 연락이 왔을 경우나, 인터넷으로 검색할 물건이 있는데 사이트를 제대로 못찾을 경우 등 기타 여러가지 사정이 발생할 수 있다. 이럴 때 직접 가기는 솔직히 너무 귀찮지 않은가? 친구한테 자신의 컴퓨터 실력도 자랑할겸 원격 접속으로 문제를 해결해 준다면 그 친구는 나를 컴신(神)으로 생각할지도 모른다.

 참고로 하드웨어에 관심이 있는 사용자라면 WOL(Wake on-LAN)이라는 단어를 본적이 있을 것이다. WOL은 랜을 이용해 컴퓨터를 부팅시키는 기능으로 메인보드/랜/공유기를 이용해 컴퓨터가 꺼져 있어도 외부에서 컴퓨터를 켤 수 있는 기능을 뜻한다. WOL이 가능한 시스템에서 UltraVNC와 같은 원격 제어 프로그램을 사용한다면 더욱 편리할 것이다.

 원격 제어 프로그램중에는 시만텍의 PCAnyWhere가 가장 유명하며 널리 사용되고 있고, 윈도우 XP에서도 원격 접속 기능을 지원하지만, UltraVNC는 상용 프로그램이 아니므로 비용을 절감할 수 있는데다가 윈도우 XP 원격 접속 기능보다 뛰어난 기능들을 지원한다.


제품명

UltraVNC v1.0.1

제작사

ultravnc.sourceforge.net

라이센스

프리웨어

다운로드

케이벤치 자료실

주요 특징

  • 리모트 컴퓨터에 접속해 원격 제어 가능
  • 편리한 파일 전송
  • 비디오 드라이버 (UltraWinVNC와 프레임 버퍼 메모리를 바로 연결)
  • MS Logon 지원
  • 뷰어 툴바 및 자바 뷰어 지원
  • 여러 대의 모니터 지원
  • 뷰어에서 보여지는 원격 화면 크기 설정 가능
  • 텍스트 채팅 지원
  • Repeater/Proxy 지원
  • Repeater/SingleClick/Nat to Nat connector 애드온 지원 (애드온은 제작사에서 다운로드 가능)
  • 모든 윈도우 및 Mac OS, 리눅스 지원

2.UltraVNC 설치

 원격 제어를 하기 위해서는 우선 제어를 할 컴퓨터와 제어를 당할 리모트 컴퓨터에 각각 UltraVNC가 설치되어 있어야 한다.

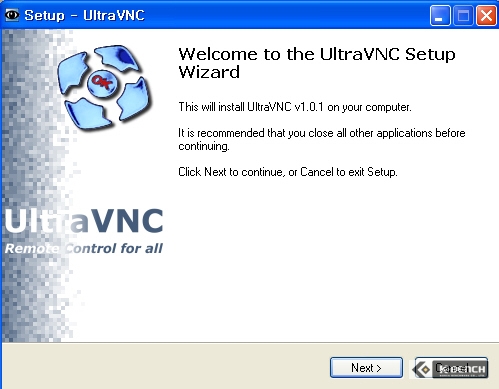
설치화면 1

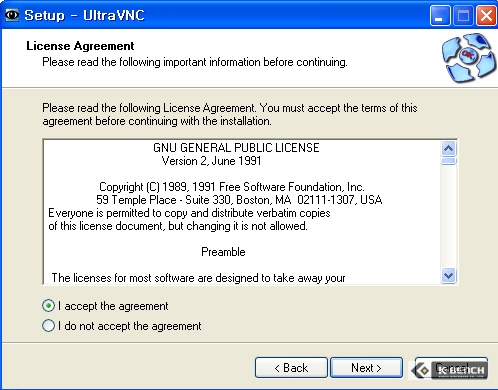
설치화면 2

▲ 설치화면 3 - GNU에 의거해 재배포 및 수정 가능

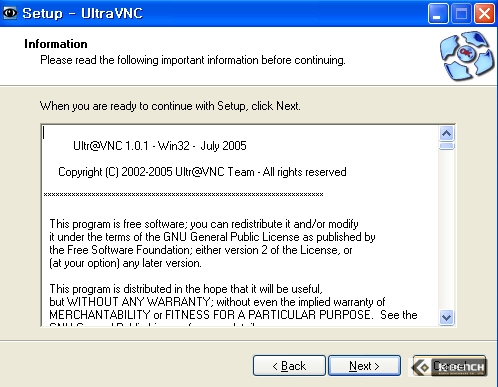
▲ 설치화면 4

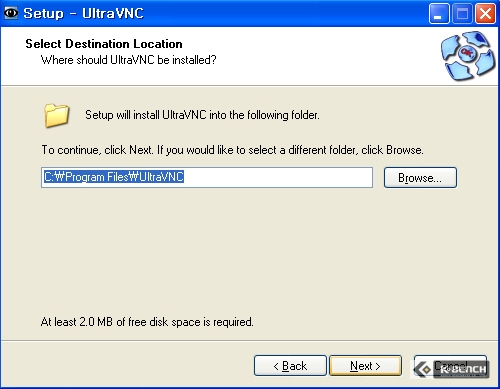
▲ 설치화면 5

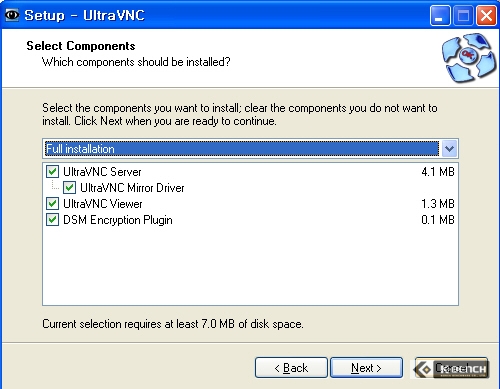
 UltraVNC에 설치될 컴포넌트를 선택하는 과정이다. UltraVNC는 서버, 뷰어로 작동을 하므로 UltraVNC Server, UltraVNC Viewer에 체크를 해야하고, UltraVNC Mirror Driver는 UltraVNC Server를 선택하면 자동 선택되는 것이니 신경쓰지 않아도 된다. DSM Encryption Plugin은 데이터를 암호화 해주는 플러그인으로 기본 설정이 체크 상태로 되어 있다.

▲ 설치화면 6

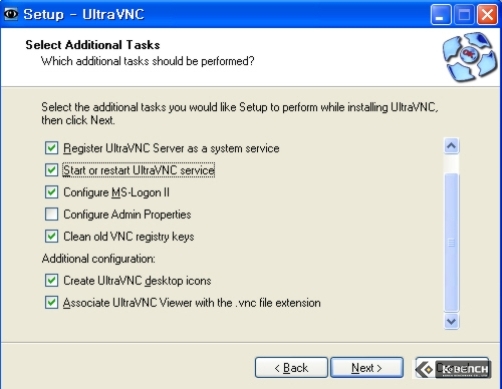
 Select Additional Tasks에서는 UltraVNC 설치 중 실행하는 옵션을 선택할 수 있다. 아래는 필자가 선택한 옵션들이다.


Register UltraVNC Server as a system service

윈도우 서비스에 UltraVNC를 등록시켜 실행

Start or restart UltraVNC services

윈도우 시작/재시작시 UltraVNC 시작

Configure MS-Logons II

UltraVNC에서 지원하는 MS-Logons II 설정

Clean old VNC registry keys

이전에 설정했던 VNC 레지스트리 항목 삭제

Create UltraVNC desktop icons

데스크탑에 UltraVNC 아이콘 등록

Associate UltraVNC Viewer with the .vnc file extention

확장자가 .vnc인 파일을 UltraVNC 뷰어로 연결

 위에 옵션들을 선택했으면 나머지 설치 과정들은 Next 버튼만 클릭하면 된다.

3.UltraVNC 서버 및 Viewer 알아보기

 설치를 끝마치면 시작 메뉴와 바탕화면에 UltraVNC Server와 UltraVNC Viewer 아이콘이 등록 됐을 것이다. 그럼 먼저 UltraVNC Server 설정을 해보도록 하자. Server란 이름이 들어간 만큼 이 기능은 원격 제어를 당해야 하는 컴퓨터에서 실행되어야 한다.

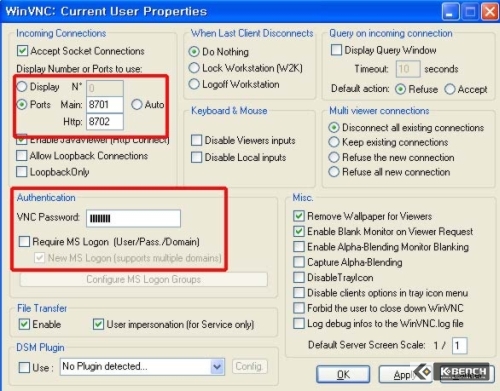
 ▲ UltraVNC Server 설정 화면

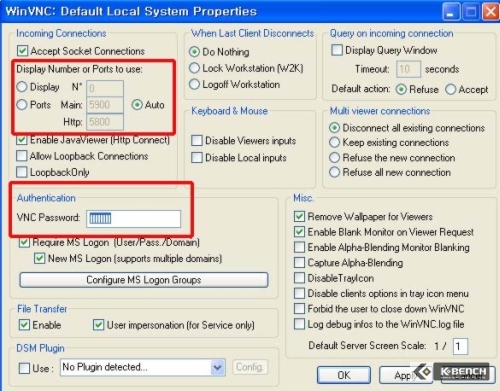
 Server 설정 화면에서 제공되는 옵션들은 여러 가지 있지만, Incoming connections에서 Port를 지정하고 Authentication에서 비밀번호를 적고 Apply를 클릭해 간단하게 사용할 수도 있다. 이 설정 화면에서 지원하는 옵션들을 순서대로 알아보도록 하자.


Incoming connections

포트 설정 옵션. 기본은 Auto이며, 다른 컴퓨터에서 서버 컴퓨터로 접속할 때 열려있는 포트를 자동으로 찾아 들어오는 것을 말한다. 일반 가정에서 혼자 사용하면 문제가 없지만 회사나 여러 사람이 이용하는 컴퓨터라면 꼭 포트를 적어 보안을 해두는 것이 좋다.
When last client disconnects 보통은 사용자가 원격 제어를 마친 후 아무 것도 안하고 접속을 끊지만, 원격 제어로 서버 관리시 보안적인 이유로 잠그거나 로그오프하길 원할 때 설정한다.
Query on incoming connection

다른 사용자가 접속을 시도할 때 팝업 대화창을 표시해준다.

Keyboard & Mouse

Viewer 및 로컬의 키보드 입력을 중지시킨다.

Multi viewer connections

한 개의 뷰어만 접속할지 여러개의 뷰어를 접속할지 설정한다.

Authentication

VNC 비밀번호를 설정한다. Viewer에서 접속시 이 비밀번호로 접속된다. MS Logon은 유저나 그룹별로 계정을 생성해 레벨을 설정할 수 있다.

File Transfer

파일 전송 허용 (기본적으로 Enable에 체크가 되있으므로 변경할 필요는 없다.)

DSM Plugin

DSM (Data Stream Modification) 플러그인이 설치되어 있다면 사용법을 설정 할 수 있다.

Misc

바탕화면 그림 제거 및 트레이 아이콘 사용안함 등 기타 자잘한 설정을 할 수 있다.

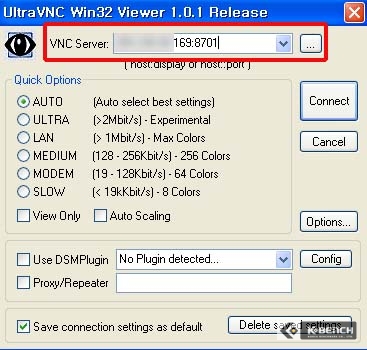
▲ UltraVNC Viewer 설정화면

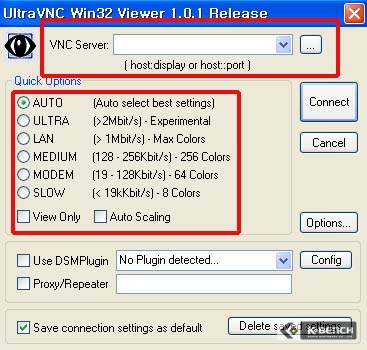
 UltraVNC 뷰어는 서버로 접속해서 접속된 화면을 보여주는 역할을 한다. 여기에서 접속할 서버의 IP와 포트를 적으면 바로 접속이 된다. 퀵 옵션에서는 서버에 접속했을 때 보여질 화면의 최적의 값을 설정할 수 있다. 기본으로 자동으로 검색하도록 선택되어 있으며 서버의 상향 속도가 매우 빠르다면 랜이나 울트라로 설정하고, 느리다면 그 이하의 옵션 중 하나를 선택하면 된다.

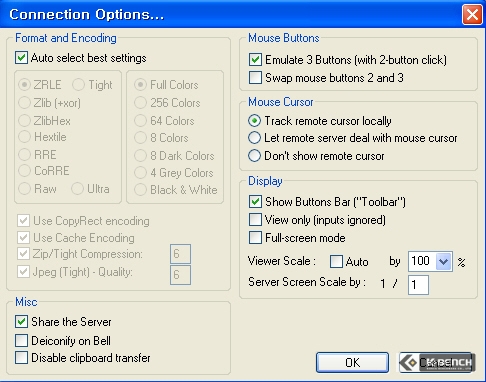
 ▲ UltraVNC Viewer - Connection Options

 위 화면은 UltraVNC Viewer에서 Options를 클릭하면 나오는 화면이다. 이 옵션은 Viewer에서 보여지는 디스플레이의 포맷 및 인코딩을 사용자가 직접 설정할 수 있고, 마우스 버튼, 마우스 커서, 툴바 표시, 관람 전용 및 풀 스크린 모드 등의 옵션을 선택할 수 있다. 이제 Server와 Viewer의 옵션들을 알아봤으니 원격 접속을 해서 상대 컴퓨터를 제어 해보도록 하자.

4.원격 제어 하기

 원격 제어를 하기전 Server를 담당할 리모트 컴퓨터와 필자의 시스템의 사양 및 인터넷 속도를 비교해보자.


서버

클라이언트

프로세서

intel Pentium 4 3.0GHz

AMD Athlon XP 2500+

메모리

1GB

1GB

그래픽카드

nVIDIA GeForce 5700

ATi RADEON 9550

인터넷 속도

상향 : 73.7KB/s
하향 : 2.7MB/s

상향 : 96.2KB/s
하향 : 1.1MB/s

 그럼 리모트 컴퓨터 바탕 화면에 있는 UltraVNC Server를 실행해 포트 설정과 비밀번호를 적고 서버를 실행하도록 하자.

▲ 포트와 비밀번호 입력 (Require MS Logon은 체크하지 않는다)

 포트와 비밀번호를 입력한 후 OK를 클릭하면 시스템 트레이에 아이콘이 등록되며 서버가 실행 중임을 알려준다. 이제 필자의 컴퓨터에서 뷰어를 실행하고 서버에 접속하도록 하자.

▲ IP와 포트를 입력 후 Connect 선택

 UltraVNC Viewer에서 주의할 점은 제어할 서버가 포트를 가지고 있을 경우 123.123.123.12:8701 처럼 콜론(:)을 입력하고 포트를 입력해야 한다. 포트가 자동으로 선택되어 있다면 그냥 IP만 적어주면 된다. 필자는 우선 Quick Options에서 AUTO로 선택하고 접속을 했다.

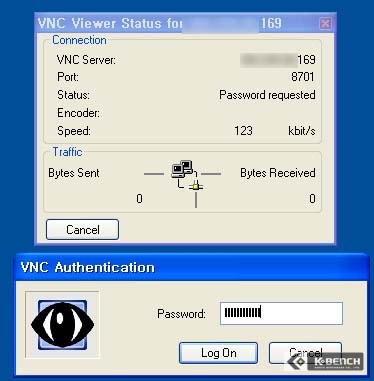
▲ 접속 중인 화면

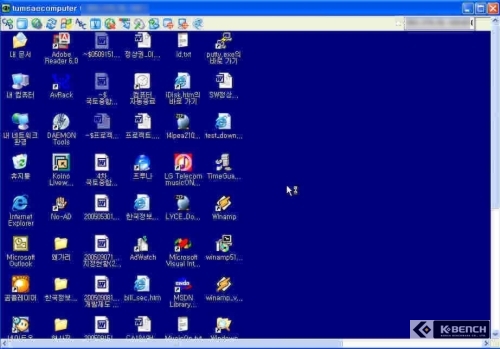
▲ 리모트 컴퓨터에 접속한 화면

 서버 컴퓨터에 접속이 되면 그 컴퓨터의 바탕화면이 보인다. 이제 이 바탕화면에 있는 아이콘을 클릭하거나 시작메뉴에 등록되어 있는 프로그램을 선택해 실행하면 된다.

▲ UltraViewer의 툴바

 UltraViewer 화면 상단에 위치한 툴바에는 작업을 더욱 편리하게 해주는 기능들이 모여 있어 접속 상태나 풀스크린 전환, 파일 전송,  채팅 기능 등을 편리하게 할 수 있도록 도와준다. 이외에 다른 기능 아이콘들도 제어 작업시 유용하게 사용할 수 있는 것으로 구성되어 있다.

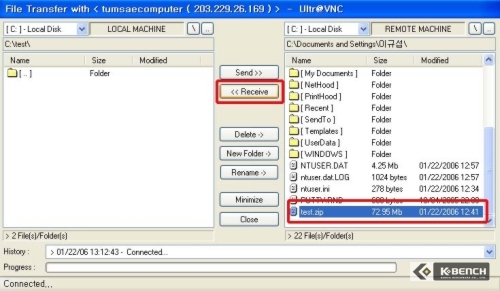
▲ 파일 전송 기능 (작업 종료는 ESC키를 사용)

 위 화면은 원격 제어 컴퓨터에서 필자의 컴퓨터로 파일을 전송하는 장면으로 오른쪽이 원격 제어 컴퓨터이며 왼쪽이 필자의 컴퓨터이다. 파일 전송은 윈도우 FTP 클라이언트 사용하듯이 파일 선택 후 Send 나 Receive를 선택하면 된다. 테스트로 73MB 용량의 압축 파일을 원격 제어 컴퓨터에서 필자의 컴퓨터로 전송했을 때의 전송 시간은 25분 정도로 속도는 조금 느렸다.

▲ 리모트 컴퓨터에서 MS 워드를 실행한 화면

 프로그램 실행 테스트로는 MS 워드를 실행해봤다. 문서 편집은 비교적 원활하게 사용할 수 있었는데, 원격 제어 컴퓨터에서 필자의 Viewer로 화면을 전송해주는 만큼 약간의 부자연스러운 화면은 감안해야 할 것이다. 또한 원격 제어 컴퓨터에서 한글 입력을 할 때에는 작업 표시줄의 한/영 전환을 이용해야 한다.

▲ 한글 입력시 작업표시줄 한/영 전환 선택

▲ 원격 제어로 다양한 유틸리티도 설치 가능

 원격 제어로 다양한 유틸리티를 설치할 수 있는 것은 물론 자유롭게 사용할 수도 있다. 따라서 다운로드에 오랜 시간이 걸리는 작업을 다른 곳에서 받아두고자 할 때 유용하게 사용할 수 있다.

5.프리웨어면서 쉽고 강력한 성능

 컴퓨터 초보자들은 다른 사람의 컴퓨터를 원격 제어한다고 하면 무척이나 신기해 한다. 하지만 UltraVNC를 이용해 가정에서 가볍게 사용한다면 리모트 컴퓨터의 IP, 포트, 비밀번호만 입력해 쉽게 제어할 수 있고 별로 어렵지도 않다.

 당연한 이야기겠지만 원활한 원격 제어를 하기 위한 전제 조건으로는 리모트 컴퓨터의 인터넷 상향 속도가 매우 중요하다. 필자가 테스트했던 2대의 시스템은 모두 케이블 라인으로 상향 속도가 70~90KB/s 정도여서 리모트 컴퓨터 제어시 약간의 답답함을 느낄 수 있었는데, 빠른 라인을 이용한다면 매우 부드럽게 원격 제어를 할 수 있을 것으로 생각된다. 참고로 UltraVNC Viewer - Quick Options에서 연결 속도 및 화질 등을 수동으로 설정할 수 있었지만 필자가 테스트 한 바로는 자동 설정보다 나은 성능을 보여주지는 못했다.

 필자가 이번에 다룬 UltraVNC는 필수 유틸리티도 아니고 널리 쓰일 수 있는 유틸리티는 아니지만 컴퓨터를 사용하는 사용자라면 한번쯤은 겪게 될 원격 제어의 필요성을 대비해 알아두면 좋은 프로그램일 듯 하다.

 다만 아쉬운 점이라면 UltraVNC의 기본적인 사용법은 어렵지 않았지만 한글을 지원한다면 보다 깊이 있는 원격 제어 기능들을 이해하는데 도움이 되지 않았을까 생각되지만, 프리웨어에게 무리한 요구를 하는 것만큼 비상식적인 일이 있을까. UltraVNC 1.0.1 버전 이후 더 이상 버전업이 이루어지지 않고 있는데 소스가 공개되어 있는만큼 소스를 개조해 더욱 발전시킨 다른 VNC가 등장하길 기대해 본다.

'etc tools' 카테고리의 다른 글

jad.bat JAD 디컴파일러 효율적으로 쓰기  (0) 2007.06.29
특수 문자 기호 이름  (0) 2007.06.04
간단하게 사용가능한 ctags 사용  (0) 2006.04.14
[펌] HTML 특수문자표  (0) 2005.11.01
자바 html parser  (0) 2005.10.20
Posted by '김용환'
,

자바 native heap

j2me 2006. 11. 8. 19:18

jvm에서 사용하는 메모리 힙은 두가지로 존재한다.

첫번째 java object을 할당하기 위한 java heap

두번째 jvm 자체적으로 사용하기 위한 native heap


native heap에는 다음과 같은 것이 포함되며, 명령어를 통해 조절이 불가능하다


a. 가장 기초 thread를 제외한 모든 thread
b. buffer, lookup table 및 ZIP 관련 작업(GZIPOutputStream methods)
c. Swing.AWT 하에서 native GUI와 관련된 Buffer 및 구조체
d. JNI code에 의해 사용된 data
e. Just-in-time(JIT) compiler 및 Mixed-Mode-interperter(MMI)를 지원하는 함수
f. JIT 관련 수행 코드

Posted by '김용환'
,

CRC-16/32

CRC(Cyclic Redundancy Check)는 시리얼 전송에서 데이타의 신뢰성을 검증하기 위한 에러 검출 방법의 일종이다.

간단한 에러 검출방법으로는 parity 비트에 의한 방법과 check-sum에 의한 에러 검출 방법이 있지만 parity 비트에 의한 방법은 데이타 중에 한꺼번에 2비트나 4비트가 변하게 되면 검출을 할 수 없고, check-sum에 의한 방법은 한 바이트에서 +1, 다른 바이트에서는 -1로 에러가 생기는 경우만 해도 에러는 검출 되지 않는다. 즉, 이들 방법으로는 에러를 검출해 낼 수 있는 확률이 대단히 낮다.


CRC에 의한 방법은 높은 신뢰도를 확보하며 에러 검출을 위한 오버헤드가 적고, 랜덤 에러나 버스트 에러를 포함한 에러 검출에 매우 좋은 성능을 갖는 것을 특징으로 한다.

이러한 CRC 방법으로 보통 2가지 종류가 사용 되는데, 원칩 마이크로 프로세서와 같이 간단한 용도에서는 CRC-16 이 사용되고, 이보다 더욱 정확한 에러 검출이 필요한 경우에는 CRC-32를 사용한다.

ZIP, ARJ, RAR 과 같은 압축 프로그램이나 플로피 디스크 등의 데이터 검증 용도에 널리 사용되고 있다.


기본 원리

n 비트의 주어진 정보가 있을 때, 이를 k 비트 만큼 자리를 올리고 미리 약속한 k 비트의 키 값으로 나누면 r 비트의 나머지가 남게 된다. 송신측에서는 원래의 정보 비트를 k 비트 자리 올린 것에 r 비트의 나머지를 더해서 n+r 비트의 데이타를 만들어 보낸다.
수신측에서는 수신된 n+r 비트의 데이타를 키 값으로 나누어 보고 나머지가 정확히 0 이 되는지를 검사하면 된다.

이 때 k 가 16 비트이면 CRC-16, 32 비트이면 CRC-32 가 되고 키 값으로는 수학자 들에 의해 정해진 값을 주로 사용한다.
CRC-16 에는 0x8005, CRC-32 에는 0x04c11db7 이 많이 사용된다. 그리고 r 비트의 나머지를 Frame Check Sequence(FCS)라고 부른다.


여기서 CRC 계산에 사용되는 modulo-2 연산의 세계를 살펴보자.

CRC 계산시의 사칙연산은 carry를 고려하지 않는다.
1 + 1 = 0 (carry는 생각하지 않음)
0 - 1 = 1
덧셈 연산은 뺄셈 연산과 결과가 같으며 XOR 연산과도 같다.


다항식 표현 방법을 통해 CRC 계산 방법을 살펴보자.

(1) 2진 다항식으로 표시

예) 비트열 101 --> 다항식 x2 + 1

정보 다항식: 데이터 비트열의 다항식으로 P(x) = pn xn-1 + ... + p3x2 + p2x1 + p1
CRC 다항식: CRC 생성을 위한 다항식으로 G(x) (미리 정해진 키 값)
몫: Q(x)
나머지: R(x)
전송 데이타: T(x)


(2) CRC 계산 방법

P(x)를 k 비트 만큼 자리를 올리고( P(x)에 xk를 곱하는 것과 동일) G(x)로 나누면

xk P(x) = Q(x)*G(x) +/- R(x) 이다.

(k는 CRC 다항식의 최고 차수)

R(x) = dk xk-1 + .. + d2x1 + d1 ( R(x)의 최고 차수는 k-1)

비트열 dk ... d2 d1 을 FCS(Frame Check Sequence) 라 함

위 식에서 xk P(x) + R(x) 는 Q(x)*G(x) 와 같다.

즉, xk P(x) + R(x) 는 G(x)의 배수이므로 G(x) 로 나누면 나머지가 0 임을 알 수 있다.

결과적으로 전송되는 데이터 비트열 : pn ... p3 p2 p1 dk ... d2 d1

즉, 전송 T(x) = xk P(x) + R(x)


예) 데이터 비트열 110011 즉 P(x) =x5+x4+x1+x0, CRC 다항식 G(x) = x4+x3+1, 즉 11001일 경우 FCS와 전송되는 비트열은?

xkP(x) = x4 (x5 + x4 + x1 + 1) = x9 + x8 + x5 + x4, 비트열로 표시하면 1100110000


                 100001
         _____________
11001 | 1100110000
           11001
          ____________
                   10000
                   11001
          ____________
                     1001    


xkP(x) = Q(x)G(x) - R(x)에서

Q(x) = x5 + x0 이므로,

R(x) = x3 + x0, ---> FCS는1001

따라서 전송되는 비트열 1100111001


연산의 최적화

CRC의 계산은 일반 나눗셈 명령을 이용해 구현할 수 없다. 1비씩 shift 하면서 XOR 연산을 통해 나머지를 구해야 한다.
하지만 정보 비트에 대해 하나하나씩 연산을 하는 것에는 분명 속도 개선의 여지가 있다.
실제 계산 시에는 모든 바이트에 대해 CRC 다항식에 대한 CRC 값을 계산해 표로 만들어 두고 들어오는 데이타를 인덱스로 삼아 계산 값을 바로 얻는 방법을 사용한다.


CRC-16 C소스 : crc16h.c
CRC-32 C소스 : crc32h.c

8051 어셈블리 CRC-8 소스 : 8051crc8.zip
8051 어셈블리 CRC-16 소스 : 8051crc16.zip


Posted by '김용환'
,