Oracle Jdk 7부터는 G1 gc 알고리즘을 디폴트로 사용한다고 했었는데.. 인터넷에 이런 자료가 없어서 직접 테스트 해보니 디폴트는 기존의 generation model을 사용중이다. 따로 옵션을 넣어줘야 한다.


<서버 설치>

$ mkdir -p /home/www/jdk7

$ cd /home/www/jdk7

$ wget http://download.oracle.com/otn-pub/java/jdk/7/jdk-7-linux-i586.tar.gz

$ tar zxvf jdk-7-linux-i586.tar.gz


$ mkdir -p /home/www/tomcat

$ cd /home/www/tomcat

$ wget http://mirror.khlug.org/apache/tomcat/tomcat-7/v7.0.25/bin/apache-tomcat-7.0.25.zip

$ unzip apache-tomcat-7.0.25.zip


$ vi /home/www/.bashrc

$ export JAVA_HOME="/home/www/jdk7/jdk1.7.0"

$ source /home/www/.bashrc


$ cd /home/www/tomcat/apache-tomcat-7.0.25/bin

$ vi catalina.sh
(다음을 # --- 다음에 추가)
CATALINA_OPTS=" -Dcom.sun.management.jmxremote -Dcom.sun.management.jmxremote.port=10090 -Dcom.sun.management.jmxremote.ssl=false -Dcom.sun.management.jmxremote.authenticate=false"

* bashrc에 넣어둘 수도 있음


$ ./catalina.sh start
Using CATALINA_BASE:   /home/www/tomcat/apache-tomcat-7.0.25
Using CATALINA_HOME:   /home/www/tomcat/apache-tomcat-7.0.25
Using CATALINA_TMPDIR: /home/www/tomcat/apache-tomcat-7.0.25/temp
Using JRE_HOME:        /home/www/jdk7/jdk1.7.0
Using CLASSPATH:       /home/www/tomcat/apache-tomcat-7.0.25/bin/bootstrap.jar:/home/www/tomcat/apache-tomcat-7.0.25/bin/tomcat-juli.jar


$ ps -ef | grep java
www      17189     1 97 11:42 pts/1    00:00:02 /home/www/jdk7/jdk1.7.0/bin/java -Djava.util.logging.config.file=/home/www/tomcat/apache-tomcat-7.0.25/conf/logging.properties -Djava.util.logging.manager=org.apache.juli.ClassLoaderLogManager  -Dcom.sun.management.jmxremote -Dcom.sun.management.jmxremote.port=10090 -Dcom.sun.management.jmxremote.ssl=false -Dcom.sun.management.jmxremote.authenticate=false -Djava.endorsed.dirs=/home/www/tomcat/apache-tomcat-7.0.25/endorsed -classpath /home/www/tomcat/apache-tomcat-7.0.25/bin/bootstrap.jar:/home/www/tomcat/apache-tomcat-7.0.25/bin/tomcat-juli.jar -Dcatalina.base=/home/www/tomcat/apache-tomcat-7.0.25 -Dcatalina.home=/home/www/tomcat/apache-tomcat-7.0.25 -Djava.io.tmpdir=/home/www/tomcat/apache-tomcat-7.0.25/temp org.apache.catalina.startup.Bootstrap start


<로컬 환경에 jdk 설치구축>

http://www.oracle.com/technetwork/java/javase/downloads/java-se-jdk-7-download-432154.html

jdk_home에 있는 bin/jconsole.exe 실행


<jconsole 이용>

ip와 포트을 입력해서 접속. 디폴트는 jdk 6와 동일하게 사용. 디폴트가 g1을 적용한 것이라고 했지만 young gen/old gen/perm gen 방식을 그대로 사용하는 ps marksweep, ps scavenge를 그대로 이요


G1 옵션 추가

$ vi catalina.sh
(다음을 # --- 다음에 추가)
CATALINA_OPTS=" -Dcom.sun.management.jmxremote -Dcom.sun.management.jmxremote.port=10090 -Dcom.sun.management.jmxremote.ssl=false -Dcom.sun.management.jmxremote.authenticate=false  -XX:+UseG1GC "  

 ( -XX:+UnlockExperimentalVMOptions  는 java 1.6 후반부 버전에서 G1 알고리즘을 쓸떄 사용가능하다. jdk7부터는 이 옵션없이 G1을 쓸 수 있다.)

jconsole로 확인하니, G1 Old gen, G1 young gen으로 뜨는지 확인했다.

chart상으로는 여러 영역이 보이지만, G1 자체가 young/old gen이 없기 때문에 이 정보는 나오지 않는다.


Posted by '김용환'
,


지금까지 jdk 6, 7에 항상 일어나는 버그이다.

String [], Byte[]와 같은  Array type ([] )으로 된 클래스를 ClassLoader를 이용해서 클래스 로딩시ClassNotFoundException이 발생한다.

그러나 Class.forName 으로 바꾸면 괜찮다. 이 문제는 reflection을 이용할 때 동일하게 나기 때문에 주의하면서 개발해야 한다.


jdk 6, jdk 7에서의 테스트 코드이다.

public class test {
    public static void main(String[] args) throws Exception {
        String[] s = new String[] { "aaa" };
        String clName = s.getClass().getName();
        Class c = test.class.getClassLoader().loadClass(clName);
       System.out.println(c);
    }
}

실행 결과는 다음과 같다.

Exception in thread "main" java.lang.ClassNotFoundException: [Ljava.lang.String;
    at java.net.URLClassLoader$1.run(URLClassLoader.java:202)
    at java.security.AccessController.doPrivileged(Native Method)
    at java.net.URLClassLoader.findClass(URLClassLoader.java:190)
    at java.lang.ClassLoader.loadClass(ClassLoader.java:307)
    at sun.misc.Launcher$AppClassLoader.loadClass(Launcher.java:301)
    at java.lang.ClassLoader.loadClass(ClassLoader.java:248)
    at test.main(test.java:5)


문제가 안 일어나게 하려면 다음과 같이 코딩해야 한다.

public class test {
    public static void main(String[] args) throws Exception {
        String[] s = new String[] { "aaa" };
        String clName = s.getClass().getName();
        Class c = Class.forName(clName,false,Thread.currentThread().getContextClassLoader());
        System.out.println(c);
    }
}

결과는 다음과 같다.

class [Ljava.lang.String;


이 문제는 “http://bugs.sun.com/bugdatabase/view_bug.do?bug_id=6434149”에 올라와 있다.

비슷한 이슈로 다른 버그(“http://bugs.sun.com/bugdatabase/view_bug.do?bug_id=6446627”)도 있다.

public class test {
    public static void main(String[] args) throws Exception {
        String[] objs = new String[10];
        objs[0] = new String();
        String[] objs2 = (String[]) cloneObject(objs,
                test.class.getClassLoader());
    }

    public static Object cloneObject(Object toClone,
            final ClassLoader classLoader) throws Exception {
        ByteArrayOutputStream bOut = new ByteArrayOutputStream();
        ObjectOutputStream oOut = new ObjectOutputStream(bOut);
        oOut.writeObject(toClone);
        oOut.close();
        ByteArrayInputStream bIn = new ByteArrayInputStream(bOut.toByteArray());
        bOut.close();
        ObjectInputStream oIn = new ObjectInputStream(bIn) {
            protected Class resolveClass(ObjectStreamClass desc)
                    throws IOException, ClassNotFoundException {
                System.out
                        .println("Attempting to load class " + desc.getName());
                return classLoader.loadClass(desc.getName());
            }
        };
        bIn.close();
        Object copy = oIn.readObject();
        oIn.close();
        return copy;
    }

}


결과.

Exception in thread "main" java.lang.ClassNotFoundException: [Ljava.lang.String;
    at java.net.URLClassLoader$1.run(URLClassLoader.java:202)
    at java.security.AccessController.doPrivileged(Native Method)
    at java.net.URLClassLoader.findClass(URLClassLoader.java:190)
    at java.lang.ClassLoader.loadClass(ClassLoader.java:307)
    at sun.misc.Launcher$AppClassLoader.loadClass(Launcher.java:301)
    at java.lang.ClassLoader.loadClass(ClassLoader.java:248)
    at test.main(test.java:5)


이문제는 현재 많은 개발자들은 오라클이 해주기를 기다리고 있다….

오라클 버그 데이터베이스에서는 개발자들이 투표를 통해서 bug를 빨리 처리해달라는 주소도 있으니 참조할 것.
http://bugs.sun.com/bugdatabase/top25_bugs.do


Posted by '김용환'
,


<시작하며..>

apache mina에서 cpu 100% 치는 현상이 발생된 적이 있다. JDK 1.6.0_22 and mina 2.0.2에서는 더 이상 cpu가 치는 현상이 없었지만, old한 jdk 에서 동작하는 apache mina를 위해서 코드를 패치하여 해결했다고 한 상태이다. (2.0.3 패치)

NioProcessor 100% CPU usage on Linux (epoll selector bug)
https://issues.apache.org/jira/browse/DIRMINA-678

이 문제는 Jetty (http://jira.codehaus.org/browse/JETTY-937), jdk(http://bugs.sun.com/view_bug.do?bug_id=6693490, http://bugs.sun.com/bugdatabase/view_bug.do?bug_id=6403933) 와도 밀접한 연관이 있으므로 알아두면 좋을 것 같다.

참고

jdk 1.6.0_22 의 release note(http://www.oracle.com/technetwork/java/javase/6u22releasenotes-176121.html)를 봐도 특별한 내용은 없다.  그러나, 1.6.0_23의 버그 fix (http://www.oracle.com/technetwork/java/javase/2col/6u23bugfixes-191074.html) 의 내용 중 “6728542”은 관련 내용이 있다.  그 내용(http://bugs.sun.com/bugdatabase/view_bug.do?bug_id=6728542)은 다음과 같다. 아마도 이 부분을 수정한 것이 아닌가 싶다.

Epoll implementation of java.nio.channels.Selector
(EPollSelectorProvider) doesn't correctly packs
epoll_event struct for all platforms.


<내용>

jdk의 버그라 할지라도 문제를 해결했는지에 대한 것은 다른 이슈이다. 수많은 버그를 피해서 만들어둔 코드가 멋지기로 하다. (ibm jike 버그 회피 코드를 잘 짰었다.. ㅋ)

Mina 의 버그질라 및 Jetty, jdk 이슈는 아래 thread dump를 근거로 이야기를 하고 있다. select 하면서 loop에 빠지면서 cpu가 100%가 되는 현상이다. 버그질라에 나온 영어로는 spinning in tight loop 이다.

java.lang.Thread.State: RUNNABLE at sun.nio.ch.EPollArrayWrapper.epollWait(Native Method)
at sun.nio.ch.EPollArrayWrapper.poll(EPollArrayWrapper.java:215)
at sun.nio.ch.EPollSelectorImpl.doSelect(EPollSelectorImpl.java:65)
at sun.nio.ch.SelectorImpl.lockAndDoSelect(SelectorImpl.java:69)
- locked <0x00002aaab3dd8760> (a sun.nio.ch.Util$1)
- locked <0x00002aaab3dd83a0> (a java.util.Collections$UnmodifiableSet)
- locked <0x00002aaab3dd82e8> (a sun.nio.ch.EPollSelectorImpl)
at sun.nio.ch.SelectorImpl.select(SelectorImpl.java:80)
 
<자바 및 jvm 소스>
java.net에 있는 jdk 6 update 22 의 linux 소스를 바탕으로 작성한다. 
(다운로드 받을 수 있는 곳 : http://download.java.net/jdk6/6u10/archive/)
java.nio.channels.Selector클래스의 select() 메서드가 호출되는 tree를 쫓아가본다.
public abstract class Selector {
public abstract int select(long timeout)    throws IOException;
}
-> 

abstract class SelectorImpl   extends AbstractSelector {

    public int select(long timeout)  throws IOException
    {
        if (timeout < 0)
            throw new IllegalArgumentException("Negative timeout");
         return lockAndDoSelect((timeout == 0) ? -1 : timeout);
    }

    private int lockAndDoSelect(long timeout) throws IOException {
    synchronized (this) {
        if (!isOpen())
        throw new ClosedSelectorException();
        synchronized (publicKeys) {
        synchronized (publicSelectedKeys) {
            return doSelect(timeout);
        }
        }
        }
    }

   protected abstract int doSelect(long timeout) throws IOException;
}

-> 
class EPollSelectorImpl  extends SelectorImpl {
….

// The poll object
EPollArrayWrapper pollWrapper;


protected int doSelect(long timeout)  throws IOException
    {
        if (closed)
            throw new ClosedSelectorException();
        processDeregisterQueue();
        try {
            begin();
           pollWrapper.poll(timeout);
        } finally {
            end();
        }
        processDeregisterQueue();
        int numKeysUpdated = updateSelectedKeys();
        if (pollWrapper.interrupted()) {
            // Clear the wakeup pipe
            pollWrapper.putEventOps(pollWrapper.interruptedIndex(), 0);
            synchronized (interruptLock) {
                pollWrapper.clearInterrupted();
                IOUtil.drain(fd0);
                interruptTriggered = false;
            }
        }
        return numKeysUpdated;
    }

}

->

/**
* Manipulates a native array of epoll_event structs on Linux:
*
* typedef union epoll_data {
*     void *ptr;
*     int fd;
*     __uint32_t u32;
*     __uint64_t u64;
*  } epoll_data_t;
*
* struct epoll_event {
*     __uint32_t events; 
*     epoll_data_t data;
* };
*/

class EPollArrayWrapper {

int poll(long timeout) throws IOException {
    updateRegistrations();
    updated = epollWait(pollArrayAddress, NUM_EPOLLEVENTS, timeout, epfd);
    for (int i=0; i<updated; i++) {
        if (getDescriptor(i) == incomingInterruptFD) {
            interruptedIndex = i;
            interrupted = true;
            break;
        }
    }
    return updated;
}

private native int epollWait(long pollAddress, int numfds, long timeout,
                             int epfd) throws IOException;
}

->

EPollArrayWrapper.c


/* epoll_wait(2) man page */

typedef union epoll_data {
    void *ptr;
    int fd;
    __uint32_t u32;
    __uint64_t u64;
} epoll_data_t;

struct epoll_event {
    __uint32_t events;  /* Epoll events */
    epoll_data_t data;  /* User data variable */
} __attribute__ ((__packed__));

JNIEXPORT jint JNICALL
Java_sun_nio_ch_EPollArrayWrapper_epollWait(JNIEnv *env, jobject this,
                                            jlong address, jint numfds,
                                            jlong timeout, jint epfd)
{
    struct epoll_event *events = jlong_to_ptr(address);
    int res;

    if (timeout <= 0) {           /* Indefinite or no wait */
        RESTARTABLE((*epoll_wait_func)(epfd, events, numfds, timeout), res);
    } else {                      /* Bounded wait; bounded restarts */
        res = iepoll(epfd, events, numfds, timeout);
    }
   
    if (res < 0) {
        JNU_ThrowIOExceptionWithLastError(env, "epoll_wait failed");
    }
    return res;
}

static int iepoll(int epfd, struct epoll_event *events, int numfds, jlong timeout)
{
    jlong start, now;
    int remaining = timeout;
    struct timeval t;
    int diff;

    gettimeofday(&t, NULL);
    start = t.tv_sec * 1000 + t.tv_usec / 1000;

    for (;;) {
        int res = (*epoll_wait_func)(epfd, events, numfds, timeout);
        if (res < 0 && errno == EINTR) {
            if (remaining >= 0) {
                gettimeofday(&t, NULL);
                now = t.tv_sec * 1000 + t.tv_usec / 1000;
                diff = now - start;
                remaining -= diff;
                if (diff < 0 || remaining <= 0) {
                    return 0;
                }
                start = now;
            }
        } else {
            return res;
        }
    }
}


<mina쪽 소스>

mina쪽에서 어떻게 해서 무한 루프가 되는 시나리오는 다음과 같다.

select(timeout)를 호출하지만, 바로 jvm 코드에 의해 selected가 리턴된다. isDisposing() 메서드는 종료여부를 알린다. selector와 바인드된 Channel 이 종료되면 disposing 값은 true가 된다.
jvm 내부의 버그로 종료되지 못한 channel 또는 처리해야 할 channel이 존재함으로서, select()에서는 이벤트가 계속 반복되는 현상이 일어나. 계속 무한 루프가 도는 현상이 발생하게 된다.


# Apache Mina 2.0.0-RC1 소스

public abstract class AbstractPollingIoProcessor<T extends AbstractIoSession> implements IoProcessor<T> {

private static final long SELECT_TIMEOUT = 1000L;

private class Processor implements Runnable {
        public void run() {
            int nSessions = 0;
            lastIdleCheckTime = System.currentTimeMillis();

            for (;;) {
                try {
                    int selected = select(SELECT_TIMEOUT);

                    nSessions += handleNewSessions();
                    updateTrafficMask();

                     if (selected > 0) {
                        process();
                    }

                    long currentTime = System.currentTimeMillis();
                    flush(currentTime);
                    nSessions -= removeSessions();
                    notifyIdleSessions(currentTime);

                    if (nSessions == 0) {
                        synchronized (lock) {
                            if (newSessions.isEmpty() && isSelectorEmpty()) {
                                processor = null;
                                break;
                            }
                        }
                    }

                     if (isDisposing()) {
                        for (Iterator<T> i = allSessions(); i.hasNext();) {
                            scheduleRemove(i.next());
                        }
                        wakeup();
                     }
                } catch (Throwable t) {
                   …..

                }
            }

/**
* poll those sessions for the given timeout
* @param timeout milliseconds before the call timeout if no event appear
* @return The number of session ready for read or for write
* @throws Exception if some low level IO error occurs
*/
protected abstract int select(long timeout) throws Exception;

}


public final class NioProcessor extends AbstractPollingIoProcessor<NioSession> {
    private final Selector selector;

@Override
protected int select() throws Exception {
    return selector.select();
}


}

 
그래서 2011년 Apache Mina 2.0.3 에서는 old jvm을 위한 패치가 이루어졌다. 
Mina 버그질라 (https://issues.apache.org/jira/browse/DIRMINA-678)의 Attachment에 있는
diff 파일을 참조할 수 있다.
image
핵심 코드만 따로 보면, 아래 소스를 보면 된다. 
Selector 안에 Channel이 문제가 있는 것(connection이 broken)일 때는 정리하면 되고, 
이미 연결되어 있어 있는 Channel에 대해서는 selector를 새거로 바꾸고 예전꺼는 정리하는 구조
(NioProcessor.registerNewSelector())로 바꿔놨다.
특별히 이 버그에 대해서 또다른 내용이 등록되어 있지 않아서 잘 동작되는 것 같다. 
# Apache Mina 2.0.4 (수정된 패치 내역이 있는 부분)

public abstract class AbstractPollingIoProcessor<T extends AbstractIoSession> implements IoProcessor<T> {

 protected AtomicBoolean wakeupCalled = new AtomicBoolean(false);

private class Processor implements Runnable {
        public void run() {
            assert (processorRef.get() == this);

            int nSessions = 0;
            lastIdleCheckTime = System.currentTimeMillis();

            for (;;) {
                try {
                    // This select has a timeout so that we can manage
                    // idle session when we get out of the select every
                    // second. (note : this is a hack to avoid creating
                    // a dedicated thread).
                   long t0 = System.currentTimeMillis();
                    int selected = select(SELECT_TIMEOUT);
                    long t1 = System.currentTimeMillis();
                    long delta = (t1 - t0);

                    if ((selected == 0) && !wakeupCalled.get() && (delta < 100)) {
                        // Last chance : the select() may have been
                        // interrupted because we have had an closed channel.
                        if (isBrokenConnection()) {
                            LOG.warn("Broken connection");

                            // we can reselect immediately
                            // set back the flag to false
                            wakeupCalled.getAndSet(false);

                            continue;
                        } else {
                            LOG.warn("Create a new selector. Selected is 0, delta = "
                                            + (t1 - t0));
                            // Ok, we are hit by the nasty epoll
                            // spinning.
                            // Basically, there is a race condition
                            // which causes a closing file descriptor not to be
                            // considered as available as a selected channel, but
                            // it stopped the select. The next time we will
                            // call select(), it will exit immediately for the same
                            // reason, and do so forever, consuming 100%
                            // CPU.
                            // We have to destroy the selector, and
                            // register all the socket on a new one.
                           registerNewSelector();
                        }

                       // Set back the flag to false
                        wakeupCalled.getAndSet(false);

                        // and continue the loop
                        continue;
                    }

                    // Manage newly created session first
                    nSessions += handleNewSessions();

                    updateTrafficMask();

                    // Now, if we have had some incoming or outgoing events,
                    // deal with them
                    if (selected > 0) {
                        //LOG.debug("Processing ..."); // This log hurts one of the MDCFilter test...
                        process();
                    }

                    // Write the pending requests
                    long currentTime = System.currentTimeMillis();
                    flush(currentTime);

                    // And manage removed sessions
                    nSessions -= removeSessions();

                    // Last, not least, send Idle events to the idle sessions
                    notifyIdleSessions(currentTime);

                    // Get a chance to exit the infinite loop if there are no
                    // more sessions on this Processor
                    if (nSessions == 0) {
                        processorRef.set(null);
                       
                        if (newSessions.isEmpty() && isSelectorEmpty()) {
                            // newSessions.add() precedes startupProcessor
                            assert (processorRef.get() != this);
                            break;
                        }
                       
                        assert (processorRef.get() != this);
                       
                        if (!processorRef.compareAndSet(null, this)) {
                            // startupProcessor won race, so must exit processor
                            assert (processorRef.get() != this);
                            break;
                        }
                       
                        assert (processorRef.get() == this);
                    }

                    // Disconnect all sessions immediately if disposal has been
                    // requested so that we exit this loop eventually.
                    if (isDisposing()) {
                        for (Iterator<S> i = allSessions(); i.hasNext();) {
                            scheduleRemove(i.next());
                        }

                        wakeup();
                    }
                } catch (ClosedSelectorException cse) {
                    // If the selector has been closed, we can exit the loop
                    break;
                } catch (Throwable t) {
                    ExceptionMonitor.getInstance().exceptionCaught(t);

                    try {
                        Thread.sleep(1000);
                    } catch (InterruptedException e1) {
                        ExceptionMonitor.getInstance().exceptionCaught(e1);
                    }
                }
            }


public final class NioProcessor extends AbstractPollingIoProcessor<NioSession> {
    /** The selector associated with this processor */
    private Selector selector;

@Override
protected void registerNewSelector() throws IOException {
    synchronized (selector) {
        Set<SelectionKey> keys = selector.keys();

        // Open a new selector
        Selector newSelector = Selector.open();

        // Loop on all the registered keys, and register them on the new selector
        for (SelectionKey key : keys) {
            SelectableChannel ch = key.channel();

            // Don't forget to attache the session, and back !
            NioSession session = (NioSession)key.attachment();
            SelectionKey newKey = ch.register(newSelector, key.interestOps(), session);
            session.setSelectionKey( newKey );
        }

        // Now we can close the old selector and switch it
        selector.close();
        selector = newSelector;
    }
}


마치며..

jvm의 버그로 인해서 회피하는 Apache mina 코드와 연관된 jvm 소스를 살펴보았다. 원천적으로 jvm 코드의 수정이 됨으로서 문제가 해결되었지만, jvm 버그가 언제 고쳐질지 모르거나 old jvm을 쓰면서 이슈가 생기는 것을 막기 위해서 회피하는 코드를 만들었다. 책임감이 강한 멋쟁이 mina commitor.. 잘 되기를 바란다.

Posted by '김용환'
,


3년전 (2009년) MBean을 가지고 모니터링 솔루션을 만들다가 JMX에서 memory leak이 있는 것을 발견했었다. 이것을 영어로 어떻게 설명하나, 누구에게 얘기해야 하나  있었는데. 1.6.0_22에서 패치되었다. 굿!

이젠 이런 그림 안봐도 되겠군~

http://bugs.sun.com/bugdatabase/view_bug.do?bug_id=6957378

Posted by '김용환'
,

jdk 1.7 이하의 app의 cpu 측정하려면 com.sun.management.OperatingSystemMXBean interface 의 getProcessCpuTime() 을 이용했었다.

jdk 1.7부터는 cpu load를 바로 호출할 수 있는 메소드가 추가되었다.

double getSystemCpuLoad() : system의 cpu load값을 0.0~1.0으로 리턴한다. 0.0은 0%, 1.0이면 100%를 의미
double getProcessCpuLoad() : jvm process의 cpu load값을 0.0~1.0으로 리턴한다. 0.0은 0%, 1.0이면 100%를 의미 


Posted by '김용환'
,

jni vs jna

java core 2011. 12. 2. 15:06


Cassandra는 최근에 JNI(Java Native Interface) 대신 JNA (Java Native Access) 방식을 이용해서 native 영역에 메모리를 copy 하는 작업이 많은 경우에 사용되어 플랫폼의 속도를 향상시키는 방법을 쓰고 있습니다. 또한 일부 임베디드 프로젝트나 서버프로젝트에서 JNA 기법을 사용하는 예들이 많아져 오픈소스를 활용하는 저희에게 좋은 정보이면서 점차적으로 알아야 할 정보가 될 것 같아서 관련된 내용을 공유하고자 합니다.  (참고로 SWIG 이라는 라이브러리도 있는데, 제가 아직 몰라서 살펴보고 공유하겠습니다.)


1.     JNI (Java Native Interface)

JNIJava 에서 native 영역(c, c++)으로 들어가 호출 또는 native (c, c++)에서 java로 호출하는 interface입니다. c, c++ 언어로 만든 라이브러리, 솔루션을 바로 java에서 사용할 수 있습니다. 웹 서비스의 경우라면 c, c++ 언어로 만든 이미지 합성 또는 동영상 라이브러리를 사용하여 서비스하는 경우라 할 수 있습니다. 안드로이드 프레임워크의 경우에는 open gl과 같은 영역에서 연동할 수 있도록 되어 있습니다.


리눅스에서 JNI를 간단히 테스트하는 코드를 보겠습니다.

자바 클래스는 간단히 리눅스 shared object (so) 을 읽어 native 지시자로 구현된 method를 호출합니다 .

HelloJNI.java

class HelloJNI {
 native void printHello();
 native void printString(String str);
 
 static {
  System.load("/work/
JniTest/hellojni
.so");
 }
 public static void main(String[] args) {
  HelloJNI myJNI = new HelloJNI();
  myJNI.printHello();
  myJNI.printString("Hello in C");
 }
}


먼저 컴파일을 하고, native 구현해야 할 함수를 정의하는 header 파일을 생성합니다.

# javac HelloJNI.java

# javah HelloJNI


HelloJNI.h 파일에는 구현해야 할 “Java_HelloJNI_printHello”, “Java_HelloJNI_printString” 함수를 정의하고 있습니다.


<HelloJNI.h>

/* DO NOT EDIT THIS FILE - it is machine generated */

#include <jni.h>

/* Header for class HelloJNI */

#ifndef _Included_HelloJNI

#define _Included_HelloJNI

#ifdef __cplusplus

extern "C" {

#endif

/*

 * Class:     HelloJNI

 * Method:    printHello

 * Signature: ()V

 */

JNIEXPORT void JNICALL Java_HelloJNI_printHello

  (JNIEnv *, jobject);

/*

 * Class:     HelloJNI

 * Method:    printString

 * Signature: (Ljava/lang/String;)V

 */

JNIEXPORT void JNICALL Java_HelloJNI_printString

  (JNIEnv *, jobject, jstring);

#ifdef __cplusplus

}

#endif

#endif


그 다음은 HelloJNI.h 의 함수를 구현한 HelloJNI.c 파일을 간단히 작성합니다. printHello 함수는 단순히 문자열을 출력하고, printString 함수는 자바로부터 받은 문자열을 그대로 출력합니다.


<HelloJNI.c>

#include "HelloJNI.h"


JNIEXPORT void JNICALL Java_HelloJNI_printHello(JNIEnv *env, jobject obj) {

 printf("Hello World !!! jni\n");

 }


JNIEXPORT void JNICALL Java_HelloJNI_printString(JNIEnv *env, jobject obj, jstring string) {

  const char *str = (*env)->GetStringUTFChars(env,string,0);

  printf("%s\n", str);

  return;

}


c코드를 컴파일하고 나서 shared object(so)로 만듭니다.

# gcc -c -I$JAVA_HOME/include -I$JAVA_HOME/include/linux HelloJNI.c

# gcc -shared -o HelloJNI.so HelloJNI.o

# ls -al HelloJNI.so

HelloJNI.so


이제는 마지막으로 자바를 실행합니다.


# java HelloJNI

Hello World !!!

Hello in C!!!


JNI 를 사용하기 위해서는 다음과 같이 6단계의 개발 단계를 거치게 됩니다. 번거롭지만 다들 JNI를 구현할 때는 이렇게 하고 있습니다.


JNI를 쓰는 이유는 java 영역에서 할 수 있는 부분을 Native 영역으로 이동하여 연동할 수 있고, 속도가 늦은 부분은 속도를 높일 수 있습니다. 안드로이드 플랫폼의 내부구조는 껍데기는 java이고, 내부는 JNI의 코드로 내부 모듈로 이루어져 있다고 할 수 있습니다.

JNI의 가장 큰 문제는 메모리 부분입니다. Native 로 구현한 공간에는 Auto GC를 하지 못하고 일일이 메모리 관리를 해야 하고, 잘못하면 메모리릭을 일어나게 할 수 있습니다. 또한 JVM 메모리를 침범하여 crash 가 되기도 합니다. 그래서 native 사용할 때는 항상 잘 사용해야 합니다.


2.     JNA (Java Native Access)

JNI 개발 측면에서는 번거로운 부분이 많은데, 이런 부분을 쉽게 해주는 API가 있는데, 바로 JNA 입니다. JNA libffi (Foreign function interface library)라 불리는 native library를 사용하여 dynamic하게 쓸 수 있게 합니다. Native 언어로 만들어진 함수를 사용하기 위해서  Header 파일 생성, Header 파일을 구현한 C소스, compile 과정이 없습니다. 번거로운 과정이 많이 생략 가능합니다.

어떻게 사용되고 동작되는지 살펴보겠습니다.

JNA 라이브러리는 원래 java.net(http://java.net/projects/jna/)에 있었는데, 지금은 github(https://github.com/twall/jna)로 옮겨진 상태입니다.

https://github.com/twall/jna/downloads 에 접근해서 jna.jar(https://github.com/downloads/twall/jna/jna.jar)를 다운받습니다.


위에서 언급했던 JNI 예제의 Native 코드를 생성합니다.

<myLib.h>

void printHello();

void printString(char* str);


<myLib.c>

#include <stdio.h>

void printHello() {

           printf("Hello World !!! jna\n");

}


void printString(char* str) {

           printf("%s\n", str);

}


이 파일들을 컴파일하여 shared object 파일로 만듭니다.

# gcc -c myLib.c

# gcc -shared -o myLib.so myLib.o

# ls myLib.so


이제는 myLib.so 파일을 정적으로 읽는 java 클래스를 하나 생성합니다. com.sun.jan.Library를 상속하는 interface 를 하나 만들고, shared object 를 읽어 자기 자신의 Instance 를 생성하여 header 파일을 생성하지 않고 바로 native 코드의 함수를 호출할 수 있도록 합니다.


<HelloWorld.java>

import com.sun.jna.Library;

import com.sun.jna.Native;

import com.sun.jna.Platform;


public class HelloWorld {

    public static void main(String[] args) {

        CLibrary.INSTANCE.printHello();

        CLibrary.INSTANCE.printString("Hi\n");

     }

}


interface CLibrary extends Library {

        CLibrary INSTANCE = (CLibrary) Native.loadLibrary(

            ("/home/kimyonghwan/myLib.so"), CLibrary.class);

           void printHello();

           void printString(String str);

}


그리고, 바로 classpath jna.jar와 현재 디렉토리를 추가하여 컴파일과 실행을 하면 예측한 대로 결과가 나옵니다.


# javac -classpath jna.jar HelloWorld.java

# java -classpath jna.jar:. HelloWorld

Hello World !!! jna

Hi


JNA 방식으로 코딩을 하니 훨씬 이해가 쉽습니다. 기존에 이미 만들어진 shared object를 바로 클래스만 작성해서 호출하는 방식이기 때문에 복잡한 interface가 필요가 없습니다. 또한 JAVA SRC 디렉토리에는 지저분한 C header 파일과 C 소스 파일은 더 이상 필요 없을 것입니다 .


그러나 jna의 한계가 있습니다. C++ 코드를 사용할 수 없습니다. (jnaerator라는 오픈소스가 C++로 변환하기는 합니다만, thirty party라 제외합니다.) 또한, api 특성상 JNI의 성경을 다 포함하지 못합니다. 예를 들어 native에서 jvm start하는 것은 JNA가 지원하지 않습니다.

단순히 Java단에서 C 코드로 일을 시킬 때 아주 편리합니다. 권한 만 있다면 리눅스 또는 윈도우 커널 라이브러리에 접근해서 interface에 바인딩하며 명령어를 실행할 수 있습니다. 또한 JNI에서 한 것처럼 C언어에서 함수에 Pointer를 연결하여 Java에서 쓸 수 있도록 있으며, Callback 이 일어나면 Java로 올려 처리도 가능합니다.


이해를 돕기 위해서 재미있는 예제를 하나 소개하겠습니다. 윈도우에서 제공하는 core library 중의 하나인 user32.dll 라이브러리를 읽어서 윈도우 OS의 현재 실행 중인 window 객체의 text를 얻어오는 예제입니다.


<User32Test.java>

import com.sun.jna.Native;

import com.sun.jna.Pointer;

import com.sun.jna.win32.StdCallLibrary;


public class User32Test {

           public interface User32 extends StdCallLibrary {

                     User32 INSTANCE = (User32) Native.loadLibrary("user32", User32.class);


                     interface WNDENUMPROC extends StdCallCallback {

                                boolean callback(Pointer hWnd, Pointer arg);

                     }


                     boolean EnumWindows(WNDENUMPROC lpEnumFunc, Pointer arg);


                     int GetWindowTextA(Pointer hWnd, byte[] lpString, int nMaxCount);

           }


           public static void main(String[] args) {

                     final User32 user32 = User32.INSTANCE;

                     user32.EnumWindows(new User32.WNDENUMPROC() {

                                int count;


                                public boolean callback(Pointer hWnd, Pointer userData) {

                                          byte[] windowText = new byte[512];

                                          user32.GetWindowTextA(hWnd, windowText, 512);

                                          String wText = Native.toString(windowText);

                                          wText = (wText.isEmpty()) ? "" : "; text: " + wText;

                                           System.out.println("Found window " + hWnd + ", total "

                                                                + ++count + wText);

                                          return true;

                                }

                     }, null);

           }

}


Eclipse에서 소스를 복사하고, build path jna.jar를 넣어주고 Run 을 실행하면 재미있는 결과가 나옵니다.

<결과>

..

Found window native@0x1074c, total 58; text: 네이버 백신

Found window native@0x10580, total 59; text: Network Flyout

Found window native@0x103fe, total 61; text: N드라이브 탐색기

..


샘플 코드의 예제를 도식화하면 JavaDll proxydll 간의 관계로 풀어낼 수 있습니다.


만약 User32window lock api를 사용하면 java에서도 쉽게 window locking이 되게 할 수 있습니다. Kernel32도 사용 가능합니다.


3.     결론

JNI 의 불편함대신 간편하게 사용될 수 있는 JNA는 점차 보편화 되고 있어서, 오픈소스 코드를 분석하거나 또는 Native 모듈을 개발하는데 큰 도움이 될 것입니다.


Posted by '김용환'
,
자바 클래스가 어떻게 되어 있는지 분석하려면, asm library를 써서 확인할 수 있다.
이외, 간단하게 콘솔로 출력할 수 있는 툴이 있어서 소개한다.

jcf-dump 라는 툴인데, gcc java를 설치하면 gcj와 함께 있는 툴이다.

http://linux.die.net/man/1/jcf-dump

Name

jcf-dump - print information about Java class files

Synopsis

jcf-dump [-c] [--javap] [--classpath=path] [--CLASSPATH=path] [-Idir...] [-o file] [--version] [--help] [-v] [--verbose] classname...


.............


gcj를 설치한다.
$ sudo apt-get install gcj-jdk

간단하게 클래스 파일을 만들어본다.

$ vi test.java
public class test {
    public static void main(String[] args) {
        int a = 0;
        String temp = "temp";
        a++;
        System.out.println("a:" + a);
    }
}


jcf-dump 를 이용하면, magic number 넘버가 나오고 compile(target)된 버전이 나온다. major_version이 50이면, jdk 1.6이라는 뜻이다.  그리고, Constant pool  정보, Fields, Methods 정보가 바로 나온다.

$ jcf-dump test
Reading .class from ./test.class.
Magic number: 0xcafebabe, minor_version: 0, major_version: 50.
Constant pool (count: 45):
#1: Methodref class: 12=java.lang.Object name_and_type: 21=<<init> ()void>
#2: String 22="temp"
#3: Fieldref class: 23=java.lang.System name_and_type: 24=<out java.io.PrintStream>
#4: Class name: 25="java/lang/StringBuilder"
#5: Methodref class: 4=java.lang.StringBuilder name_and_type: 21=<<init> ()void>
#6: String 26="a:"
#7: Methodref class: 4=java.lang.StringBuilder name_and_type: 27=<append (java.lang.String)java.lang.StringBuilder>
#8: Methodref class: 4=java.lang.StringBuilder name_and_type: 28=<append (int)java.lang.StringBuilder>
#9: Methodref class: 4=java.lang.StringBuilder name_and_type: 29=<toString ()java.lang.String>
#10: Methodref class: 30=java.io.PrintStream name_and_type: 31=<println (java.lang.String)void>
#11: Class name: 32="test"
#12: Class name: 33="java/lang/Object"
#13: Utf8: "<init>"
#14: Utf8: "()V"
#15: Utf8: "Code"
#16: Utf8: "LineNumberTable"
#17: Utf8: "main"
#18: Utf8: "([Ljava/lang/String;)V"
#19: Utf8: "SourceFile"
#20: Utf8: "test.java"
#21: NameAndType name: 13=<init>, signature: 14=()void
#22: Utf8: "temp"
#23: Class name: 34="java/lang/System"
#24: NameAndType name: 35=out, signature: 36=java.io.PrintStream
#25: Utf8: "java/lang/StringBuilder"
#26: Utf8: "a:"
#27: NameAndType name: 37=append, signature: 38=(java.lang.String)java.lang.StringBuilder
#28: NameAndType name: 37=append, signature: 39=(int)java.lang.StringBuilder
#29: NameAndType name: 40=toString, signature: 41=()java.lang.String
#30: Class name: 42="java/io/PrintStream"
#31: NameAndType name: 43=println, signature: 44=(java.lang.String)void
#32: Utf8: "test"
#33: Utf8: "java/lang/Object"
#34: Utf8: "java/lang/System"
#35: Utf8: "out"
#36: Utf8: "Ljava/io/PrintStream;"
#37: Utf8: "append"
#38: Utf8: "(Ljava/lang/String;)Ljava/lang/StringBuilder;"
#39: Utf8: "(I)Ljava/lang/StringBuilder;"
#40: Utf8: "toString"
#41: Utf8: "()Ljava/lang/String;"
#42: Utf8: "java/io/PrintStream"
#43: Utf8: "println"
#44: Utf8: "(Ljava/lang/String;)V"
Access flags: 0x21 public super
This class: 11=test, super: 12=java.lang.Object
Interfaces (count: 0):
Fields (count: 0):
Methods (count: 2):
Method name:"<init>" public Signature: 14=()void
Attribute "Code", length:29, max_stack:1, max_locals:1, code_length:5
Attribute "LineNumberTable", length:6, count: 1
Method name:"main" public static Signature: 18=(java.lang.String[])void
Attribute "Code", length:74, max_stack:3, max_locals:3, code_length:34
Attribute "LineNumberTable", length:22, count: 5
Attributes (count: 1):
Attribute "SourceFile", length:2, #20="test.java"


만약 1.5로 컴파일하면, major_version은 49가 될 것이다.


아주 큰 장점은..  자바의 타겟 컴파일 이슈가 문제가 될 때, 바로 이 툴로 확인할 수 있을 것이다.

ClassFormatError, ClassNotFoundException 이런 이슈등에 해결될 수 있을 것이다.

  • 46 = Java 1.2
  • 47 = Java 1.3
  • 48 = Java 1.4
  • 49 = Java 5
  • 50 = Java 6
  • 51 = Java 7

-c 옵션을 주어서, method의 실제 동작되는 jvm assembly를 볼 수 있다.
$ gcj-dump -c test.java
Methods (count: 2):
Method name:"<init>" public Signature: 14=()void
Attribute "Code", length:29, max_stack:1, max_locals:1, code_length:5
  0: aload_0
  1: invokespecial #1=<Method java.lang.Object.<init> ()void>
  4: return
Attribute "LineNumberTable", length:6, count: 1
  line: 1 at pc: 0
Method name:"main" public static Signature: 18=(java.lang.String[])void
Attribute "Code", length:74, max_stack:3, max_locals:3, code_length:34
  0: iconst_0
  1: istore_1
  2: ldc #2=<String "temp">
  4: astore_2
  5: iinc 1 1
  8: getstatic #3=<Field java.lang.System.out java.io.PrintStream>
 11: new #4=<Class java.lang.StringBuilder>
 14: dup
 15: invokespecial #5=<Method java.lang.StringBuilder.<init> ()void>
 18: ldc #6=<String "a:">
 20: invokevirtual #7=<Method java.lang.StringBuilder.append (java.lang.String)java.lang.StringBuilder>
 23: iload_1
 24: invokevirtual #8=<Method java.lang.StringBuilder.append (int)java.lang.StringBuilder>
 27: invokevirtual #9=<Method java.lang.StringBuilder.toString ()java.lang.String>
 30: invokevirtual #10=<Method java.io.PrintStream.println (java.lang.String)void>
 33: return
Attribute "LineNumberTable", length:22, count: 5
  line: 3 at pc: 0
  line: 4 at pc: 2
  line: 5 at pc: 5
  line: 6 at pc: 8
  line: 7 at pc: 33


이것을 이용하면, 나중에 java 7에서 invoke 개선안에 대해서 어떻게 동작하는지 쉽게 볼 수 있을 것이다.


javap 결과도 보여줄 수 있다.
$ jcf-dump -javap test
Reading .class from ./test.class.
Magic number: 0xcafebabe, minor_version: 0, major_version: 50.
Access flags: 0x21 public super
This class: test, super: java.lang.Object
Interfaces (count: 0):
Fields (count: 0):
Methods (count: 2):
     public void "<init>"()
     public static void "main"(java.lang.String[])


개발하다보면, java5에서 java6로 넘어가는 과정에서 많은 고민이 있었다. 내년에도 이런 식으로 이슈가 있을 것이다. 개발환경은 java7인데, 운영환경은 java6로 했을때, jvm이 인식못하는 jvm assembly 나 타겟 이슈가 있을 때, 이 툴을 이용하면 개발자들이 자주 실수 하는 부분을 찾아낼 수 있을 것이다.

간단하게 하면 머 이런식이 될 것이다.

$ jcf-dump -javap test | grep 'major_' | awk '{if($7=="50.") print "jdk 1.6"; else if($7=="51.") print "jdk 1.7";}'
jdk 1.6


사실 굳이 jcf-dump로 확인할 필요가 없다. 리눅스의 file 명령어로 확인할 수 있다. ㅎㅎㅎ

$ file test.class
test.class: compiled Java class data, version 50.0


Posted by '김용환'
,

테스트 해보니 java7 RC 버그로 알려졌던 WatchService 이슈가 여전히 update 1에도 나타났다. 
http://knight76.tistory.com/entry/Java-7-RC-버그-WatchService


그러나, jdk7 loop predicate 버그는 update1에서 fix되었다.  
http://knight76.tistory.com/1360


https://issues.apache.org/jira/browse/LUCENE-3346

Posted by '김용환'
,

이 내용은  IBM의 "무복사 기법을 통한 효율적인 데이터 전송" 글을 바탕으로 만들어졌습니다.
http://www.ibm.com/developerworks/kr/library/j-zerocopy/index.html

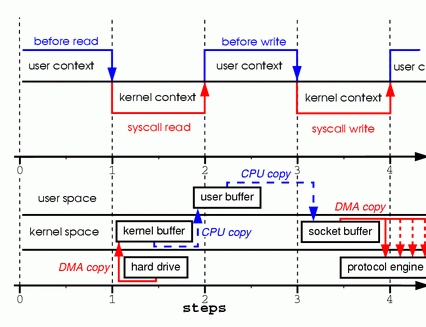
기존의 read하고 socket 으로 send하는 예제는 다음과 같이 복사됩니다.
기존 데이터 복사 방식 


Context Swithing은 다음과 같이 나타납니다.
기존 방식에서의 맥락 전환 


기존 방식은 Context Swithing은 총 4번이 일어나고, cpu copy는 2번 일어납니다.


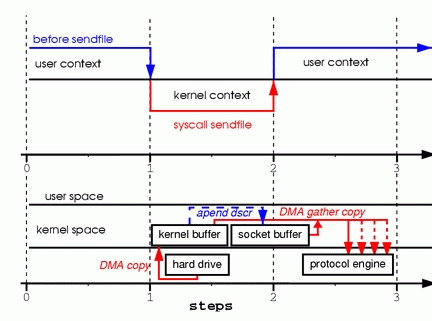
만약 FileChannel의 transferTo 라는 메소드를 호출하면, 운영체제의 sendfile을 호출하게 됩니다.

아래 그림처럼 cpu copy는 한번만 일어납니다.
transferTo()를 사용할 때 일어나는 데이터 복사


context swithing은 두번만 일어나면서 속도향상이 일어납니다. 
 
transferTo()를 사용할 때의 맥락 전환


만약 Scatter gather IO를 지원하는 네트웍 카드이면  아예 cpu copy를 하지 않습니다.

transferTo()와 데이터 모으기를 사용한 데이터 복사


NIC는 Network interface card를 의미하는 것이고, 우리가 일반적으로 얘기는 하는 이더넷 카드, 네트웍 카드를 말합니다.

 
잘 들여다 보면, zero copy는 call 단계를 줄이면서 checksum 코드나 복사 비용을 적게하려는 시도라고 할 수 있습니다.


리눅스에서 zero copy 기법은 sendfile() 이라는 함수로 매핑되고 있습니다. 리눅스에서 돌아가는 어플리케이션들(apache http server, nginx, tomcat 6 )에서 sendfile 옵션을 제공해서 속도 향상을 할 수 있지요. 실제 Sendfile을 옵션을 주었을 때 상황에서 따라서 2배이상의 효과를 누리기도 하고 어쩔 때는 효과가 없기도 합니다.

 
중요한 점은 네트웍 카드에서 지원을 해줘야 합니다. Scatter gather DMA를 지원해야 줘야 하는데요. Scatter/gather DMA를 쓰기 위한 api는 메모리 청크단위로 read하고 write 하는 구조로 되어 있습니다. cpu가 따로 작업을 하지 않아도 되기 때문에 속도는 늘어날 수 있지요. (http://www.artima.com/cppsource/scattered_io.html)

struct iovec
{
  void*   iov_base;
  size_t  iov_len;
};
ssize_t readv(int fd, const struct iovec* vector, int count);
ssize_t writev(int fd, const struct iovec* vector, int count);


내가 사용하고 있는 서버의 네트웍 카드를 보니 broadcom 사의 NetXtrem II 이며, zero copy를 지원하는 것으로 되어 있습니다.

java를 이해하려면, 리눅스의 sendfile 을 제대로 이해할 필요가 있다. 이에 대한 원전격인  http://www.linuxjournal.com/article/6345?page=0,0의 내용을 봐야 합니다.


read 함수와 write 함수를 호출했을 때 어떻게 동작되는지 보여주는 그래프입니다. 


zero copy(sendfile 콜 호출)를 했을 때,  어떻게 동작하는 지 보여주는 그래프입니다.  0번의 cpu copy와 2번의 dma copy와 2번의 conext switching을 보여주고 있지요.


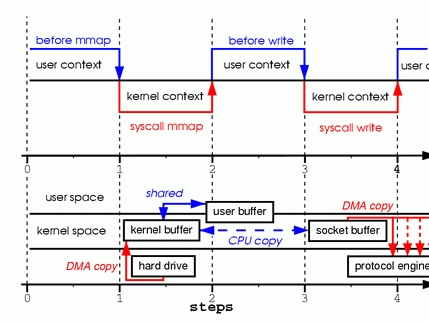
바로  mmap 이라는 함수를 사용하는 것인데요. (mmap은 펌웨어 개발자라면 다들 알고 있는 함수로 유명합니다.)

tmp_buf = mmap(file, len);
write(socket, tmp_buf, len);


dma copy는 2번, cpu copy는 한번, context switching은 2번 일어나는 구조입니다.  대신 사용자 영역에서 사용할 수 있는 user buffer에 데이터가 실린다는 점에서 훌륭한 구조라 할 수 있습니다.


zero copy의 큰 단점은 표준의 부재입니다. 운영체제마다 각각 구현했고, 리눅스나 유닉스, HP, Solaris끼리 서로 호환이 되지 않고 있습니다. 또한,  zero copy를 구현한 sendfile의 manual에 따르면, in은 무조건 소켓이 되지 못하고, out은 반드시 소켓이어야 한다는 점입니다. 따라서 쓰임새가 자유롭지 못해서 mmap을 사용하는 경우가 많이 있습니다.


java의 경우도 반드시 이 경우를 따를 수 밖에 없지요.  그림에서 보여주듯이 NIC 만 보여주고 있습니다.

즉, zero copy인 경우에 java의 FileChannel의 transferTo 메소드를 호출할 때는 socket to file 식은 쓸 수 없다점입니다. file-to-file, file-to-socket으로 쓰는 구조가 되는 것입니다. 그리고, 동적인 데이터보다는 static 데이터 위주로 사용되기 때문에 dynamic한 작업을 하는 경우에는 맞지 않습니다. 속도를 저하시킬 수 있기 때문입니다.

 그래서 ibm 참조자료에서 예제를 파일을 전송하는 것으로 든 이유가 바로 그런 부분입니다.


참조자료

http://www.ibm.com/developerworks/kr/library/j-zerocopy/index.html

Posted by '김용환'
,

mysql의 jdbc driver url의 connectTimeout과 socketTimeout에 대한 개념을 정리한다.
이 개념은 굳이 mysql driver뿐 아니라 http 나 간단한 소켓 프로그래밍에 대해서도 적용될 수 있다.

1) Socket Timeout

socketTimeout은 클라이언트(웹 서버)에서 mysql 서버에 대한 Connection에 대해서 데이터를 받는 것 까지의 timeout을 의미한다.

즉, client->server까지는 포함하지 않고, server->client 까지의 timeout을 의미한다고 봐야한다. 내가 마지막으로 받을 것으로 기대하고 대기하고 있는 timeout이라고 하면 된다. 소켓이 올 때까지 라는 의미는 Blocking socket operation이라는 전제가 깔려 있다는 의미이다..
다음의 메소드들처럼 blocking method가 있다는 것.

     * ServerSocket.accept();
     * SocketInputStream.read();
     * DatagramSocket.receive();


timeout시 socket은 끊어지지 않고 사용가능합니다. 단순히 java.io.InterruptedIOException만 발생합니다.


    /**
     * Constructor:  Connect to the MySQL server and setup a stream connection.
     *
     * @param host the hostname to connect to
     * @param port the port number that the server is listening on
     * @param props the Properties from DriverManager.getConnection()
     * @param socketFactoryClassName the socket factory to use
     * @param conn the Connection that is creating us
     * @param socketTimeout the timeout to set for the socket (0 means no
     *        timeout)
     *
     * @throws IOException if an IOException occurs during connect.
     * @throws SQLException if a database access error occurs.
     */
    public MysqlIO(String host, int port, Properties props,
        String socketFactoryClassName, MySQLConnection conn,
        int socketTimeout, int useBufferRowSizeThreshold) throws IOException, SQLException {
        this.connection = conn;
       
        if (this.connection.getEnablePacketDebug()) {
            this.packetDebugRingBuffer = new LinkedList();
        }
        this.traceProtocol = this.connection.getTraceProtocol();
       

        this.useAutoSlowLog = this.connection.getAutoSlowLog();
       
        this.useBufferRowSizeThreshold = useBufferRowSizeThreshold;
        this.useDirectRowUnpack = this.connection.getUseDirectRowUnpack();

        this.logSlowQueries = this.connection.getLogSlowQueries();

        this.reusablePacket = new Buffer(INITIAL_PACKET_SIZE);
        this.sendPacket = new Buffer(INITIAL_PACKET_SIZE);

        this.port = port;
        this.host = host;

        this.socketFactoryClassName = socketFactoryClassName;
        this.socketFactory = createSocketFactory();
        this.exceptionInterceptor = this.connection.getExceptionInterceptor();
       
        try {
         this.mysqlConnection = this.socketFactory.connect(this.host,
          this.port, props);
        
 
         if (socketTimeout != 0) {
          try {
           this.mysqlConnection.setSoTimeout(socketTimeout);
          } catch (Exception ex) {
           /* Ignore if the platform does not support it */
          }
         }
 
         this.mysqlConnection = this.socketFactory.beforeHandshake();
 
         if (this.connection.getUseReadAheadInput()) {
          this.mysqlInput = new ReadAheadInputStream(this.mysqlConnection.getInputStream(), 16384,
            this.connection.getTraceProtocol(),
            this.connection.getLog());
         } else if (this.connection.useUnbufferedInput()) {
          this.mysqlInput = this.mysqlConnection.getInputStream();
         } else {
          this.mysqlInput = new BufferedInputStream(this.mysqlConnection.getInputStream(),
            16384);
         }
 
         this.mysqlOutput = new BufferedOutputStream(this.mysqlConnection.getOutputStream(),
           16384);
 
 
         this.isInteractiveClient = this.connection.getInteractiveClient();
         this.profileSql = this.connection.getProfileSql();
         this.autoGenerateTestcaseScript = this.connection.getAutoGenerateTestcaseScript();
 
         this.needToGrabQueryFromPacket = (this.profileSql ||
           this.logSlowQueries ||
           this.autoGenerateTestcaseScript);
 
         if (this.connection.getUseNanosForElapsedTime()
     && Util.nanoTimeAvailable()) {
    this.useNanosForElapsedTime = true;
 
    this.queryTimingUnits = Messages.getString("Nanoseconds");
   } else {
    this.queryTimingUnits = Messages.getString("Milliseconds");
   }
 
   if (this.connection.getLogSlowQueries()) {
    calculateSlowQueryThreshold();
   }
        } catch (IOException ioEx) {
         throw SQLError.createCommunicationsException(this.connection, 0, 0, ioEx, getExceptionInterceptor());
        }
    }


내부적으로는 Socket 클래스의 setSoTimeout 을 호출합니다.

 void setSoTimeout(int timeout)

 
내부적으로 ReadAheadInputStream 클래스 에서 read하는 작업이 들어가 있다.
보통 중간에 문제가 되면, read하다가 IOException이 나게 된다. 여기서 Socket timeout을 잘 주면 좋을 것이다.

그러나 Query Timeout(statement 단에서 지정)보다 적게 주면 문제가 되니. 항상 query timeout보다 socket timeout이 길어야 한다.


2. connect timeout

connectTimout은 connect 메소드를 호출했을 때의 connection timeout을 의미한다.

connection 이 TCP/UDP 연결이 완료(established)될 까지의 timeout이다. 즉  connect(최초 또는 retry)할 때. client->server->client 까지 되돌아오는 시간을 의미한다.

 내부적으로 Socket 클래스의 connect 메소드를 호출한다.

void connect(SocketAddress endpoint, int timeout)


3. 운영

운영할 때는 너무 길게 주지 않고, 적당히 주고 있다..  DOS에 잘 방어하면서도.. 그것때문에 side effect는 적게.하는 정책을 두고 있다.

jdgc:mysql://alpha.google.com/server?useUnicode=true&amp;characterEncoding=euckr&amp;connectTimeout=5000&amp;socketTimeout=5000

Posted by '김용환'
,