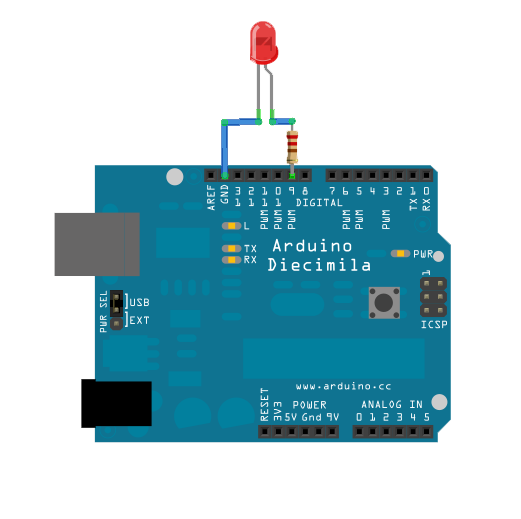
아두이노 보드에 이렇게 구성한다. 
8번 포트를 아웃푹으로 지정


아두이노 소스 


const int ledPin = 8;      // the pin that the LED is attached to

void setup()
{
  // initialize the serial communication:
  Serial.begin(9600);
  // initialize the ledPin as an output:
  pinMode(ledPin, OUTPUT);
}

void loop() {
  byte brightness;

  // check if data has been sent from the computer:
  if (Serial.available()) {
    // read the most recent byte (which will be from 0 to 255):
    brightness = Serial.read();
    // set the brightness of the LED:
    analogWrite(ledPin, brightness);
  }
}


프로세싱 소스

(원 소스는 http://www.learningprocessing.com 에서 있으며, 그림 예제에서 일부를 수정해서 만들었음)

 import processing.serial.*;
 Serial port;


boolean button = false;

int x = 150;
int y = 150;
int w = 100;
int h = 75;

void setup() {
  size(400,400); 
  
  // 디버그 
 println("Available serial ports:");
 println(Serial.list());
 // 내 pc 에는 Serial 내부 구조의 1번에 com3로 연결된 아두이노가 있다. 
  port = new Serial(this, Serial.list()[1], 9600);  
}

void draw() {
  if (button) {
    background(255);
    stroke(0);
  } else {
    background(0);
    stroke(255);
  }
  
  fill(175);
  rect(x,y,w,h);
}


void mousePressed() {
  if (mouseX > x && mouseX < x+w && mouseY > y && mouseY < y+h) {
    button = !button;
  }  

// 버튼의 값이 true이면 led을 끼고, false이면 led를 끈다.
  if (button == true) {
    // turn on led
     port.write(255);
  } else {
    // turn off led
    port.write(0);
  }
}


여기서 약간 나는 머리를 썼다.
LED를 재미있게 만들었다. 원래 선물받은 제품인대, 꼬마 전구가 문제가 생겨서 못쓰고 있었다.
(사실 나는 "손에 잡히는 아두이노" 책에서 영감받아 나만의 재미있는 것을 만들려던 참이었다.)


꼬마 전구 대신 간단한 LED를 이용했다. 그리고 간단하게 테이프를 붙였다.
(.  원리는 무척 간단한데, 이런 제품을 구하기 가 어렵다는 게 있다. )

그리고 아두이노에 연결했다

처음에는 검은 바탕으로 있다. 꺼져있다. 


가운데 버튼을 눌러주면 환하게 켜진다. 


그렇게 복잡하지는 않지만, pc에서 아두이노를 다룬다는 것은 재미있다. 복잡한 프레임워크나 어려운 코드를 쓰지 않아도 내가 원하는 것을 할 수 있다니 매력이 있다. 

흐흐.. 이제 점점 장난감으로 갈 것 같다. 


Posted by '김용환'
,

아두이노를 다룰 때, 아두이노 자체에서만 동작하는 "Arduino software(아두이노 소프트웨어)"만 써왔다.
pc에서 아두이노 기기를 다룰려면, 드라이버를 이용해서 코딩해야 한다. 
찾아보니 Visial Studio에서 연동하는 게 있기는 한데..
간단하게 동작되는 것만 하고 싶었는데. Processing(프로세싱) 이라는 툴 및 언어를 이용하면 될 것 같다. 
(프로세싱 언어가 자바랑 비슷한 문법을 하고 있다. 자바 개발자에게는 어쩌면 딱이다.)

프로세싱은 UI 및 아두이노와 serial 통신을 책임져준다. 


"손에 잡히는 아두이노" 책에서 간단히 소개할 때는 그런가 보다 했는데..
조금씩 이해하면서 접근해야지. 


설치 
http://processing.org/download/ 에 접속해서 1.5.1 를 다운받는다. 


UI Loo& Feel 은 꼭 아두이노 소프트웨어처럼 생겼다. 하지만 거의 자바와 비슷한 문법을 취하고 있다. (사실 내부는 jvm을 사용하고 있다.)


실제 돌아가는지 테스트해본다. 

http://arduino.cc/en/Tutorial/Dimmer


다음과 같이 설정한다. 


아두이노 소프트웨어에 다음의 코드를 넣는다.  


const int ledPin = 9;      // the pin that the LED is attached to

void setup()
{
  // initialize the serial communication:
  Serial.begin(9600);
  // initialize the ledPin as an output:
  pinMode(ledPin, OUTPUT);
}

void loop() {
  byte brightness;

  // check if data has been sent from the computer:
  if (Serial.available()) {
    // read the most recent byte (which will be from 0 to 255):
    brightness = Serial.read();
    // set the brightness of the LED:
    analogWrite(ledPin, brightness);
  }
}


프로세싱 코드


SERIAL 포트 중에 연결되어 있는 녀석으로 수정해야 한다. 
내 pc에는 1번 값에 com3로 arduino로 연결되어 있어서 1로 수정했다.  


 import processing.serial.*;
 Serial port;
 
 void setup() {
 size(256, 150);
 
 println("Available serial ports:");
 println(Serial.list());
 
 // Uses the first port in this list (number 0).  Change this to
 // select the port corresponding to your Arduino board.  The last
 // parameter (e.g. 9600) is the speed of the communication.  It
 // has to correspond to the value passed to Serial.begin() in your
 // Arduino sketch.
 port = new Serial(this, Serial.list()[1], 9600);  
 
 }
 
 void draw() {
 // draw a gradient from black to white
   for (int i = 0; i < 256; i++) {
   stroke(i);
   line(i, 0, i, 150);
   }
 
 // write the current X-position of the mouse to the serial port as
 // a single byte
 port.write(mouseX);
 }


그리고, processing 코드를 돌려보면 검은색 부분으로 마우스를 이동하면 LED가 꺼지고,
밝은 색 부분으로 마우스를 이동하면 LED가 켜진다. 


좋은 Reference 

http://www.arduino.cc/en/Tutorial/HomePage
http://processing.org/learning/
http://www.learningprocessing.com
http://www.cre8ive.kr/blog/2009/02/27/arduino-processing-%EC%97%B0%EB%8F%99/
책 - "손에 잡히는 아두이노"


Posted by '김용환'
,