스칼라의 콜렉션은 Immutable, mutable 말고

병렬 콜렉션(Par...)와 순차 콜렉션(일반적으로 사용하는 콜렉션)과 상위 클래스(Gen...)으로 나눠진다. 

참고로 Gen은 general의 약자이다. 


출처: http://docs.scala-lang.org/overviews/parallel-collections/architecture.html


아래의 예를 보면 기본 콜렉션인 Array에 par 함수를 호출하면서 병렬 콜렉션인 ParArray를 인스턴스로 얻는다.

val parArray = (1 to 100).toArray.par

parArray: scala.collection.parallel.mutable.ParArray[Int] = ParArray(1, 2, 3, 4, 5, 6, 7, 8, 9, 10, 11, 12, 13, 14, 15, 16, 17, 18, 19, 20, 21, 22, 23, 24, 25, 26, 27, 28, 29, 30, 31, 32, 33, 34, 35, 36, 37, 38, 39, 40, 41, 42, 43, 44, 45, 46, 47, 48, 49, 50, 51, 52, 53, 54, 55, 56, 57, 58, 59, 60, 61, 62, 63, 64, 65, 66, 67, 68, 69, 70, 71, 72, 73, 74, 75, 76, 77, 78, 79, 80, 81, 82, 83, 84, 85, 86, 87, 88, 89, 90, 91, 92, 93, 94, 95, 96, 97, 98, 99, 100)


http://docs.scala-lang.org/overviews/parallel-collections/overview.html 에 병렬 콜렉션에 대한 예제가 있는데 심플해서 도움이 된다.


map 예제

val lastNames = List("Smith","Jones","Frankenstein","Bach","Jackson","Rodin").par
lastNames.map(_.toUpperCase)

lastNames: scala.collection.parallel.immutable.ParSeq[String] = ParVector(Smith, Jones, Frankenstein, Bach, Jackson, Rodin)

res7: scala.collection.parallel.immutable.ParSeq[String] = ParVector(SMITH, JONES, FRANKENSTEIN, BACH, JACKSON, RODIN)


fold 예제

val parArray = (1 to 100).toArray.par
parArray.fold(0)(_ + _)

parArray: scala.collection.parallel.mutable.ParArray[Int] = ParArray(1, 2, 3, 4, 5, 6, 7, 8, 9, 10, 11, 12, 13, 14, 15, 16, 17, 18, 19, 20, 21, 22, 23, 24, 25, 26, 27, 28, 29, 30, 31, 32, 33, 34, 35, 36, 37, 38, 39, 40, 41, 42, 43, 44, 45, 46, 47, 48, 49, 50, 51, 52, 53, 54, 55, 56, 57, 58, 59, 60, 61, 62, 63, 64, 65, 66, 67, 68, 69, 70, 71, 72, 73, 74, 75, 76, 77, 78, 79, 80, 81, 82, 83, 84, 85, 86, 87, 88, 89, 90, 91, 92, 93, 94, 95, 96, 97, 98, 99, 100)

res5: Int = 5050


filter 예제

val lastNames = List("Smith","Jones","Frankenstein","Bach","Jackson","Rodin").par
lastNames.filter(_.head >= 'f')

lastNames: scala.collection.parallel.immutable.ParSeq[String] = ParVector(Smith, Jones, Frankenstein, Bach, Jackson, Rodin)

res7: scala.collection.parallel.immutable.ParSeq[String] = ParVector(Smith, Jones, Jackson, Rodin)


성능을 높이는 splitter와 combiner(builder)에 대한 정보는 coursera 강의를 참조할 수 있다.
https://github.com/rohitvg/scala-parallel-programming-3/wiki/Splitters-and-Combiners


아래 자료를 보면 병렬 콜렉션의 장점(속도)를 알 수 있고 병렬 콜렉션의 이해도, custom splitter/builder 내용이 담겨 있다.


Scala Parallel Collections from Aleksandar Prokopec


Posted by '김용환'
,


스칼라의 콜렉션의 fold와 reduce와 scan 함수는 시간이 조금만 지나면 혼동되기 쉬운 것 같다. 

accumulate 기능이 있어서 서로 비슷하게 생겼다..


List(1,2,3).foldLeft(100)((s,x) => s - x)

((100 - 1) - 2) -3 = 94 


List(1,2,3).foldRight(100)((s,x) => s - x)

1 - (2 - (3 - 100)) = -98


List(1,2,3).reduceLeft((s,x) => s - x)

(1 - 2) - 3 = -4


List(1,2,3).reduceRight((s,x) => s - x)

1 - ( 2 - 3) = 2


List(1,2,3).scanLeft(100)((s, x) => s - x)

List(100, 100-1, (100-1)-2, (100-1)-2-3) 

=> List(100, 99, 97, 94)


List(1,2,3).scanRight(100)((s, x) => s - x)

// index3 : 초기값 100

// index2 : 3 - 100 = -97

// index1 : 2 - -97 = 99

// index0 : 1 - 99 = -98

List(-98, 99, -97, 100)

Posted by '김용환'
,

..

'Cloud' 카테고리의 다른 글

[펌] 한국 오픈 스택 2017 자료 올라옴  (0) 2017.08.16
[펌] fluentd 사용 사례  (0) 2017.08.15
처음 본 오픈스택 Swift  (0) 2017.07.24
처음 본 오픈 스택 Glance  (0) 2017.07.21
처음 본 오픈 스택의 Nova  (0) 2017.07.20
Posted by '김용환'
,


elasticsearch 5.0에서 사라진 api를 확인하고 싶다면.. 아래 페이지에 접근한다.


https://www.elastic.co/guide/en/elasticsearch/reference/5.0/breaking_50_search_changes.html


변경 사항과 삭제된 api를 볼 수 있다.


예를 들어, 삭제된 api는 다음과 같다.


Deprecated queries removededit

The following deprecated queries have been removed:

filtered
Use bool query instead, which supports filter clauses too.
and
Use must clauses in a bool query instead.
or
Use should clauses in a bool query instead.
missing
Use a negated exists query instead. (Also removed _missing_ from the query_string query)
limit
Use the terminate_after parameter instead.
fquery
Is obsolete after filters and queries have been merged.
query
Is obsolete after filters and queries have been merged.
query_binary
Was undocumented and has been removed.
filter_binary
Was undocumented and has been removed.


그리고, filtered query의 경우는 아래의 url에 접근할 수 있지만. 자세히 살펴보면 deleted page로 되어 있다..(즉 삭제된 api를 의미한다)


https://www.elastic.co/guide/en/elasticsearch/reference/5.5/query-dsl-filtered-query.html

Posted by '김용환'
,


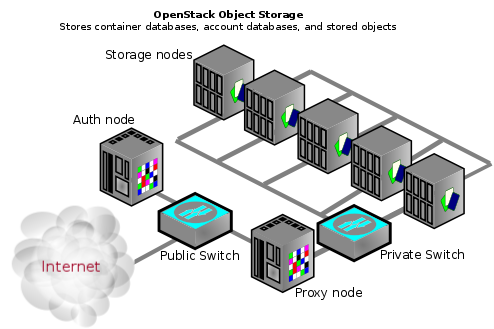
오픈 스택의 swift(https://github.com/openstack/swift)은 object stroage이다. 


동영상, 이미지, 디스크 이미지등을 저장할 수 있는 저장공간이다. 


HTTP/HTTPS REST api를 이용해 데이터를 저장할 수 있다. 


출처 : https://docs.openstack.org/security-guide/object-storage.html


 RAID가 없기 때문에 가격이 싸고 S3 API를 지원하며 스케일링을 쉽게 진행할 수 있다. 중앙 DB가 없고 TTL을 지원하는 많은 기능을 가지고 있다. https://docs.openstack.org/swift/latest/admin/objectstorage-features.html을 살펴보면 더 자세한 내용을 확인할 수 있다. 


FeaturesBenefits
Leverages commodity hardwareNo lock-in, lower price/GB.
HDD/node failure agnosticSelf-healing, reliable, data redundancy protects from failures.
Unlimited storageLarge and flat namespace, highly scalable read/write access, able to serve content directly from storage system.
Multi-dimensional scalabilityScale-out architecture: Scale vertically and horizontally-distributed storage. Backs up and archives large amounts of data with linear performance.
Account/container/object structureNo nesting, not a traditional file system: Optimized for scale, it scales to multiple petabytes and billions of objects.
Built-in replication 3✕ + data redundancy (compared with 2✕ on RAID)A configurable number of accounts, containers and object copies for high availability.
Easily add capacity (unlike RAID resize)Elastic data scaling with ease.
No central databaseHigher performance, no bottlenecks.
RAID not requiredHandle many small, random reads and writes efficiently.
Built-in management utilitiesAccount management: Create, add, verify, and delete users; Container management: Upload, download, and verify; Monitoring: Capacity, host, network, log trawling, and cluster health.
Drive auditingDetect drive failures preempting data corruption.
Expiring objectsUsers can set an expiration time or a TTL on an object to control access.
Direct object accessEnable direct browser access to content, such as for a control panel.
Realtime visibility into client requestsKnow what users are requesting.
Supports S3 APIUtilize tools that were designed for the popular S3 API.
Restrict containers per accountLimit access to control usage by user.


이해에 도움되는 swift 슬라이드 자료이다 .


Openstack Swift overview from 어형 이


Posted by '김용환'
,


오픈 스택의 Glance(https://docs.openstack.org/glance/latest/contributor/architecture.html)를 사용하면 운영체제 템플릿 이미지를 등록할 수 있다. 이미지 등록, 삭제, 변경등을 api를 통해 진행할 수 있다. 


Glance API 서버를 통해 controller를 지나 Registry Layer에서 Glance DB를 사용하는 구조이다. 


출처 : https://docs.openstack.org/glance/latest/contributor/architecture.html


이미지 포맷은 https://docs.openstack.org/image-guide/image-formats.html에서 볼 수 있듯이 다양하다.


많은 이미지와 컨테이너 타입을 지원하고 있다. 표로 설명하는 문서(https://platform9.com/support/supported-image-types-and-file-formats/)는 다음과 같다.


Format TypeDescriptionSupported By Platform9? Our Comments
raw/imgAn unstructured disk image format; if you have a file without an extension it is possibly a raw format.Yes (given .raw, .img, .dat, .bin extensions)Common extensions .raw, .img, .dat, .bin
qcow2Supported by the QEMU emulator that can expand dynamically and supports Copy-on-WriteYesMost common file format used with Linux/KVM
vmdkCommon disk format supported by many common virtual machine monitorsYes (for VMware vSphere hypervisor)VMDK format is commonly associated with VMware
vdiSupported by VirtualBox virtual machine monitor and the QEMU emulatorNot recommended(Will be recognized, but may or may not work depending on driver availability)VirtualBox image files in practice may or may not work with Linux/KVM hypervisor. You might run into compatibility issues due to missing required virtualization drivers)
isoAn archive format for the data contents of an optical disc, such as CD-ROMYes
akiAn Amazon kernel imageNoAmazon image types are not popularly used with Linux/KVM
ariAn Amazon ramdisk imageNoAmazon image types are not popularly used with Linux/KVM
amiAn Amazon machine imageNoAmazon image types are not popularly used with Linux/KVM
vhdThe VHD disk format, a common disk format used by virtual machine monitors from VMware, Xen, Microsoft, VirtualBox, and others
No
 Not a popular image format


우분투 OS이미지를 생성하는 방법(아마도 구 버전이겠지만.) 대충 이렇다.

(출처 : http://lollyrock.com/articles/glance-image-create/)


glance image-create --name 'Ubuntu 14.04 LTS' \ --container-format bare \ --disk-format qcow2 \ --is-public true \ --copy-from http://uec-images.ubuntu.com/releases/14.04/release/ubuntu-14.04-server-cloudimg-amd64-disk1.img +------------------+--------------------------------------+ | Property | Value | +------------------+--------------------------------------+ | checksum | None | | container_format | bare | | created_at | 2014-04-02T13:16:20 | | deleted | False | | deleted_at | None | | disk_format | qcow2 | | id | aa5ab6de-e461-4330-136e-fb149802bdc0 | | is_public | True | | min_disk | 0 | | min_ram | 0 | | name | Ubuntu 14.04 LTS Beta 1 | | owner | 9ab2f1a7ca521eee9c8de5a14567d377 | | protected | False | | size | 261095936 | | status | queued | | updated_at | 2014-04-02T13:16:20 | +------------------+--------------------------------------+


glance 슬라이드 자료.


OpenStack Glance from Deepti Ramakrishna


Posted by '김용환'
,


scalameter(https://scalameter.github.io/)는 마이크로 벤치마킹 기능을 가진 툴이다.  JVM warm up 또는 GC 의 영향을 받아 속도 체크가 좀 틀릴 수 있다. 이를 좀 막고 측정할 수 있는 라이브러리를 알게 되었다.


slideshare에 관련 자료가 잘 설명되어 있다. 


ScalaMeter 2014 from Aleksandar Prokopec


sbt 설정에 다음 라이브러리를 추가한다.

"com.storm-enroute" %% "scalameter-core" % "0.7"

(!!! 0.6에는 라이브러리가 많이 없으니 최신 버전을 활용하는 것이 좋다)


sbt console을 사용해서 scalameter를 임포트한다.


scala> import org.scalameter._


jvm warm up 관련해서 메모리 초기화로 인해서 결과 값이 달라지지 않게 하니 적당히 잘 나온다.


scala> withWarmer(new Warmer.Default) measure { (0 until 100000).toArray }

res28: Double = 0.688856


scala> withWarmer(new Warmer.Default) measure { (0 until 100000).toArray }

res29: Double = 0.689882


scala> withWarmer(new Warmer.Default) measure { (0 until 100000).toArray }

res30: Double = 0.684432


scala> withWarmer(new Warmer.Default) measure { (0 until 100000).toArray }

res31: Double = 0.681093


scala> withWarmer(new Warmer.Default) measure { (0 until 100000).toArray }

res32: Double = 0.678273


scala> withWarmer(new Warmer.Default) measure { (0 until 100000).toArray }

res33: Double = 0.671677


scala> withWarmer(new Warmer.Default) measure { (0 until 100000).toArray }

res34: Double = 0.695395


메모리 정보도 확인할 수 있다.


scala> withMeasurer(new Measurer.MemoryFootprint) measure { (0 until 100000).toArray }

res9: Double = 399.656


scala> withMeasurer(new Measurer.MemoryFootprint) measure { (0 until 100000).toArray }

res10: Double = 400.016


scala> withMeasurer(new Measurer.MemoryFootprint) measure { (0 until 100000).toArray }

res11: Double = 399.656


scala> withMeasurer(new Measurer.MemoryFootprint) measure { (0 until 100000).toArray }

res12: Double = 400.016


scala> withMeasurer(new Measurer.MemoryFootprint) measure { (0 until 100000).toArray }

res13: Double = 399.656


scala> withMeasurer(new Measurer.MemoryFootprint) measure { (0 until 100000).toArray }

res14: Double = 399.656


scala> withMeasurer(new Measurer.MemoryFootprint) measure { (0 until 100000).toArray }

res15: Double = 400.016


scala> withMeasurer(new Measurer.MemoryFootprint) measure { (0 until 100000).toArray }

res16: Double = 399.656


scala> withMeasurer(new Measurer.MemoryFootprint) measure { (0 until 100000).toArray }

res17: Double = 397.08


scala> withMeasurer(new Measurer.MemoryFootprint) measure { (0 until 100000).toArray }

res18: Double = 400.016


scala> withMeasurer(new Measurer.MemoryFootprint) measure { (0 until 100000).toArray }

res19: Double = 399.656


scala> withMeasurer(new Measurer.MemoryFootprint) measure { (0 until 100000).toArray }

res20: Double = 400.016


scala> withMeasurer(new Measurer.MemoryFootprint) measure { (0 until 100000).toArray }

res21: Double = 397.568


GC 정보는 다음과 같이 테스트할 수 있다. 


scala>  withMeasurer(new Measurer.GarbageCollectionCycles, Aggregator.median[Int]) measure { (0 until 9999000).toArray }

res5: org.scalameter.Quantity[Int] = 2 #


scala>  withMeasurer(new Measurer.GarbageCollectionCycles, Aggregator.median[Int]) measure { (0 until 9999000).toArray }

res6: org.scalameter.Quantity[Int] = 2 #


scala>  withMeasurer(new Measurer.GarbageCollectionCycles, Aggregator.median[Int]) measure { (0 until 9999000).toArray }

res7: org.scalameter.Quantity[Int] = 2 #


scala>  withMeasurer(new Measurer.GarbageCollectionCycles, Aggregator.median[Int]) measure { (0 until 9999000).toArray }

res8: org.scalameter.Quantity[Int] = 2 #


관련 소스는 다음과 같다.


https://github.com/scalameter/scalameter/blob/master/scalameter-core/src/main/scala/org/scalameter/Measurer.scala


Posted by '김용환'
,


스칼라 콘솔에서 테스트하고 싶은 예제 코드가 있을 때 실행 라인이 아닌 

전체 예제 코드를 실행하고 싶을 때 :paste를 사용하면 된다. 


스칼라 콘솔(REPL)을 실행한다.


scala> 


:paste를 입력하고 엔터를 입력한다.


scala> :paste

// Entering paste mode (ctrl-D to finish)


그리고 코드를 입력 한 후 Ctrl+D 키를 함께 누른다. 

그러면 결과가 실행된다.


scala> :paste

// Entering paste mode (ctrl-D to finish)


  def max(xs: List[Int]): Int = xs match {

    case List() => throw new java.util.NoSuchElementException

    case x :: Nil => x

    case _ => val t: Int = max(xs.tail); if (t > xs.head) t else xs.head

  }


  val m = max(List(3,2,1,100))

  print(m)


// Exiting paste mode, now interpreting.


m: Int = 100

Posted by '김용환'
,


오픈 스택의 Nova는 가상 머신 라이프 사이클 관리자로서, 아마존 EC2와 동일한 역할을 한다. https://github.com/openstack/nova

(초창기에는 Nova가 오픈스택의 전부였다고 한다....)


즉 서버 가상화를 수행할 수 있다. 


초기의 Nova는 오픈 스택의 핵심이었다고 한다. Nova가 서버, 네트워크, 볼륨을 모두 관리하다가 Nova 볼륨은 Cinder로 Nova 네트워크는 Neutron으로 프로젝트가 분리되었다. 


데이터독의 Nova 아키텍처는 간단하다. 


이미지 출처 : https://datadog-prod.imgix.net/img/blog/openstack-monitoring-nova/nova-high-level-3.png?fit=max


좀 더 좋은 이미지를 살펴봤다. 예전 오픈 스택에는 다음과 같은 아키텍처 그림이 있었다고 하나. 지금은 오픈 스택 싸이트에서는 보이지 않는다.


내부는 RabbitMQ를 사용하고 있다. 


이미지 출처 : http://cloudn1n3.blogspot.kr/2014/11/openstack-series-part-4-nova-compute.html


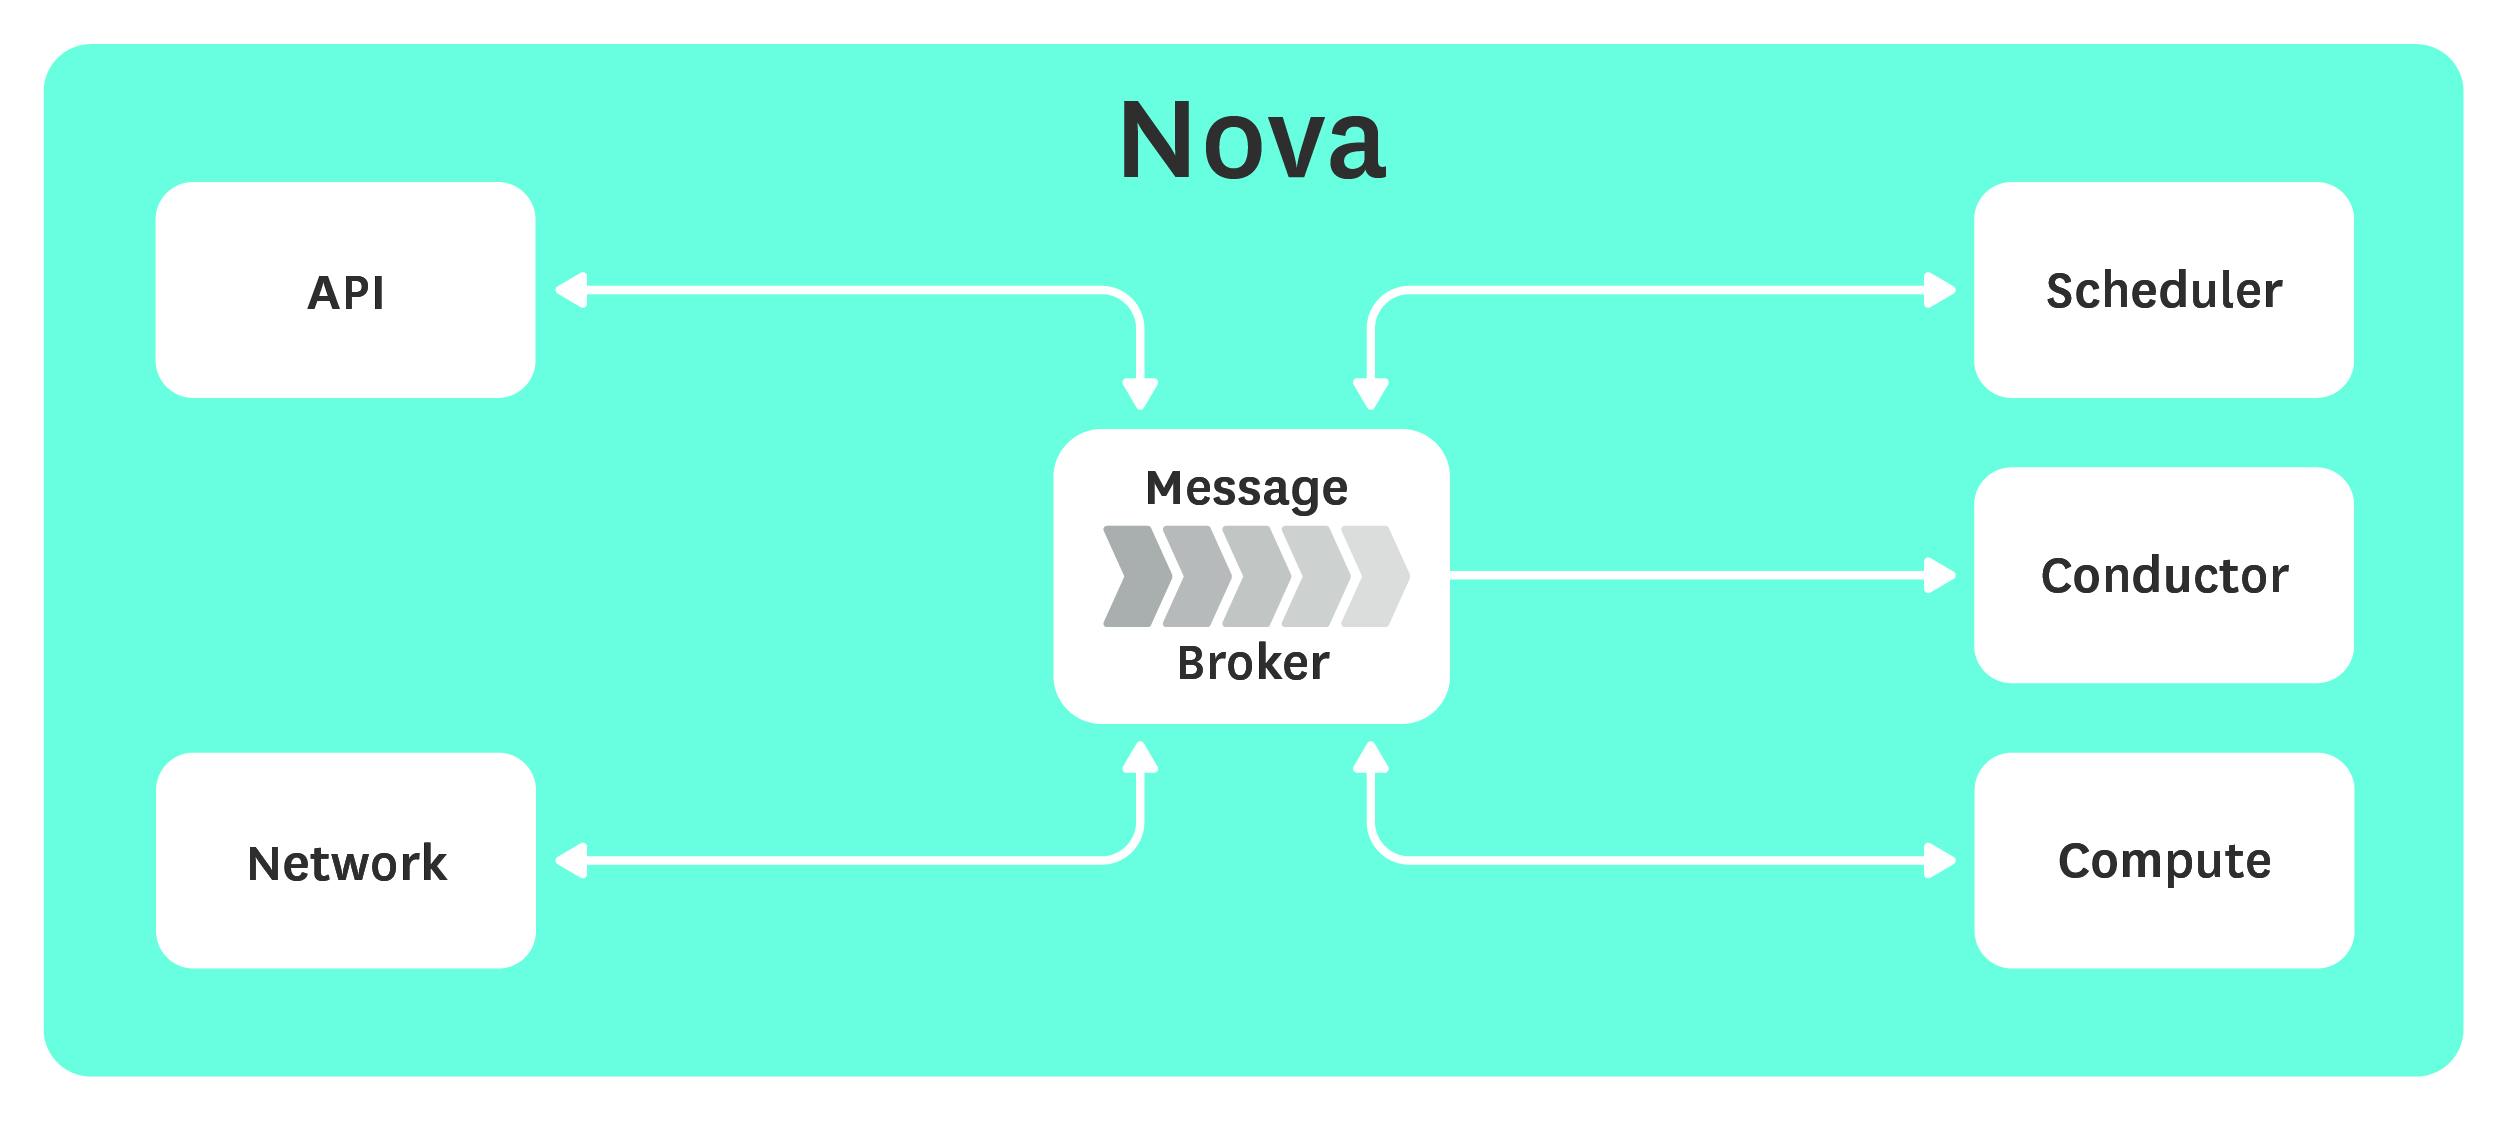
공식문서(openstack.org)의 아키텍처는 다음과 같다. 


  • DB: 데이터 저장용 
  • API: HTTP 요청을 받고 커맨드를 변환해 oslo.messaging 큐 또는 HTTP로 다른 컴포넌트와 통신한다.
  • Scheduler: 인스턴스를 실행한다.
  • Network: ip 포워딩, 브릿지, vlan을 관리한다.
  • Compute: 하이퍼바이저와 가상 머신과의 통신을 관리한다. 
  • Conductor: 코디네이션(빌드/리사이즈)가 필요하다라는 요청을 처리한다. 마치 데이터베이스 프록시처럼 동작한다.


Nova를 설명한 쉬운 자료.


Openstack Study Nova 1 from Jinho Shin


Nova에 대한 자세한 내용은 아래 슬라이드를 보니 도움이 된다. 

Nova와 AMQP와의 연동 방법, 인스턴스가 만들어질 때까지의 동작 순서를 설명한다.


Openstack Nova deep dive from Anand Nande


'Cloud' 카테고리의 다른 글

처음 본 오픈스택 Swift  (0) 2017.07.24
처음 본 오픈 스택 Glance  (0) 2017.07.21
[펌] 공개된 카카오 오픈 스택 관련 공개 및 강의 자료  (0) 2017.07.20
처음 본 오픈 스택의 Cinder  (0) 2017.07.18
처음 본 Kolla  (0) 2017.07.17
Posted by '김용환'
,


파이썬의 sorted 함수는 콜렉션(List, Tuple, 등) 및 배열을 정렬할 수 있다. 


정렬 키를 lambda를 사용해서 깔끔히 정렬되는 것을 보니 깔끔해 보인다. 


print("List")
lst = ['cc', 'aa', 'ba', 'md']
print(list)
print("origin-", lst)
print("sort-", sorted(lst))
print("sort(reverse)-", sorted(lst, reverse=True))
print("\n")

print("\n")
print("Tuple")
tup = [('cc', 3), ('aa', 2), ('ba', 5), ('md', 4)]
print("origin-", tup)
print("sort-", sorted(tup, key=lambda tup: tup[1]))
print("sort(reverse)-",sorted(tup, key=lambda tup: tup[1], reverse=True))
print("\n")

print("\n")
print("Class")
class Member:
def __init__(self, id):
self.id = id
def __repr__(self):
return repr(self.id)

members = [Member(1), Member(10), Member(5), Member(4)]
print("origin-", members)
print("sort-", sorted(members, key=lambda member: member.id))
print("sort(reverse)-", sorted(members, key=lambda member: member.id, reverse=True))


예제 결과는 다음과 같다. 


List

<class 'list'>

origin- ['cc', 'aa', 'ba', 'md']

sort- ['aa', 'ba', 'cc', 'md']

sort with reverse- ['md', 'cc', 'ba', 'aa']


Tuple

origin- [('cc', 3), ('aa', 2), ('ba', 5), ('md', 4)]

sort- [('aa', 2), ('cc', 3), ('md', 4), ('ba', 5)]

sort with reverse- [('ba', 5), ('md', 4), ('cc', 3), ('aa', 2)]


Class

origin- [1, 10, 5, 4]

sort- [1, 4, 5, 10]

sort(reverse)- [10, 5, 4, 1]

Process finished with exit code 0

Empty test suite.


'python' 카테고리의 다른 글

flask 환경 구성하기  (0) 2017.09.19
pyenv 설치 방법  (0) 2017.09.19
[python3] python3에서 자주 실수하는 부분  (0) 2017.07.18
[python3] dict()의 in의 의미  (0) 2017.07.11
[python3] 맥에서 spyder 설치/실행  (0) 2017.04.28
Posted by '김용환'
,