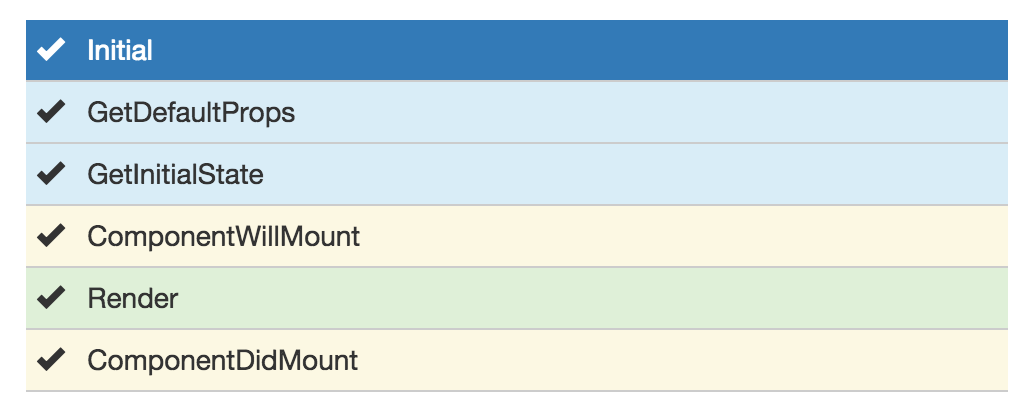
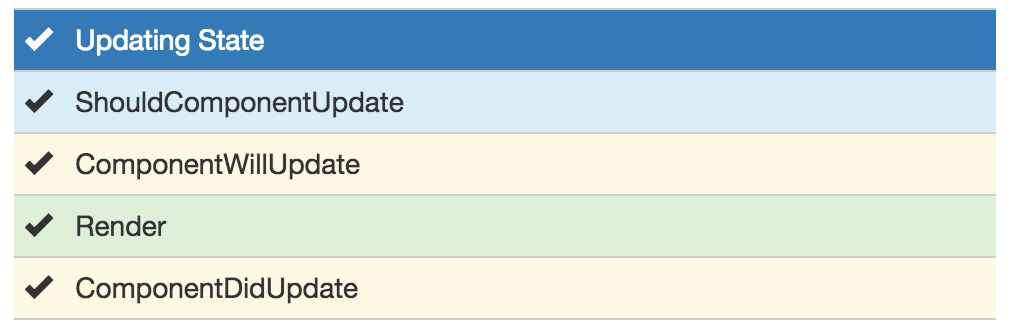
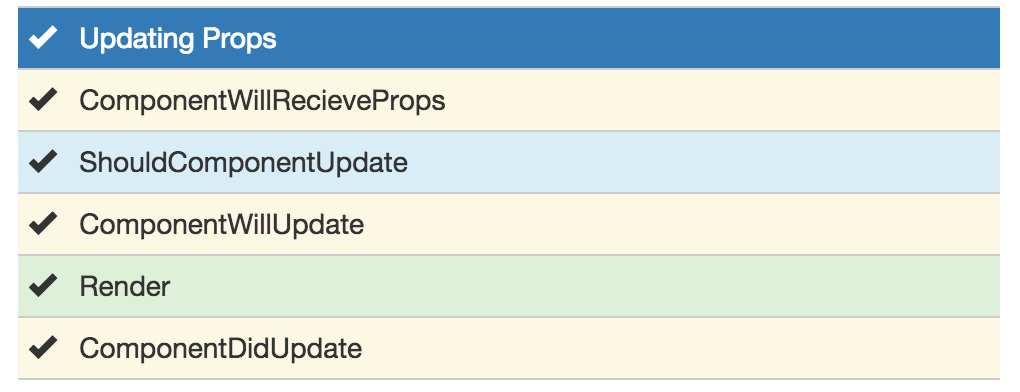
React, Redux 디버깅할 때 유용한 툴을 소개한다.


이것 없으면 진짜 힘들다..


1. 개발자 도구


크롬의 개발자 도구이다. 이번에 자세히 써보니. 크롬 개발자 도구에 대한 기본 지식이 없어서 쉽지 않았다.

아래 내용을 참고 한다. 


http://shiren.github.io/2016-03-23-%EC%9B%B9%EA%B0%9C%EB%B0%9C%EC%9E%90%EB%A5%BC-%EC%9C%84%ED%95%9C-%ED%81%AC%EB%A1%AC-%EA%B0%9C%EB%B0%9C%EC%9E%90-%EB%8F%84%EA%B5%AC/


2. Chrome React DevTools


설치

https://chrome.google.com/webstore/detail/react-developer-tools/fmkadmapgofadopljbjfkapdkoienihi


3. Chrom Redux DevTools


설치 

https://chrome.google.com/webstore/detail/redux-devtools/lmhkpmbekcpmknklioeibfkpmmfibljd?hl=ko


사용하려면 아래 createStore에 아래 정보를 추가해야 한다.

const store = createStore( reducer, /* preloadedState, */ + window.__REDUX_DEVTOOLS_EXTENSION__ && window.__REDUX_DEVTOOLS_EXTENSION__() );


Posted by '김용환'
,


React에서 컴포넌트의 생명 주기를 다룬 깃허브 글이 있어 소개한다.

http://busypeoples.github.io/post/react-component-lifecycle/


초기화를 하면 다음과 같은 순서대로 리액트 함수가 호출된다.


GetDefaultProp  =>  GetInitialState  => ComponentWillMount => Render => ComponentDidMound


state를 변경하면  다음과 같은 순서대로 리액트 함수가 호출된다.


props를 변경하면 다음과 같은 순서대로 리액트 함수가 호출된다.


unmount가 되면 다음 리액트 함수가 호출된다. 


개발해보니 react 컴포넌트가 로딩되기 전, 후에 작업은 componentWillUnmount, componentWillMount를 사용할 때가 가장 많이 사용되는 것 같다. 

Posted by '김용환'
,


React에서 부모 컴포넌트의 state를 자식 컴포넌트의 state로 이동시킬 수 있는 방법은 다음과 같다.


https://ourcodeworld.com/articles/read/409/how-to-update-parent-state-from-child-component-in-react


class Parent extends React.Component {
    constructor(props) {
        super(props)

        // Bind the this context to the handler function
        this.handler = this.handler.bind(this);

        // Set some state
        this.state = {
            messageShown: false
        };
    }

    // This method will be sent to the child component
    handler() {
        this.setState({
            messageShown: true
        });
    }

    // Render the child component and set the action property with the handler as value
    render() {
        return <Child action={this.handler} />
    }
}


class Child extends React.Component {
    render() {
        return (
            <div>
                {/* The button will execute the handler function set by the parent component */}
                <Button onClick={this.props.action} />
            </div>
        )
    }
}


일반 함수로 리턴할 수 있어서 좋다. 


https://www.quora.com/Why-doesnt-React-automatically-allow-child-components-to-call-setState-of-the-parent-component


  1. class ParentComponent extends React.Component {
  2. onClick() {
  3. const _childValue = this.state.childValue;
  4. this.setState({ childValue: _childValue + 1 });
  5. }
  6. render() {
  7. return (<ChildComponent value={this.state.childVvalue} onClick={this.onClick.bind(this)} />)
  8. }
  9. }
  10. class ChildComponent extends React.Component {
  11. render() {
  12. return (
  13. <span>
  14. <div>My value: {this.props.value} </div>
  15. <button onClick={this.props.onClick}>Increment</button>
  16. </span>
  17. )
  18. }
  19. }


Posted by '김용환'
,


react에서 props와 state를 마구 썼더니. 조금씩 보인다. 


비슷하긴 한데. 중요한 차이가 있다. 


전역 상수(immutable)와 같은 개념은 props를


일반 변수(mutable)과 같은 개념은 state를 사용한다. 


실제 해보니.. 


초기값은 props로 저장하고 defaultValue에 사용하고,


변수 값 (input, datetime 등의 value)를 얻기 위해 state를 사용하니 유연하다. 


자세한 내용은 아래를 참조한다. 


https://velopert.com/921


Posted by '김용환'
,


React datetime lib(https://github.com/YouCanBookMe/react-datetime) 를 사용하고 있다. 


react datetime은 내부적으로 momentjs를 사용하고 있다. 


ISO8601 데이터를 원하는 포맷(dateFormat, timeFormat)으로 맞춘다. 

<Datetime locale="ko" dateFormat="YYYY-MM-DD" timeFormat="HH:mm" 
            defaultValue={ this.props.toTime } onChange={this.changeToTime} 
            ref={(c) => this.state.toTime = c} /></td>


onChange 이벤트일 때는 내부적으로 정의한 이벤트가 아니라 momentjs 객체가 전달되는 구조이다. 


onChangefunctionempty functionCallback trigger when the date changes. The callback receives the selected moment

 object as only parameter, if the date in the input is valid. If the date in the input is not valid, the callback receives the value of the input (a string).


따라서 setState를 호출해 e.target.value 를 사용하면 value가 없다는 에러가 발생한다.


moment 객체를 이벤트로 보내기 때문이다.  


changeToTime(e) {
this.setState({
toTime: moment(e).format()
});
}


moment(e)로 감싸고, format()을 호출하면 변경된 시간 문자열을 얻을 수 있다.


Posted by '김용환'
,


React 16으로 컴포넌트 개발 중, input 필드를 잘 정의하고. 


<input type="text" placeholder="검색할 개수를 입력하세요." defaultValue={ this.props.number } onChange={this.changeNumber} className="form-control" ref={(c) => this.state.number = c} name="number" /></td>


event도 잘 정의했다. 

changeNumber(e) {
console.log(e)
this.setState({
number: e.target.value
});
}


Cannot read property 'setState' of undefined 라는 에러가 발생했다!!


다음과 같이 state와 event를 바인딩을 잘 했는지 잘 살펴본다. 


constructor(props) {

    super(props);


    this.state = {

        count : 1

    };


    this.changeNumber = this.changeNumber.bind(this);

}


아. 생성자에서 event 바인딩을 놓쳤다..


아래 코드를 추가하면 된다. 

this.changeNumber = this.changeNumber.bind(this);


Posted by '김용환'
,


react 16 개발시 date/time 관련 패키지는 아래 react-datetime lib(https://github.com/YouCanBookMe/react-datetime)가 가장 나은 것 같다.


https://github.com/YouCanBookMe/react-datetime은 모멘트(moment) 기반으로 되어 있다. 


사용 법은 다음과 같다.


<td><Datetime locale="ko" dateFormat="YYYY-MM-DD" timeFormat="HH:mm" defaultValue={ this.props.fromTime } /></td>


Posted by '김용환'
,


리액트 웹앱 제작 총론(learning react)의 14장 예시에 화면 리프레시를 안하는 기능이 있어서 정리한다. 


var destination = document.querySelector("#container");
var TodoItems = React.createClass({
render() {
var todoEntries = this.props.entries;
function createTasks(item) {
return <li key={item.key}>{item.text}</li>
}

console.log("aaa")
var listItems = todoEntries.map(createTasks);
return (
<ul className="theList">
{listItems}
</ul>
);
}
});
var TodoList = React.createClass({
getInitialState: function() {
return {
items: []
};
},
addItem(e) {
var itemArray = this.state.items;
itemArray.push(
{
text: this._inputElement.value,
key: Date.now()
}
);
this.setState({
items: itemArray
});

this._inputElement.value = ""
this._inputElement.focus
e.preventDefault();
},
render() {
return (
<div className="todoListMain">
<div className="header">
<form onSubmit={this.addItem}>
<input ref={(a) => this._inputElement = a}
placeholder="enter task">
</input>
<button type="submit">add</button>
</form>
</div>
<TodoItems entries={this.state.items}/>
</div>
);
}
});

ReactDOM.render(
<div>
<TodoList/>
</div>,
destination
);


html에서 form onSubmit을 호출할 때는 무조건 페이지가 로딩된다.


그러나, addItem() 아래 부분에 아래를 추가하면.. 클릭 이벤트를 실행하지만 웹 브라우져는 이동하지 말라는 뜻이다. 


e.preventDefault();


java script에서 이벤트 전파를 중단하는 4가지 방법을 설명한 내용은 다음 블로그에 있다.


http://programmingsummaries.tistory.com/313


- event.preventDefault()

- event.stopPropagation()

- eventstopImmediatePropagation()

- return false


Posted by '김용환'
,


자바스크립트 지식이 전무해서 리액 웹앱 제작 총론(learning react)를 공부하고 있다.


책의 내용이 조금 다르지만 원래는 블로그였다. 중간까지는 거의 같은데, 뒷부분부터는 조금씩 달라진다. 


https://www.kirupa.com/react/


12장 내용은 저자 블로그에 아예 없는데,  중국 블로거 싸이트에 소스가 있으니 참조할 수 있다. 


http://www.zcfy.cc/article/1558


실제 책 소스는 아래를 참조한다. 


https://github.com/kirupa/kirupa/tree/master/reactjs


Posted by '김용환'
,
react 공부에 도움되는 싸이트..


velopert 님의 좋은 강의(유투브 짱)


해보기
http://codepen.io


스타터 킷
https://github.com/davezuko/react-redux-starter-kit


리액트 앱 시작 킷

https://github.com/facebookincubator/create-react-app


Posted by '김용환'
,