http://developer.android.com/sdk/index.html 에 밑에 보면,
ndk 를 다운받을 수 있다.


mac, window(cygwin 이용), linux 버전있는데, linux로 설치해본다.


ndk7이 4.0을 포함한 최신 버전이지만, ubuntu10. 11에서 awk 관련해서 버그가 있다. 32비트에서만 이슈가 있음. 이 부분에 대한 해결방법은 여기에 있다.

나는 ndk 6b를 사용했지만, 위의 7도 동일하게 사용할 수 있다.


리눅스(ubuntu)에 android-ndk-r6b.tar.gz을 설치한다.
tar jxvf android-ndk-r6b.tar.gz

설치는 완료했다.

이제 코드쪽을 본다.
이클립스에서 클래스 하나를 생성하고, jni 함수를 하나를 만들고, 동적 library를 읽도록 한다.

package com.google;

import android.app.Activity;
import android.os.Bundle;
import android.widget.TextView;

public class HelloJni extends Activity {
    /** Called when the activity is first created. */
    @Override
    public void onCreate(Bundle savedInstanceState) {
        super.onCreate(savedInstanceState);
  TextView tv = new TextView(this);
  tv.setText(stringFromJNI());
  setContentView(tv);
    }
    public native String stringFromJNI();
 static {
  System.loadLibrary("hello-jni");   
 }

}


이클립스 workspace의 프로젝트에서 컴파일된 디렉토리로 들어가서
class파일을 통해서 header 파일을 만든다.

프로젝트이름\bin> javah -classpath . com.google.JniHello

그러면, header 파일이 생성된 것을 확인할 수 있다.

> dir
com_google_JniHello.h

이 파일을 이용해서 c 소스를 만든다.

#include <string.h>
#include <jni.h>


jstring
Java_com_google_HelloJni_stringFromJNI( JNIEnv* env,
                                                  jobject thiz )
{
    return (*env)->NewStringUTF(env, "Hello from JNI !");
}


이 파일을 linux에 설치한 ndk에 특정 위치에 둔다.

설치디렉토리/jni-test/knight/jni 폴더에 둔다.
그리고, make 파일인 Android.mk도 같이 집어 넣는다.

Android.mk 파일은 다음과 같다.

# Copyright (C) 2009 The Android Open Source Project
#
# Licensed under the Apache License, Version 2.0 (the "License");
# you may not use this file except in compliance with the License.
# You may obtain a copy of the License at
#
#      http://www.apache.org/licenses/LICENSE-2.0
#
# Unless required by applicable law or agreed to in writing, software
# distributed under the License is distributed on an "AS IS" BASIS,
# WITHOUT WARRANTIES OR CONDITIONS OF ANY KIND, either express or implied.
# See the License for the specific language governing permissions and
# limitations under the License.
#
LOCAL_PATH := $(call my-dir)

include $(CLEAR_VARS)

LOCAL_MODULE    := hello-jni
LOCAL_SRC_FILES := hello-jni.c

include $(BUILD_SHARED_LIBRARY)


설치디렉토리/jni-test/knight/ 디렉토리에서 빌드한다.

설치디렉토리/jni-test/knight # ../../ndk-build

컴파일이 잘되면 이렇게 so 파일이 나온다.
설치디렉토리/jni-test/knight/libs/armeabi/libhello-jni.so 파일이 생성된다.


so파일을 이클립스단으로 복사한다.
그 전에 먼저 jni 파일과 mk 파일을 복사한다.

eclipse 프로젝트의 jni 폴더를 생성하고, jni와 mk 파일을 복사한다.
그리고, so 파일을 libs에 복사한다.
디렉토리는 이렇게 나와야 한다.


이 파일에 대해서 에뮬에서 run하면 다음과 같은 결과가 나온다.


그리고, 보드에다가도 테스트해봤다.
ok 잘돈다.


소스는 아래와 같다.


ndk 를 보면, sample 디렉토리 밑에 많은 샘플(open gl 외 다양한 예제) 들이 있다.
참조해서 만들어보면 좋다.

san-angles 라는 샘플은 움직이는 예제를 보여준다. 터치해주면 잠깐 멈추고 그러니. 테스트하기에 재미있는 예제이다.


* 레퍼런스
 http://developer.android.com/sdk/ndk/index.html 

Posted by '김용환'
,

혼자 잡담) java-jni-cpp 가지고 300만원짜리 알바까지 했는데..
왠걸 다시 하니 기억이 안난다. 오홋 새록새록해~ 그래도 어떻게 하나 열심히 공부해야지~^^


정리하는 내용
- 리눅스에서 java->c 호출
- 리눅스에서 c->java 호출


그래픽이나 c/c++로 만들어진 라이브러리들을 바로 사용할 수 있도록 하는 프레임웤이다.

HelloJNI 테스트 해본다.

class HelloJNI {
 native void printHello();
 native void printString(String str);
 
 static {
  System.load("/work/JniTest/hellojni.so");
 }
 public static void main(String[] args) {
  HelloJNI myJNI = new HelloJNI();
  myJNI.printHello();
  myJNI.printString("Hello in C");
 }
}


삼바를 이용해서 리눅스 /work/JniTest 디렉토리를 생성하고,  HelloJNI.java 복사한다.

컴파일하고, 그  class 파일을 이용해서 header 파일을 생성하도록 한다.
javac HelloJNI.java
javah HelloJNI


HelloJNI.h 파일이 생성

/* DO NOT EDIT THIS FILE - it is machine generated */
#include <jni.h>
/* Header for class HelloJNI */

#ifndef _Included_HelloJNI
#define _Included_HelloJNI
#ifdef __cplusplus
extern "C" {
#endif
/*
 * Class:     HelloJNI
 * Method:    printHello
 * Signature: ()V
 */
JNIEXPORT void JNICALL Java_HelloJNI_printHello
  (JNIEnv *, jobject);

/*
 * Class:     HelloJNI
 * Method:    printString
 * Signature: (Ljava/lang/String;)V
 */
JNIEXPORT void JNICALL Java_HelloJNI_printString
  (JNIEnv *, jobject, jstring);

#ifdef __cplusplus
}
#endif
#endif


HelloJNI.c 소스를 생성

#include "HelloJNI.h"

JNIEXPORT void JNICALL Java_HelloJNI_printHello(JNIEnv *env, jobject obj) {
 printf("Hello World !!! jni\n");
}


JNIEXPORT void JNICALL Java_HelloJNI_printString(JNIEnv *env, jobject obj, jstring string) {
  const char *str = (*env)->GetStringUTFChars(env,string,0);
  printf("%s\n", str);
  return;
}


컴파일을 하여 so 파일이 만들어지도록 한다.

# gcc -c -I$JAVA_HOME/include -I$JAVA_HOME/include/linux HelloJNI.c
# gcc -shared -o HelloJNI.so HelloJNI.o
# ls -al HelloJNI.so
HelloJNI.so

 정상적으로 동작된다.

# java HelloJNI
Hello World !!!
Hello in C!!!


이런식으로 표현한 다양한 방식을 샘플로 적어본다.

java 코드

class JniFuncMain {
..
public static native JniTest createJniObject();
..
}


class JniTest
{
 private int intField;
 
 public JniTest(int num)
 {
  intField = num;
 }
 
 public int callByNative(int num)
 {
  return num;
 }
 
 public void callTest()
 {
  System.out.println("intField=" + intField);
 }
}


 cpp 코드


#include <jni.h>
#ifdef __cplusplus
extern "C" {
#endif
/*
 * Class:     JniFuncMain
 * Method:    createJniObject
 * Signature: ()LJniTest;
 */
JNIEXPORT jobject JNICALL Java_JniFuncMain_createJniObject
  (JNIEnv *env, jclass clazz)
{
 jclass targetClass;
 jmethodID mid;
 jobject newObject;
 jstring helloStr;
 jfieldID fid;
 jint staticIntField;
 jint result;
 
 // Get the Class staticIntField Value
 fid = env->GetStaticFieldID(clazz, "staticIntField", "I");
 staticIntField = env->GetStaticIntField(clazz, fid);
 printf("[CPP] Get JniFuncMain_Class_staticIntField!!\n");
 printf("[CPP] JniFuncMain_Class_staticIntField = %d\n", staticIntField);
 
 // Find the Class to create object
 targetClass = env->FindClass("JniTest");
 
 // Find the Constructor
 mid = env->GetMethodID(targetClass, "<init>", "(I)V");
 
 // Create a JniTest Object
 printf("[CPP] JniTest_Object Create!!\n");
 newObject = env->NewObject(targetClass, mid, 100);
 
 // Call the Method of Object
 mid = env->GetMethodID(targetClass, "callByNative", "(I)I");
 result = env->CallIntMethod(newObject, mid, 200);
 
 // Set the intField_field of JniObject
 fid = env->GetFieldID(targetClass, "intField", "I");
 env->SetIntField(newObject, fid, result);
 
 // return created Object
 return newObject;
}
#ifdef __cplusplus
}
#endif


# g++ -I/$JAVA_HOME/include -I/$JAVA_HOME/include/linux -c jnifunc.cpp
# g++ -shared -o jnifunc.so jnifunc.o
# java 메인클래스실행


이외에 c에서 java로도 호출이 가능하게 할 수 있다.


#include <jni.h>

int main()
{
 JNIEnv *env;
 JavaVM *vm;
 JavaVMInitArgs vm_args;
 JavaVMOption options[1];
 jint res;
 jclass cls;
 jmethodID mid;
 jstring jstr;
 jclass stringClass;
 jobjectArray args;
 
 // 1.JVM에 넘겨줄 아규먼트 셋팅 
 options[0].optionString = "-Djava.class.path=.";
 vm_args.version = 0x00010002;
 vm_args.options = options;
 vm_args.nOptions = 1;
 vm_args.ignoreUnrecognized = JNI_TRUE;
 
 //2.JVM 생성
 res = JNI_CreateJavaVM(&vm, (void**)&env, &vm_args);
 
 //3. 클래스 검색 과 로딩
 cls = (*env)->FindClass(env, "InvocationApiTest");
 
 //4. main 메소드 얻어오기 
 mid = (*env)->GetStaticMethodID(env, cls, "main", "([Ljava/lang/String;)V");
 
 //5.메인메소드의 실제 파라미터값을 지정한다. 
 jstr = (*env)->NewStringUTF(env, "Hello Test from Native!!!");
 stringClass = (*env)->FindClass(env, "java/lang/String");
 args = (*env)->NewObjectArray(env, 1, stringClass, jstr);
 
 //6.main 메소드를 호출한다.
 (*env)->CallStaticVoidMethod(env, cls, mid, args);
 
 //7.JVM를 내린다.
 (*vm)->DestroyJavaVM(vm);
}


클래스 파일

public class InvocationApiTest
{
 public static void main(String[] args)
 {
  System.out.println(args[0]);
 }
}


# gcc -I/$JAVA_HOME/include -I$JAVA_HOME/include/linux -c invocationApi.c

그다음은 jvm 관련 항목을 링크 옵션으로 줘야 jvm이 실행할 수 있다.
# gcc -L$JAVA_HOME/jre/lib/i386/client invocationApi.o -ljvm
(libjvm.so 라는 파일이 $JAVA_HOME/jre/lib/i386/client/libjvm.so 파일이 있어야 한다.)

dependent한 library 가 있는지를 확인한다.

# ldd a.out 

# export LD_LIBRRARY_PATH=$LD_LIBRARY_PATH:$JAVA_HOME/jre/lib/i386/client

# a.out
결과 출력


다음예는
jni onload 함수를 오버라이딩해서,
a라고 하는 함수를 b라는 함수로 호출되도록 바꿔치기 를 할 수 있는 예제이다.


// hellojnimap.cpp

#include <jni.h>
#include <stdio.h>

void printHelloNative(JNIEnv *env, jobject obj);
void printStringNative(JNIEnv *env, jobject obj, jstring string);

// JNI_ONload는 오버라이딩한 것이다.
JNIEXPORT jint JNICALL JNI_OnLoad(JavaVM *vm, void *reserved)
{
 JNIEnv *env = NULL;
 JNINativeMethod nm[2];
 jclass cls;
 jint result = -1;
 
 if(vm->GetEnv((void**)&env, JNI_VERSION_1_4) != JNI_OK) {
  printf("Error");
  return JNI_ERR;
 }
 
 cls = env->FindClass("HelloJNI");
 
 nm[0].name = (char*)"printHello";
 nm[0].signature = (char*)"()V";
 nm[0].fnPtr = (void *)printHelloNative;
 
 nm[1].name = (char*)"printString";
 nm[1].signature = (char*)"(Ljava/lang/String;)V";
 nm[1].fnPtr = (void *)printStringNative;
 
 env->RegisterNatives(cls, nm, 2);
 
 return JNI_VERSION_1_4;
}

void printHelloNative(JNIEnv *env, jobject obj)
{
 printf("Hello World in C++!!\n");
 return;
}

void printStringNative(JNIEnv *env, jobject obj, jstring string)
{
 //const char *str = (*env)->GetStringUTFChars(env, string, 0);
 const char *str = env->GetStringUTFChars(string, 0);
 printf("%s\n", str);
 return;
}

#if 0
JNIEXPORT void JNICALL Java_HelloJNI_printHello
  (JNIEnv *env, jobject obj)
{
 printf("Hello World in C!!\n");
 return;
}

JNIEXPORT void JNICALL Java_HelloJNI_printString
  (JNIEnv *env, jobject obj, jstring string)
{
 const char *str = (*env)->GetStringUTFChars(env, string, 0);
 printf("%s\n", str);
 return;
}
#endif


//HelloJNI.java

class HelloJNI
{
 native void printHello();
 native void printString(String str);
 
 static {
  System.load("/work/JniTest/hellojnimap.so");
 }
 
 public static void main(String[] args) {
  HelloJNI myJNI = new HelloJNI();
  
  myJNI.printHello();
  myJNI.printString("Hello from c!!");
 }
 
}


# g++ -I/$JAVA_HOME/include -I$JAVA_HOME/include/linux -c hellojnimap.cpp
# g++ -shared -o hellojnimap.so hellojnimap.o
# java 메인클래스실행

Posted by '김용환'
,


안드로이드 버전에 탑재된 리눅스 커널 버전을 확인하기 위해서는 위키(http://en.wikipedia.org/wiki/Android_version_history)를 통해 확인할 수 있다.

만약 내가 누군가의 모바일 에서 리눅스 커널 버전을 application으로 확인하기 위한 앱 소스는 다음과 같다.


간단 소스


package com.google;

import android.app.Activity;
import android.os.Bundle;
import android.widget.TextView;

public class OSFinderActivity extends Activity {
    @Override
    public void onCreate(Bundle savedInstanceState) {
        super.onCreate(savedInstanceState);
        TextView tv = new TextView(this);
        tv.setText(System.getProperty("os.version"));
        setContentView(tv);
    }
}


리눅스 커널 버전을 확인


소스에서도 리눅스 커널을 보고 싶다.

froyo는 kernel/Makefile을 보면 확인이 가능하다.

VERSION = 2
PATCHLEVEL = 6
SUBLEVEL = 32
EXTRAVERSION = .9

공식문서에 있는 2.6.32 가 맞다.
http://developer.android.com/sdk/android-2.2-highlights.html


진저브레드는 kernel 디렉토리가 없어서 grep 으로 찾아보니. 아래 파일에서 2.6.32 로 나온다.
system/core/ThirdPartyProject.prop

공식문서에서는 2.6.35인데.. ^^;;;
http://developer.android.com/sdk/android-2.3-highlights.html


아이스크림 샌드위치는 공식적으로 커널 버전에 대한 내용은 없다. (현재 2011.11월 말)
다만, 아래 엔가젯에서 "but it's running on an updated build (IRK48) and kernel (3.0.1).
" 이라는 내용이 언급되어 있을 뿐이다.

http://www.engadget.com/2011/09/28/ice-cream-sandwich-gets-a-two-minute-tour-courtesy-of-a-lucky-e/


Posted by '김용환'
,

다음 디렉토리 지운다.

(xp)
C:\Documents and Settings\사용자계정\.android

또는

(win7)
사용자 user 디렉토리\사용자계정\.android

Posted by '김용환'
,


> adb shell
간단한 명령어
# pwd
# cd /
# ls
# ps
# netstat
# getprop

property 지정 (init 프로세스에서 property의 변경사항을 모니터링하다가 ctl.start나 ctl.stop이 오면 service를 시작 또는 종료한다.)

 # setprop ctl.start bootanim
setprop ctl.start bootanim
# setprop ctl.stop bootadnim
setprop ctl.stop bootadnim

참고
특별히 고치지 않은 버전에서의 root/init.rc 파일 에는 다음 설정이 있다.
service bootanim /system/bin/bootanimation
    user graphics
    group graphics
    disabled
    oneshot 

이미 서비스로 등록되어 있는 bootanimation을 내리고 올리는 작업을 할 수 있다.


# getprop ro.debuggable
getprop ro.debuggable
1
# setprop ro.debuggable 0
setprop ro.debuggable 0

# getprop persist.service.adb.enable
getprop persist.service.adb.enable
1
# setprop persist.service.adb.enable 0
setprop persist.service.adb.enable 0
#
여기서 adb가 죽고, 튕겨나감
>adb shell
error: device not found

avd를 다시 실행한다.


>adb devices
List of devices attached
emulator-5554   device

>adb -s emulator-5554 get-state
device

>adb -d get-serialno
unknown


>adb -s emulator-5554 kill-server


>adb -s emulator-5554 start-server
* daemon not running. starting it now on port 5037 *
* daemon started successfully *


local 파일을 에뮬로 복사
>adb -s emulator-5554 push c:\1.jpg /data/1.jpg
689 KB/s (154474 bytes in 0.218s)


에뮬에 있는 apk 를 local로 복사
>adb -s emulator-5554 pull /data/app/ApiDemos.apk c:\ApiDemos.apk
212 KB/s (2409035 bytes in 11.093s)


export 해서 apk 만들기
http://blog.naver.com/minroud?Redirect=Log&logNo=80130874162

>adb -s emulator-5554 -e install HelloAndroid1.apk
140 KB/s (13515 bytes in 0.093s)
        pkg: /data/local/tmp/HelloAndroid1.apk
Success

(이클립스 데몬에서 올라가는 것 확인)

혹시 똑같은 apk가 있어서 설치가 안되면 강제로 설치하도록 함
(Failure [INSTALL_FAILED_ALREADY_EXISTS] 무시)

>adb -s emulator-5554 -e install -r  HelloAndroid1.apk
13 KB/s (13515 bytes in 1.000s)
        pkg: /data/local/tmp/HelloAndroid1.apk
Success

uninstall 할때는 패키지명으로 삭제해야 함
>adb -s emulator-5554 uninstall com.google.HelloAndroid


# service list
service list
Found 49 services:
0       phone: [com.android.internal.telephony.ITelephony]
1       iphonesubinfo: [com.android.internal.telephony.IPhoneSubInfo]
2       simphonebook: [com.android.internal.telephony.IIccPhoneBook]
3       isms: [com.android.internal.telephony.ISms]
4       diskstats: []
5       appwidget: [com.android.internal.appwidget.IAppWidgetService]
..

# service call activity 1598968902
service call activity 1598968902
Result: Parcel(
  0x00000000: 0000001c 006e0061 00720064 0069006f '....a.n.d.r.o.i.'
  0x00000010: 002e0064 00700061 002e0070 00410049 'd...a.p.p...I.A.'
  0x00000020: 00740063 00760069 00740069 004d0079 'c.t.i.v.i.t.y.M.'
  0x00000030: 006e0061 00670061 00720065 00000000 'a.n.a.g.e.r.....')
#
 

Posted by '김용환'
,


vmware에 ubuntu 운영체제에 안드로이드 소스 설치후에 소스를 볼라면, vi와 cscope의 달인이 아니면 보기가 너무 힘들다.  그래서, 삼바 서버를 설치해두면 두고 두고 쓰기 편하다.

삼바를 설치후, 소스 보는 것이 편해진다.


삼바 설치

$ sudo apt-get install samba smbfs

삼바 환경설정

$ sudo gedit /etc/samba/smb.conf
#   security = user
-> (수정)
   security = user


# By default, the home directories are exported read-only. Change the
# next parameter to 'no' if you want to be able to write to them.
;   read only = yes
-> (추가)
# By default, the home directories are exported read-only. Change the
# next parameter to 'no' if you want to be able to write to them.
;   read only = yes
writable = yes


;   create mask = 0700
-> (수정)
   create mask = 0700

;   directory mask = 0700
-> (수정)
   directory mask = 0700

;   valid users = %S
-> (수정)
   valid users = %S


#======================= Share Definitions =======================
바로 밑에 추가


[root]
comment = Root
path = /
browable = yes
writable = yes


환경 설정 확인
root 계정 접근을 확인한다.

$ sudo testparm


....
[root]
 comment = Root Directory
 path = /
 valid users = %S
 read only = No
 create mask = 0700
 directory mask = 0700

......


패스워드 설정

$ sudo smbpasswd -a root
New SMB password:
Retype new SMB password:
Added user root.


ip 확인

$ ifconfig
eth0      Link encap:Ethernet  HWaddr 00:0c:29:ff:fb:0a 
          inet addr:192.168.150.128


리눅스에서 나와 윈도우 탐색기에서 접근
패스워드는 smbpasswd에서 입력한 계정 paswd 가능하다.


repo로 받은 안드로이드 소스 보기가 편하다..


* 예전(7,8년 전)에는 삼바 설정 파일 수정후에 삼바 데몬을 재시작했는데..
ubuntu 에서 설치후에는 samba 설정 파일만 수정하면, 알아서 자동으로 읽는다.. 완전 신기.
그리고, 속도도 빨라졌다. 삼바가 이렇게 좋아질 줄이야!!!


그리고, 이클립스를 이용해서 소스를 확인할 때 볼 수 있는 소스를 복사해서 사용한다.
framework/base/core/java 밑에 있는 파일을 로컬로 복사한다. 그리고, 이클립스에서 안드로이드 소스에 해당되는 곳에 F3를 눌러 복사한 folder 로 지정하서 소스를 보면 끝..

\\ip\안드로이드소스받은위치\frameworks\base\core\java


네트웍 드라이드 연결을 할 수 도 있다.
윈도우 탐색기->도구->네트웍드라이브 연결

드라이브이름과 , \\192.168.158.128\root\work 각각 넣어주고 엔터하면 접근된다.

Posted by '김용환'
,

ubuntu 11.04 (내가 제일 좋아하는 ubuntu 버전)에서 android 4점대 컴파일이다. 
공식싸이트(http://source.android.com/source/downloading.html)를 기준으로 설명한다.

$ sudo add-apt-repository "deb http://archive.canonical.com/ lucid partner"
$ sudo apt-get update
$ sudo apt-get install sun-java6-jdk

$ sudo apt-get install git-core gnupg flex bison gperf libsdl-dev libesd0-dev libwxgtk2.6-dev build-essential zip curl libncurses5-dev zlib1g-dev  ant gcc-multilib g++-multilib

$ mkdir ~/bin

$ curl https://dl-ssl.google.com/dl/googlesource/git-repo/repo > ~/bin/repo

$ chmod a+x ~/bin/repo

$ mkdir my-android

$ cd my-android

$ ~/bin/repo init -u https://android.googlesource.com/platform/manifest -b android-4.0.1_r1

$ ~/bin/repo sync
(시간 소요 많이 됨)

$  source build/envsetup.sh


$ lunch full-eng

============================================
PLATFORM_VERSION_CODENAME=REL
PLATFORM_VERSION=4.0.1
TARGET_PRODUCT=full
TARGET_BUILD_VARIANT=eng
TARGET_BUILD_TYPE=release
TARGET_BUILD_APPS=
TARGET_ARCH=arm
TARGET_ARCH_VARIANT=armv7-a
HOST_ARCH=x86
HOST_OS=linux
HOST_BUILD_TYPE=release
BUILD_ID=ITL41D
============================================

$ make

(시간 소요 많이 됨) 


그외에..  안드로이드 4.01 용 갤럭시 넥서스와 판다보드 드라이버가 공개되었다.  커스텀 롬을 기대할 수 있을 것 같다~ 멋진 분들이 만들어주실 커스텀 롬 짱!
http://code.google.com/android/nexus/drivers.html


삼성 갤럭시 넥서스의 gsm의 경우는 tgz로 되어 있는데, 그거 다운받으면 아래와 같은 shell이 있는데, 그것을 실행시키면 드라이버를 다운받을 수 있다.

$ chmod 755 extract-samsung-maguro.sh

Type "I ACCEPT" if you agree to the terms of the license: I ACCEPT


Posted by '김용환'
,

android 타겟이 arm이라서 x86도 포팅하면 재미있겠다하는 생각이 들었는데. 이미 그런게 있었다. 흘~

android-x86 (http://www.android-x86.org)이라는 싸이트에서 참조해서 진저 브레드용 안드로이드를 올려보았다. 아직 싸이트에서는 2.3 진저브레드 iso 파일이 없어서 직접 소스 컴파일을 해보았다. 


$ mkdir android-x86
$ cd android-x86
$ ~/bin/repo init -u git://git.android-x86.org/manifest.git -b gingerbread-x86
$ ~/bin/repo sync 
$ make iso_img TARGET_PRODUCT=generic_x86

(컴파일시간은 엄청 걸림)

$ ls  out/target/product/generic_x86/generic_x86.iso 
out/target/product/generic_x86/generic_x86.iso


generic_x86 을 파일을 vmware를 이용해서 읽게 한다.


특징적인 것은 일부 구글 앺인 market이 없다는 게 (정확히는 몰라서..  정책때문에 그런가?? 싶기도 하고) App store 같은게 있기는 한데, 활성화는 안되었다. 

2.3 진저브레드는 좀 불안한거 같다. App Store에 받은 어플리케이션이 실행이 안되고 crash되는 부분이 조금 있다. 

2.2가 그나마 안정적인듯 하다. 

일반 어플리케이션이 동작이 안되는 이유를 발견했는데. 그것은 어플리케이션이 arm library에 dependent (/lib/armeabi/libW2A-jni.so) 한 부분이 있다. 그래서 x86에서는 동작이 되지 않된 것 같다. 


Posted by '김용환'
,

ubuntu 11.04 (내가 제일 좋아하는 ubuntu 버전)에서 android gingerbread(진저브레드)  소스 컴파일에 대한 정보이다.
 인터넷에서 검색하면 예전 버전들이 많았다. git repository 위치도 달라서 그냥 다 될 것이라는 기대는 하면 안된다. 공식싸이트(http://source.android.com/source/downloading.html)가 그나마 가장 신뢰해야한다는 생각을 다시 하게 되었다. 

구글에 올라온 정보가 약간 틀려서, 조금 수정했다. 

$ sudo add-apt-repository "deb http://archive.canonical.com/ lucid partner"
$ sudo apt-get update
$ sudo apt-get install sun-java6-jdk

$ sudo apt-get install git-core gnupg flex bison gperf libsdl-dev libesd0-dev libwxgtk2.6-dev build-essential zip curl libncurses5-dev zlib1g-dev  ant gcc-multilib g++-multilib

$ mkdir ~/bin
$ curl https://dl-ssl.google.com/dl/googlesource/git-repo/repo > ~/bin/repo

$ chmod a+x ~/bin/repo

$mkdir my-android

$ cd my-android

나는 진저 브레드 브랜치로 다운받음
$  ~/bin/repo init -u https://android.googlesource.com/platform/manifest -b  gingerbread
($ ~/bin/repo init -u https://android.googlesource.com/platform/manifest 이렇게 해서 받을 수도 있지만, 

$ ~/bin/repo sync
check out 받는 거라 시간이 많이 소요됨

$  source build/envsetup.sh

$  lunch full-eng


빌드과정이라 시간이 많이 소요됨. 4cpu를 다쓸 수 있게 설정함.
$ make -j4

============================================
PLATFORM_VERSION_CODENAME=REL
PLATFORM_VERSION=2.3.7
TARGET_PRODUCT=full
TARGET_BUILD_VARIANT=eng
TARGET_SIMULATOR=false
TARGET_BUILD_TYPE=release
TARGET_BUILD_APPS=
TARGET_ARCH=arm
TARGET_ARCH_VARIANT=armv7-a
HOST_ARCH=x86
HOST_OS=linux
HOST_BUILD_TYPE=release
BUILD_ID=GINGERBREAD
============================================


디폴트는 타겟이 arm 기반이라서 안드로이드를 ubuntu에서 돌릴 수 없으나, 잘 바꾸면 돌아갈 수도 있을 것 같다. 


ramdisk.img,  system.img, userdata.img  파일이 빌드 결과물에 있다.
ramdisk.img 는 개발할때 root fs를 ram에서 실행하기 위해서 필요하다.
system.img는 안드로이드 플랫폼용 이미지이다.
userdata.img는 임베디드 어플단 이미지이다.

이렇게 이미지를 나누어서 flash에 구워진다.

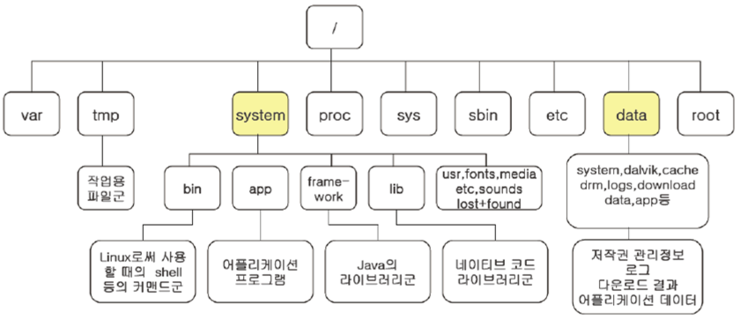
이외,  root.img가 만들 수 있는데. 이는 root 디렉토리를 이미지화한 것으로 '/'를 의미한다. 즉 부팅에 대한 초기화 내용이 들어가 있다.
시스템에서는 root/init.rc에 정보를 읽을 것이다.


/system 은 system.img, /data는 userdata.img, 나머지 /는 root.img 을 의미한다.
그래서 안드로이드 파일 시스템 구조는 이렇게 구성이 된다.


(http://blog.naver.com/PostView.nhn?blogId=limpe&logNo=20115813026&redirect=Dlog&widgetTypeCall=true 그림만 참조)


재미있는 것은  root/init.goldfish.rc 파일도 볼 수 있는데, 이는 가상의 하드웨어의 이름이다. init.xxx.rc 파일은 하드웨어 vendor에 따른 초기화를 의미한다 .

arm9기반에서 동작되는 것처럼 지원하는 초기화 이름을 goldfish 라고 해서 사용되고 있는데, 이 파일이 init.goldfish.rc 파일이다.


Posted by '김용환'
,


https://opensource.samsung.com/ 에 접속해서 가입(join) 후 소스를 다운받을 수 있다.

내가 가지고 있는 안드로이드는 galaxy tab밖에 없어서 이걸로 테스트할 예정이다.  시간이 되면 함 튜닝도 해볼려구 한다. 리눅스를 공부한 게 헛되지 않았다는 생각이 많이 들었다.

갤럭시탭의 버전 이름은 (gt-p1000) 이었구나..

로그인후 첫 화면이다.


전체적으로 썰렁하다..

갤럭시탭 type를 선택하고, download all를 선택해서 다운을 받는다.


Posted by '김용환'
,