우버 해킹 (2017)

Security 2018. 2. 2. 10:13


우버에서는 내부 깃허브 싸이트를 운영하고 있었다. 해커는 소스에서 우버 AWS 계정(아마도 공통 계정?)을 얻은 후, 

AWS 계정으로 들어가 개인정보를 털었다고 한다. 


http://www.boannews.com/media/view.asp?idx=58202&page=1&kind=1


우버의 발표에 의하면 공격자들은 우버 소프트웨어 엔지니어들끼라만 사용하던 사설 깃허브 코딩 사이트에 접근하는 데에 성공했다. 그리고 거기서 우버의 AWS 계정 크리덴셜을 찾아냈다. 우버는 각종 컴퓨터 관련 일들을 관리하고 해결하기 위해 이러한 플랫폼들을 사용, 유지하고 있었다. 그리고 이 계정에는 고객과 기사들의 개인정보가 같이 저장되어 있었다.

Posted by '김용환'
,


elasticsearch에서 pagination을 하고 싶다면, search_after를 사용한다.


https://www.elastic.co/guide/en/elasticsearch/reference/current/search-request-search-after.html


위 url에서 제공하는 간단한 예제는 다음과 같다. 


GET twitter/tweet/_search

{
    "size": 10,
    "query": {
        "match" : {
            "title" : "elasticsearch"
        }
    },
    "search_after": [1463538857, "654323"],
    "sort": [
        {"date": "asc"},
        {"_id": "desc"}
    ]
}


여러 날짜별로 분리된 인덱스에서도 search_after를 사용할 수 있다.  


다음 예제는 search_after를 활용할 수 있도록 2개의 필드로 소팅하고 2개의 특정 값으로 pagination하는 예제이다. 


curl -XGET 'http://search.google.io:9200/plus.-*/_search?pretty' -H 'Content-Type: application/json' -d'

{  

   "version":true,

   "query":{  

      "bool":{  

         "must":[  

            {  

               "match_all":{        }

            },

            {  

               "range":{  

                  "@timestamp":{  

                     "gte":"2018-01-31T16:52:07+09:00",

                     "lte":"2018-01-31T17:52:07+09:00"

                  }

               }

            }

         ]

      }

   },

   "size":11,

   "sort":[  

      {  

         "@timestamp":{  

            "order":"desc"

         }

      },

      {  

         "_uuid.keyword":{  

            "order":"asc"

         }

      }

   ]

}

'


curl -XGET 'http://search.google.io:9200/plus-*/_search?pretty' -H 'Content-Type: application/json' -d'

{  

   "version":true,

   "query":{  

      "bool":{  

         "must":[  

            {  

               "match_all":{  


               }

            },

            {  

               "range":{  

                  "@timestamp":{  

                     "gte":"2018-01-31T16:52:07+09:00",

                     "lte":"2018-01-31T17:52:07+09:00"

                  }

               }

            }

         ]

      }

   },

   "size":11,

   "search_after":[  

      "1517388213000",

      "f938251211a3"

   ],

   "sort":[  

      {  

         "@timestamp":{  

            "order":"desc"

         }

      },

      {  

         "_uuid.keyword":{  

            "order":"asc"

         }

      }

   ]

}

'


Posted by '김용환'
,


ansible의 become은 sudo를 사용할 수 없이 실제 해당 유저로 로그인함을 의미한다.


http://docs.ansible.com/ansible/latest/become.html


ansible 예제처럼 특정 사용자로 인증 후 사용될 수 있다.


- name: Run a command as the apache user
  command: somecommand
  become: true
  become_user: apache


만약 root로 접근하고 싶다면, 미리 장비에서 root로 접근할 수 있는 설정이 되어 있어야 잘 동작한다.


www@aaa~$ sudo -i

root@aaa:~#


다음은 playbook 예제이다.


- name: create /home/www

  become: yes

  become_method: sudo

  file: path=/home/www state=directory owner=www group=www


- hosts: webservers

  tasks:

    - service: name=nginx state=started

      become: yes

      become_method: sudo


Posted by '김용환'
,


ansible-playbook을 실행하다가 ERROR! Specified --limit does not match any hosts 에러가 발생했다.


$ ansible-playbook -i test-stats docker.yml 


호스트 설정이 빠져서 발생한 것이니. host 설정을 살펴본다.


[docker] 

abc.test01.i.google.com


Posted by '김용환'
,


요즘에 https://github.com/square/okhttp은 점차 안드로이드 진영에서 인정받으면서 서버단에서 많이 쓰기 시작하고 있다. 

okhttp에 pooling이 내부적으로 되어 있어서, 편하게 사용가능하다.


OKHttpClient를 생성할 때 OKHttpClient.Builder를 호출하는데, 기본 생성자인 ConnectionPool을 생성하면서 5개 connection을 자동으로 생성한다.


https://github.com/square/okhttp/blob/master/okhttp/src/main/java/okhttp3/OkHttpClient.java


https://github.com/square/okhttp/blob/master/okhttp/src/main/java/okhttp3/OkHttpClient.java#L487


https://github.com/square/okhttp/blob/master/okhttp/src/main/java/okhttp3/ConnectionPool.java#L85


public ConnectionPool() {

this(5, 5, TimeUnit.MINUTES);

}


Posted by '김용환'
,


scala 프로젝트에서 사용할만한 scala- elasticsearch 라이브러리는 sksamuel이 가장 좋은 것 같다. (아직 갈길이 멀지만.)


sksamuel의 HTTPClient을 잘 사용하고 있다. 

val result = client.execute {
val req = search(indexName).
query {
bool {
//..
}

queryStatement = client.show(req)
req
}
}


중요한 것은 비동기로 되어 있어서 쭉 지나가 버린다. 


동기(synchronous) 코드로 개발하려면 Await.result 또는 Await.ready를 사용한다. 


Await.result를 사용하는 코드는 간단하다. 내부적으로 Future[Either[]] 형태로 Right/Left를 먼저 써야 한다. 


import scala.concurrent.duration._
val response = Await.result(result, atMost = 5.second)

response match {
case Right(success) => {
// ..

}
case Left(e) => {
//..
}
}


Await.ready와 Await.result는 exception 처리방식이 조금 다르다. 나는 아직 완벽한 프로그램이 아니라서 차라리 crash가 나은 듯해서 Await.result를 사용해봤다.


exception이 발생하면 Await.result는 crash exception이 발생하고, 

Await.ready는 exception을 Failure로 감싼다. 


Posted by '김용환'
,

트위터는 이미 mesos 기반을 쓰고 있고..


넥플릭스는 mesos 기반의 컨테이너 개발이 진행 중이다. 


https://queue.acm.org/detail.cfm?id=3158370


Posted by '김용환'
,


centos 7.2에서 2017.1.25부터 docker yum 설치가 실패하고 있다. 


다음 의존성 때문인 것 같다. 


libsemanage-2.5-8.el7.x86_64 conflicts selinux-policy-base < 3.13.1-66\\n--> Finished Dependency Resolution\\n You could try using --skip-broken to work around the problem\\n You could try running: rpm -Va --nofiles --nodigest


문제 해결이 쉽지 않아 os를 7.4로 올리니 정상적으로 docker를 설치할 수 있었다..

Posted by '김용환'
,


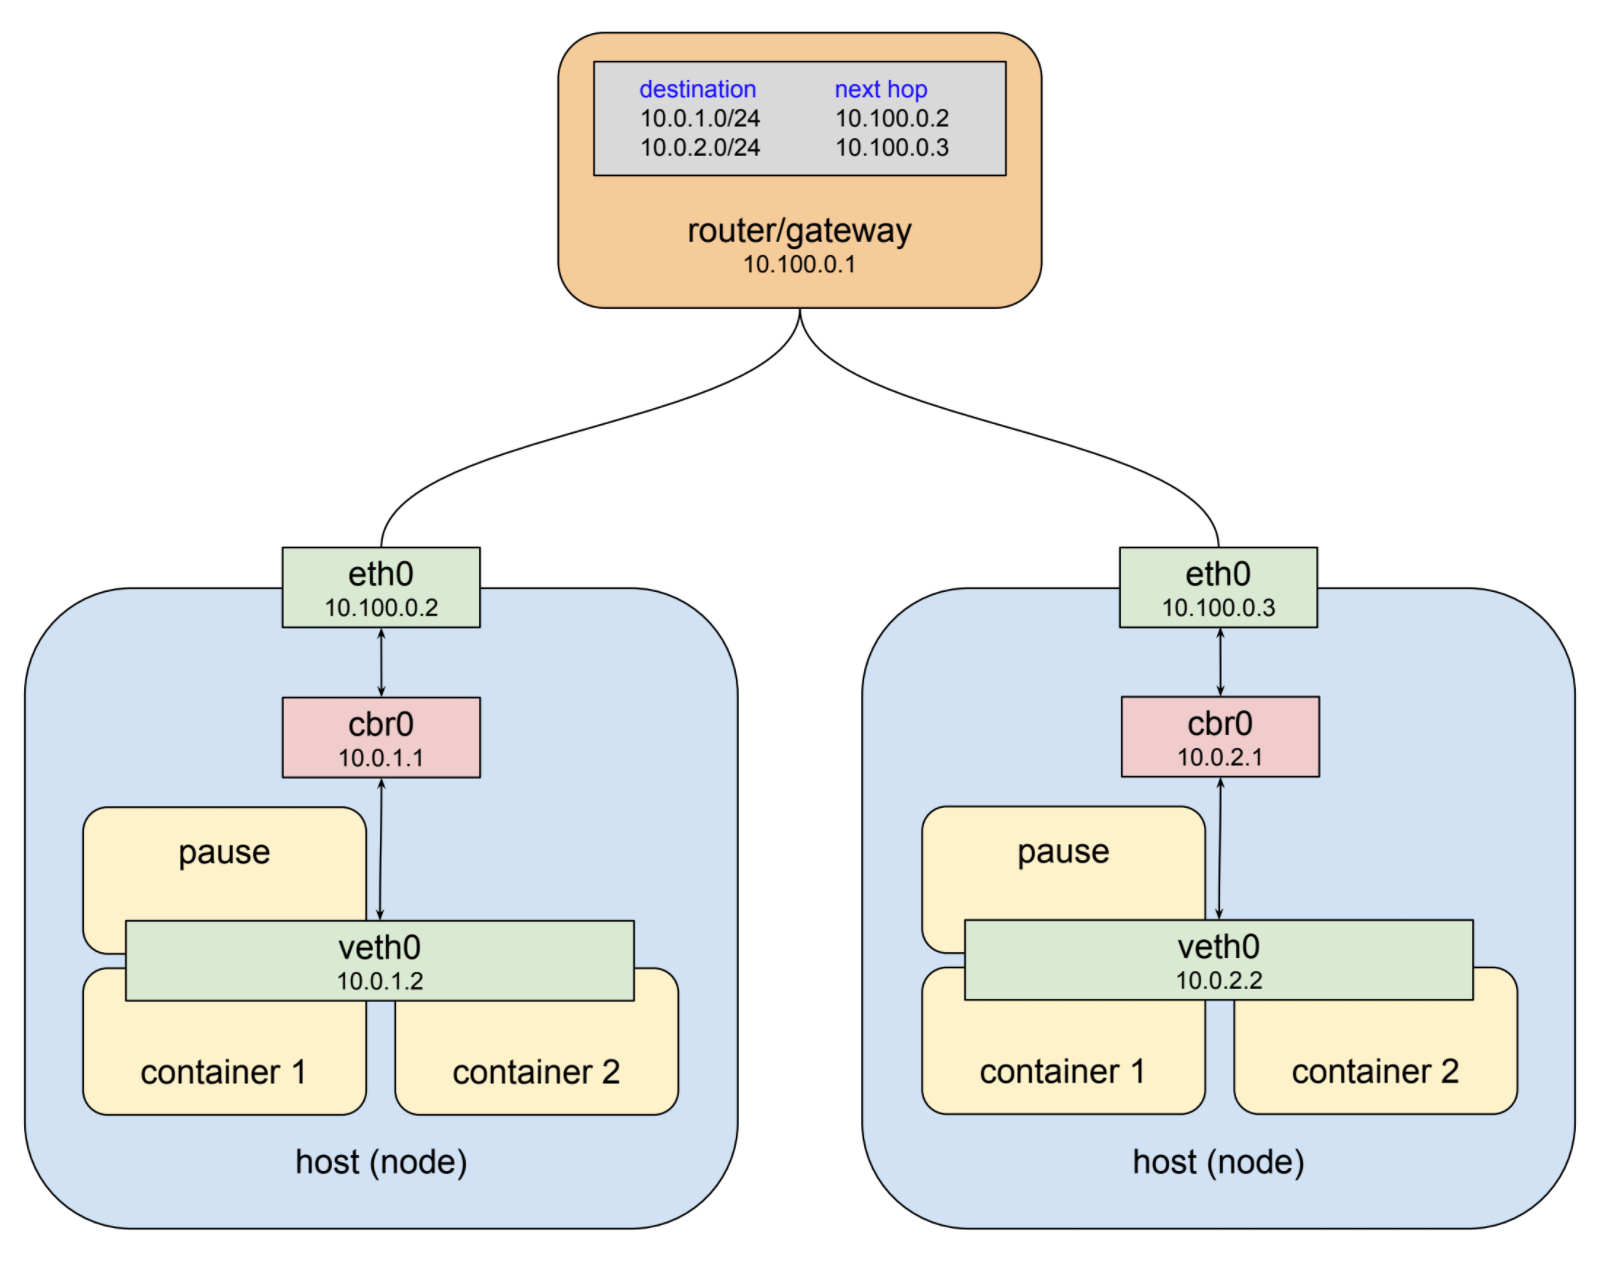
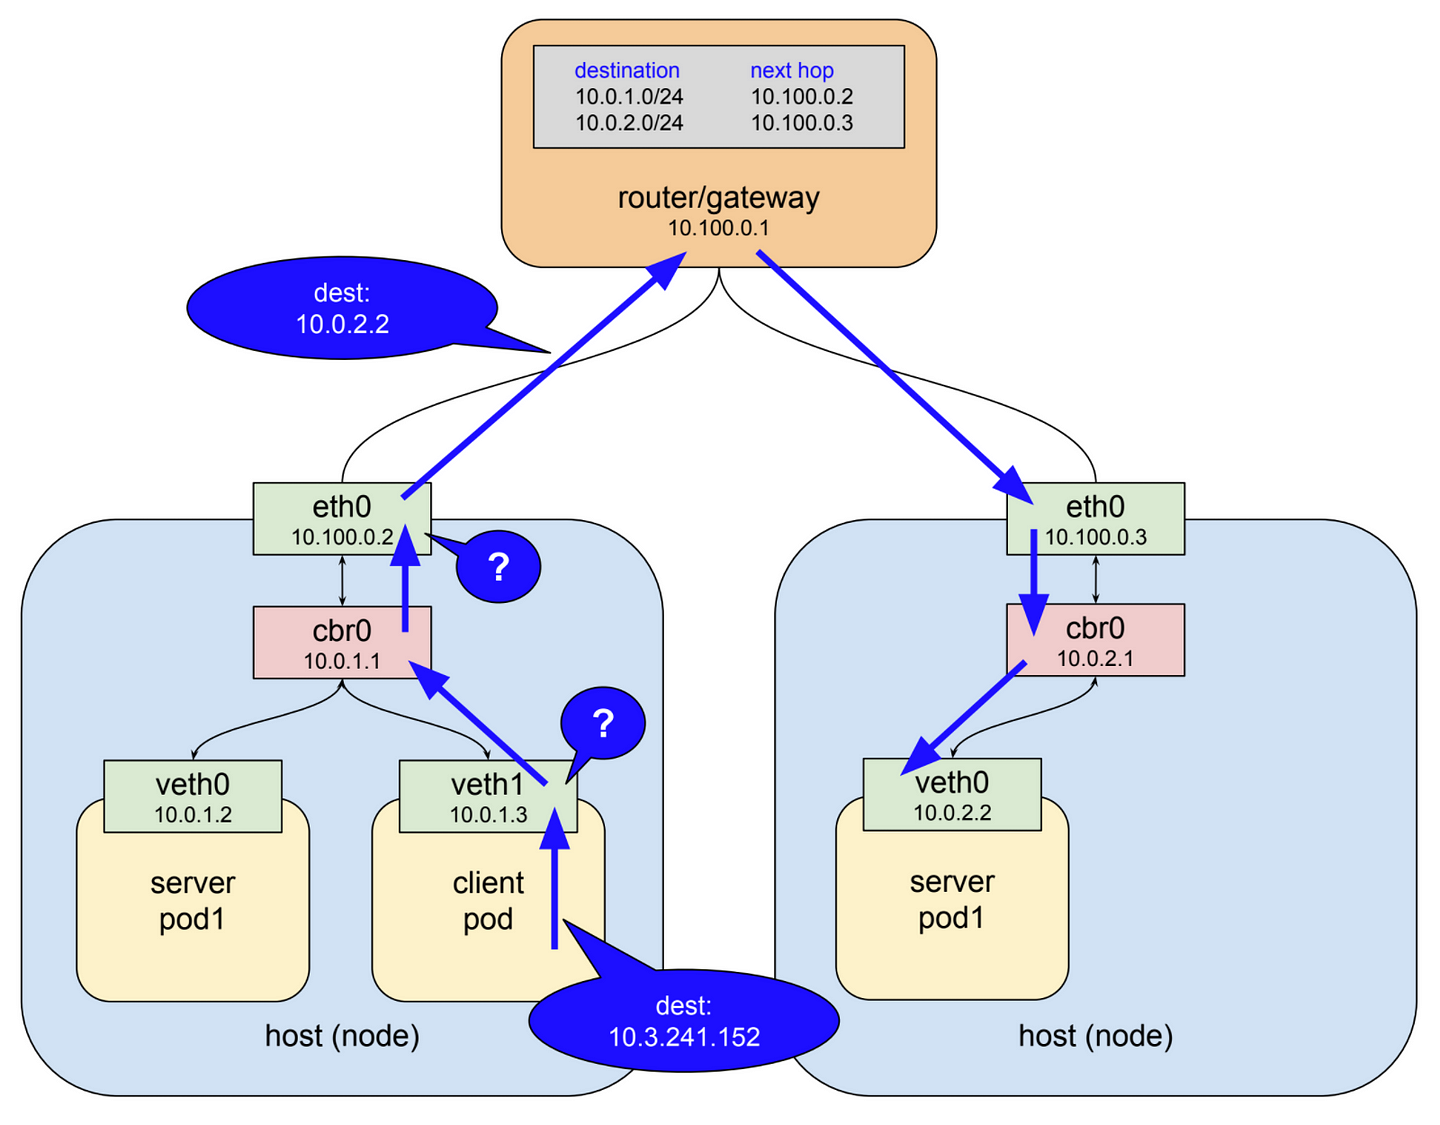
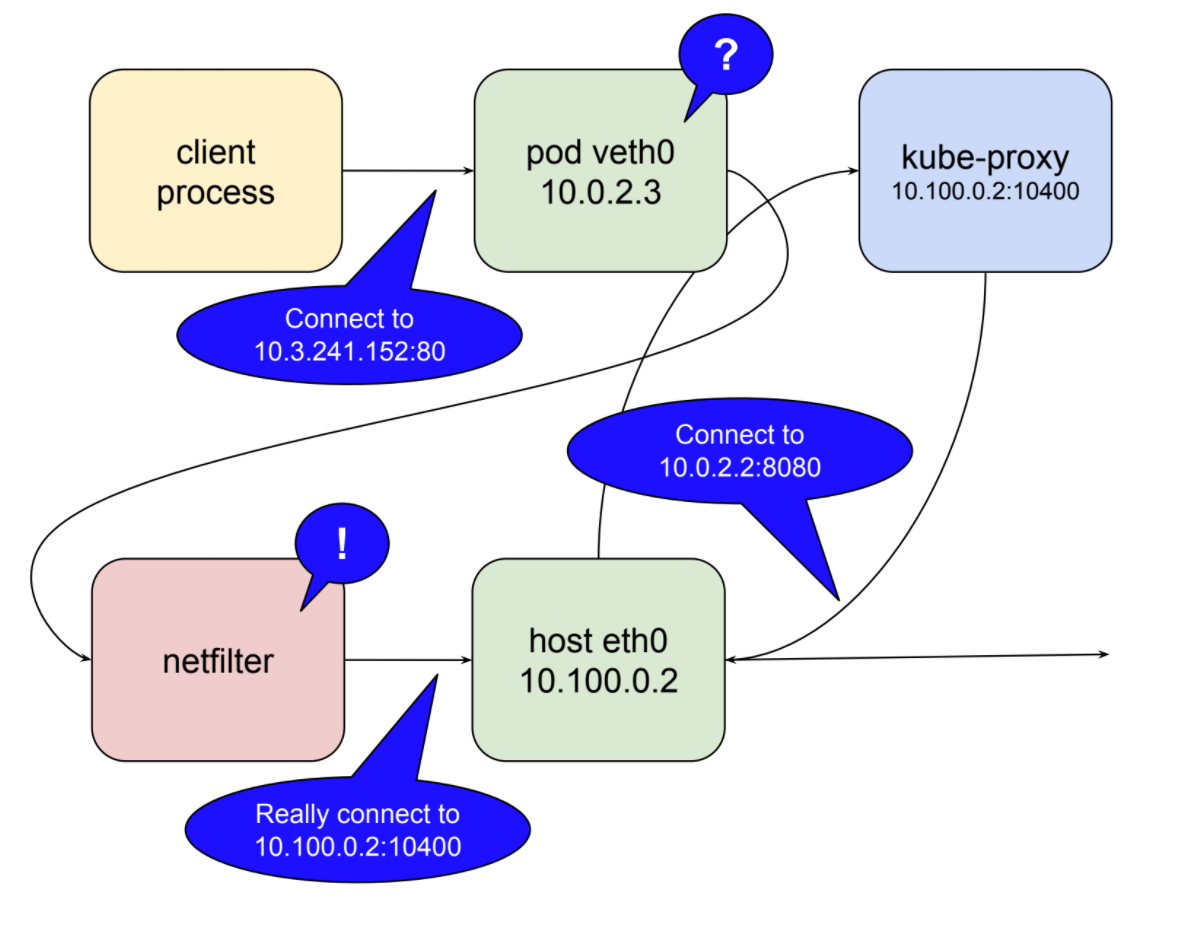
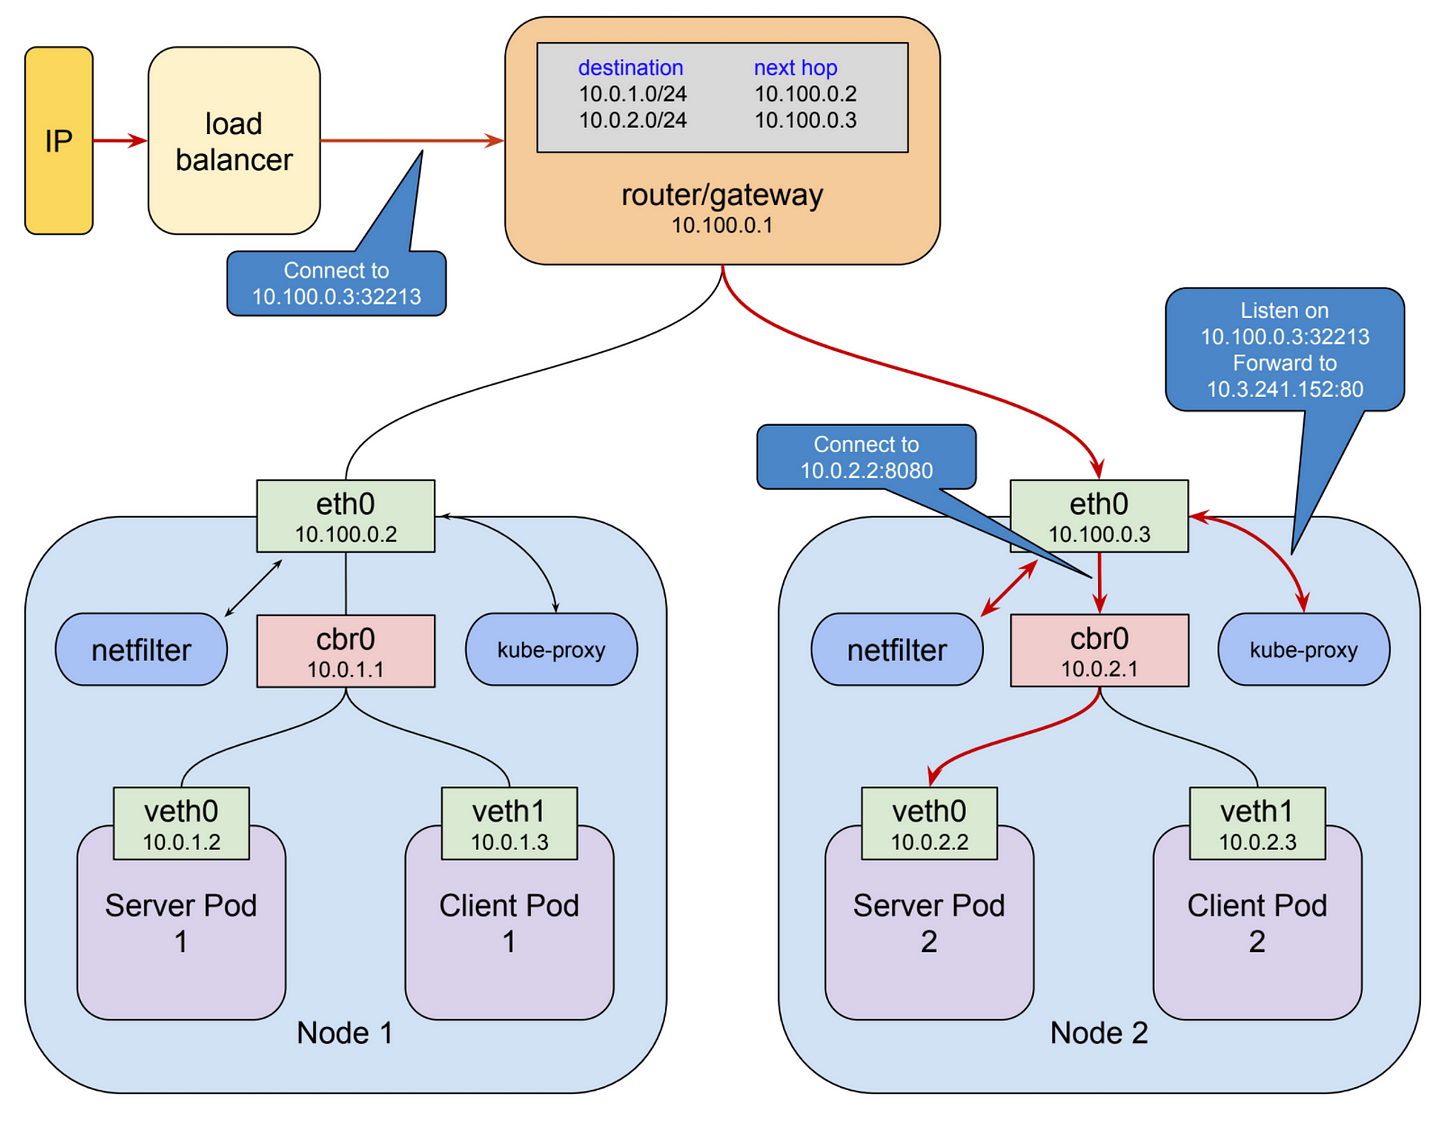
kubernetes의 네트워킹과 Pod, Service, ServiceNetwork의 개념, 오버레이 네트워크(https://en.wikipedia.org/wiki/Overlay_network), 디플로이(https://kubernetes.io/docs/concepts/workloads/controllers/deployment/), kube-proxy를 잘 설명한 글이 소개한다.


1. Understanding kubernetes networking: pods


https://medium.com/google-cloud/understanding-kubernetes-networking-pods-7117dd28727


(주요 그림)


2. Understanding kubernetes networking: services


https://medium.com/google-cloud/understanding-kubernetes-networking-services-f0cb48e4cc82


(주요 그림)


내부적으로 동작하는 netfilter의 중요성을 설명한 내용이 포함되어 있다. 


3. Understanding kubernetes networking: ingress


https://medium.com/google-cloud/understanding-kubernetes-networking-ingress-1bc341c84078


(주요 그림)


Posted by '김용환'
,


https://blog.docker.com/2018/01/docker-mac-kubernetes/


이제 맥 docker에서 k8s를 사용할 수 있게끔 한다고 한다.


Posted by '김용환'
,