https://gravitational.com/blog/running-postgresql-on-kubernetes/

postgres를 그냥 k8s에서 운영했다가 데이터 손실되었다고 한다.

stateful(https://kubernetes.io/docs/concepts/workloads/controllers/statefulset/) 써서 HA를 유지하는 것이 좋다는 얘기가 있다. 


stateful은 중요하다.


Using StatefulSets

StatefulSets are valuable for applications that require one or more of the following.

  • Stable, unique network identifiers.
  • Stable, persistent storage.
  • Ordered, graceful deployment and scaling.
  • Ordered, graceful deletion and termination.
  • Ordered, automated rolling updates.

In the above, stable is synonymous with persistence across Pod (re)scheduling. If an application doesn’t require any stable identifiers or ordered deployment, deletion, or scaling, you should deploy your application with a controller that provides a set of stateless replicas. Controllers such as Deployment or ReplicaSet may be better suited to your stateless needs.

Limitations

  • StatefulSet was a beta resource prior to 1.9 and not available in any Kubernetes release prior to 1.5.
  • As with all alpha/beta resources, you can disable StatefulSet through the --runtime-config option passed to the apiserver.
  • The storage for a given Pod must either be provisioned by a PersistentVolume Provisioner based on the requested storage class, or pre-provisioned by an admin.
  • Deleting and/or scaling a StatefulSet down will not delete the volumes associated with the StatefulSet. This is done to ensure data safety, which is generally more valuable than an automatic purge of all related StatefulSet resources.
  • StatefulSets currently require a Headless Service to be responsible for the network identity of the Pods. You are responsible for creating this Service.


Posted by '김용환'
,

일래스틱서치에 uuid로 소팅하고 싶은데, 에러가 발생했다. 


(쿼리)

 curl -XGET 'localhost:9200/google_plus_data/_search?pretty' -H 'Content-Type: application/json' -d'

{

  "query": { "match_all": {} },

  "size": 10,

  "sort": [ 

            { "@timestamp": "desc" } ,

            { "_uuid": "asc" } 

          ]

}'


(에러)


"reason" : "Fielddata is disabled on text fields by default. Set fielddata=true on [_uuid] in order to load fielddata in memory by uninverting the inverted index. Note that this can however use significant memory. Alternatively use a keyword field instead."


에러 관련해서 문서를 보면 먼가 작업을 해야 할 것 같지만..

https://www.elastic.co/guide/en/elasticsearch/reference/5.0/fielddata.html


uuid는 keyword라는 필드가 있어서.. 사용하면 작 동작한다.


 curl -XGET 'localhost:9200/google_plus_data/_search?pretty' -H 'Content-Type: application/json' -d'

{

  "query": { "match_all": {} },

  "size": 10,

  "sort": [ 

            { "@timestamp": "desc" } ,

            { "_uuid.keyword": "asc" } 

          ]

}'


Posted by '김용환'
,

[python] str과 repr 비교

python 2018. 1. 23. 14:57


python에는 Java의 toString()과 같은 문법이 있다. 


>>> import datetime

>>> today = datetime.datetime.now()

>>> str(today)

'2018-01-23 14:49:37.284361'

>>> repr(today)


>>> f=1.1111111111111111

>>> str(f)

'1.11111111111'

>>> repr(f)

'1.1111111111111112'


str은 사용자가 보기 편하게 "비공식"적으로 쓰는 문자열(반드시) 표현법이고,

repr은 시스템에서 구분하기 위한 공식적연 표현법이며 문자열이 아니어도 된다.


https://docs.python.org/3.7/reference/datamodel.html#object.__repr__


object.__repr__(self)

Called by the repr() built-in function to compute the “official” string representation of an object. If at all possible, this should look like a valid Python expression that could be used to recreate an object with the same value (given an appropriate environment). If this is not possible, a string of the form <...some useful description...> should be returned. The return value must be a string object. If a class defines __repr__() but not __str__(), then __repr__() is also used when an “informal” string representation of instances of that class is required.


This is typically used for debugging, so it is important that the representation is information-rich and unambiguous.


object.__str__(self)

Called by str(object) and the built-in functions format() and print() to compute the “informal” or nicely printable string representation of an object. The return value must be a string object.


This method differs from object.__repr__() in that there is no expectation that __str__() return a valid Python expression: a more convenient or concise representation can be used.


The default implementation defined by the built-in type object calls object.__repr__().


Posted by '김용환'
,

scala retry 참조 코드

scala 2018. 1. 23. 11:33

scala retry 참조 코드 


https://stackoverflow.com/questions/7930814/whats-the-scala-way-to-implement-a-retry-able-call-like-this-one


import util._

object RetryUtils {

@annotation.tailrec
def retry[T](n: Int)(fn: => T): T = {
Try { fn } match {
case Success(x) => x
case _ if n > 1 => retry(n - 1)(fn)
case Failure(e) => throw e
}
}
}


예제 코드


val retryResult = retry(3) {
if (validateObject(esClient)) {
esClient
} else {
null
}
}


Posted by '김용환'
,

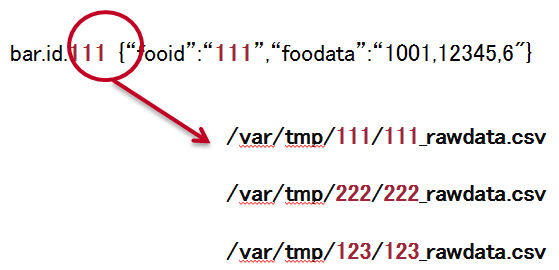
fluent에는 fluent-plugin-forest(https://github.com/tagomoris/fluent-plugin-forest)라는 플러그인이 있다.


fluent 설정에 자주 보이는 편한 플러그인으로.. 


의미는 패턴화, 또는 그룹핑을 가능케 하는 표현식으로 보면 좋을 것 같다. 


특정 태그 명으로 반복되는 경우


<match service.blog>
  @type file
  time_slice_format %Y%m%d%H
  compress gz
  path /var/log/blog.*.log
</match>
<match service.portal>
  @type file
  time_slice_format %Y%m%d%H
  compress gz
  path /var/log/portal.*.log
</match>


아래와 같이 forest와 template을 같이 사용해 패턴화할 수 있다. 


<match service.*>
  @type forest
  subtype file
  remove_prefix service
  <template>
    time_slice_format %Y%m%d%H
    compress gz
    path /var/log/${tag}.*.log
  </template>
</match>


아래와 같은 패턴으로 로그가 들어오면..


아래와 같이 패턴화할 수 있다. 


<match bar.id.*>

    @type copy 

    <store> 

         type forest 

         subtype file_alternative 

         <template> 

             path /var/tmp/${tag_parts[2]}/rawdata.csv

         </template>

    </store>

</match>


참조 : https://qiita.com/yococo/items/8fa81747310e0a61808e


'Cloud' 카테고리의 다른 글

[k8s] 쿠버네티스의 로그 수집 툴  (0) 2018.02.06
[k8s] postgresql 운영 - stateful (펌질)  (0) 2018.01.25
[fluentd] filter/record에 예약어 존재  (0) 2017.12.18
NIFI의 provenance 의 drop event  (0) 2017.12.12
NIFI 팁  (0) 2017.12.08
Posted by '김용환'
,

Spark와 Kafka 연동

scala 2018. 1. 20. 10:01


Spark와 Kafka 연동하는 방식은 다음과 같다.


- 수신기 기반 접근 방식(Receiver-based approach)

- 다이렉트 스트림 접근 방식(Direct stream approach)

- 구조화된 스트리밍(Structured streaming)


1. 수신기 기반 접근 방식


수신기 기반 방식은 스파크와 카프카와의 첫 번째 통합 방식이었다. 수신기 접근 방식에서 드라이버는 익스큐터에서 카프카 브로커의 고급 API를 사용해 데이터를 가져올 수 있는 수신자를 실행한다. 수신자가 카프카 브로커에서 이벤트를 가져 오고 있기 때문에 수신자는 주키퍼(zookeeper)에 오프셋을 저장한다. 주키퍼는 카프카 클러스터에서도 사용된다. 주요 측면은 WAL(Write Ahead Log)의 사용이다. 수신자는 카프카에서 데이터를 소비하면서 WAL에 계속 저장한다. 따라서 문제가 발생해 익스큐터 또는 수신자가 손실되거나 재시작될 때 WAL을 사용해 이벤트를 복구하고 처리할 수 ​​있다. 따라서이 로그 기반 설계는 내구성과 일관성을 모두 제공한다.


각 수신기는 카프카 토픽(topic)에서 이벤트의 입력 DStream을 생성하고 주키퍼에 카프카 토픽, 브로커, 오프셋 등을 쿼리한다. 

사용하는 API는 KafkaUtils.createStream이다.

def createStream(
 ssc: StreamingContext, // StreamingContext 오브젝트
 zkQuorum: String, //주키퍼 쿼럼(quorum) (호스트이름:포트,호스트이름:포트,..)
 groupId: String, //컨슈머의 그룹 id
 topics: Map[String, Int], // 소비할 (토픽 이름, 파티션 개수) 맵입니다. 각 파티션은 자체 스레드에서 사용된다.
 storageLevel: StorageLevel = StorageLevel.MEMORY_AND_DISK_SER_2
 Storage level to use for storing the received objects
 (default: StorageLevel.MEMORY_AND_DISK_SER_2)
): ReceiverInputDStream[(String, String)] //(카프카 메시지 키, 카프카 메시지 값) DStream 


예제는 다음과 같다.

val topicMap = topics.split(",").map((_, numThreads.toInt)).toMap
val lines = KafkaUtils.createStream(ssc, zkQuorum, group, topicMap).map(_._2)


2. 다이렉트 스트림 접근 방식

다이렉트 스트림 접근 방식(direct stream approach)은 카프카 통합과 관련한 새로운 접근 방식이며 드라이버를 사용하여 브로커에 직접 연결하고 이벤트를 가져 오는 방식으로 동작한다. 주요 내용은 다이렉트 스트림 API를 사용하는 것이므로 스파크 태스크는 카프카 토픽/파티션 대비 스파크 파티션 비율을 볼 때 1:1 비율로 동작한다는 것이다. 다이렉트 스트림 기반 접근 방식은 HDFS 또는 WAL에 대한 의존성 때문에 유연하지 않다. 또한 이제 오프셋으로 바로 접근할 수 있기 때문에 멱등성 또는 트랜잭션 방식을 사용해 정확히 한 번만 처리할 수 있다.
수신자를 사용하지 않고 카프카 브로커에서 직접 메시지를 가져오는 입력 스트림을 생성한다. 입력 스트림은 카프카에서 가져온 각 메시지가 정확히 한 번 처리하는 트랜스포메이션에 포함되도록 보장할 수 있다.

다음과 같이 KafkaUtils.createDirectStream() API를 사용하여 다이렉트 스트림을 생성할 수 있다.


def createDirectStream[
 K: ClassTag, // 카프카 메시지 키의 K 타입
 V: ClassTag, // 카프카 메시지 값의 V 타입
 KD <: Decoder[K]: ClassTag, // 카프카 메시지 키 디코더의 KD 타입
 VD <: Decoder[V]: ClassTag, // 카프카 메시지 값 디코더의 VD 타입
 R: ClassTag // 메시지 핸들러에서 리턴하는 R 타입
](
 ssc: StreamingContext, //StreamingContext 오브젝트
 KafkaParams: Map[String, String],
 /*
카프카의 설정 매개변수(http://kafka.apache.org/documentation.html#configuration)를 참조한다. 
host1:port1,host2:port2 형식으로 지정된 카프카 브로커(주키퍼 서버는 아님)과 함께 "metadata.broker.list"또는 "bootstrap.servers" 매개 변수를 설정해야 한다.
 */
 fromOffsets: Map[TopicAndPartition, Long], // 스트림의 시작점(포함)을 정의하는 토픽/파티션 별 카프카 오프셋
 messageHandler: MessageAndMetadata[K, V] => R // 각 메시지와 메타 데이터를 원한 타입으로 변환하는 함수
): InputDStream[R] // R 타입의 DStream


다이렉트 스트림 API에 대한 예는 다음과 같다.

val topicsSet = topics.split(",").toSet
val KafkaParams : Map[String, String] =
       Map("metadata.broker.list" -> brokers,
           "group.id" -> groupid )
val rawDstream = KafkaUtils.createDirectStream[String, String, StringDecoder, StringDecoder](ssc, KafkaParams, topicsSet)


다이렉트 스트림 API는 카프카에서만 사용할 수 있어서 일반적으로 사용할 수 있는 방식이 아니다.


3. 구조화된 스트리밍(Structured streaming)

구조화된 스트리밍(structured streaming)은 아파치 스파크 2.0 이상에서 새로 도입되었다.

구조화 스트리밍(structured streaming)은 스파크 SQL 엔진 위에 구축된 확장 가능하고 내결함성 스트림 처리 엔진이다. 이는 DStream 패러다임 및 스파크 스트리밍 API와 관련된 이슈가 아니라 스트림 처리와 계산이 배치 처리에 가깝다. 구조화된 스트리밍 엔진은 정확히 한 번 스트림 처리, 처리 결과에 대한 증분 업데이트, 집계 등과 같은 내용을 처리한다.

다음은 카프카 소스 스트림 또는 카프카 소스에서 읽는 예이다.

val ds1 = spark
.read
.format("Kafka")
.option("Kafka.bootstrap.servers", "host1:port1,host2:port2")
.option("subscribe", "topic1")
.load()

ds1.selectExpr("CAST(key AS STRING)", "CAST(value AS STRING)").as[(String, String)]


val ds1 = spark
.readStream
.format("Kafka")
.option("Kafka.bootstrap.servers", "host1:port1,host2:port2")
.option("subscribe", "topic1")
.load()

ds1.selectExpr("CAST(key AS STRING)", "CAST(value AS STRING)").as[(String, String)]


또한 구조화된 스트리밍 API는 스파크 스트리밍의 큰 이슈를 해결할 수 있는 방법을 제공한다. 즉 스파크 스트리밍은 들어오는 데이터를 마이크로 배치로 처리하고 수신 시간을 데이터를 분할하는 수단으로 사용하므로 실제 이벤트 시간을 고려하지 않는다. 구조화된 스트리밍을 사용하면 수신되는 데이터에서 이런 이벤트 시간을 지정하여 최신 데이터가 자동으로 처리되도록 할 수 있다.

구조화된 스트리밍의 핵심 아이디어는 실시간 데이터 스트림을 이벤트가 스트림에서 처리될 때 연속적으로 추가되는 무제한 테이블(unbounded table)로 처리하는 것이다. 그리고 일반적으로 배치 데이터를 갖고 처리하는 것처럼 무제한 테이블에서 계산과 SQL 쿼리를 실행할 수 있다. 

DStream은 시간이 지나면서 많은 데이터는 처리되어 결과를 생성한다. 따라서 무제한 입력 테이블은 결과 테이블을 생성하는 데 사용된다. 출력 또는 결과 테이블은 출력(output)이라고하는 외부 싱크(sink)에 저장될 수 있다.

스트림을 받는 예제는 다음과 같다. 

import java.sql.Timestamp

import org.apache.spark.sql.SparkSession

import org.apache.spark.sql.functions._


val inputLines = spark.readStream

 .format("socket")

 .option("host", "localhost")

 .option("port", 9999)

 .load()


val words = inputLines.as[String].flatMap(_.split(" "))


val wordCounts = words.groupBy("value").count()


val query = wordCounts.writeStream

 .outputMode("complete")

 .format("console")


query.start()


지연을 처리하기 위해 watermark를 사용할 수 있다. 다음은 그 예이다. 


import java.sql.Timestamp

import org.apache.spark.sql.SparkSession

import org.apache.spark.sql.functions._


val inputLines = spark.readStream

.format("socket")

.option("host", "localhost")

.option("port", 9999)

.option("includeTimestamp", true)

.load()


val words = inputLines.as[(String, Timestamp)].flatMap(line =>

line._1.split(" ").map(word => (word, line._2))).toDF("word", "timestamp")


val windowedCounts = words.withWatermark("timestamp", "10 seconds")

.groupBy(window($"timestamp", "10 seconds", "10 seconds"), $"word").count().orderBy("window")


val query = windowedCounts.writeStream

.outputMode("complete")

.format("console")

.option("truncate", "false")


query.start()


Posted by '김용환'
,


Date를 GMT스타일(is8601)의 표현 문자열(momentjs가 표현하는 날짜시간 문자열)로 변경하는 예제이다.


Calendar calendar = Calendar.getInstance();

Date date = calendar.getTime();

SimpleDateFormat sdf = new SimpleDateFormat("yyyy-MM-dd'T'HH:mm:ss.SSSXXX");

sdf.setTimeZone(TimeZone.getTimeZone("Asia/Seoul"));


String text = sdf.format(date);

System.out.println(text);

// "2018-01-19T20:34:46.177+09:00"


여기서 XXX의 의미가 중요하다.

XXX는 +09:00를,

X는 +09을 의미한다.


GMT 스타일의 ISO8601문자열을 Date로 변환하려면 다음과 같이 개발한다.


val dateFormat = new SimpleDateFormat("yyyy-MM-dd'T'HH:mm:ssXXX")
dateFormat.setTimeZone(TimeZone.getTimeZone("UTC"))
val date: Date = dateFormat.parse("2017-12-11T13:00:00+09:00")
println(date)

Mon Dec 11 13:00:00 KST 2017


--- 참고로 Joda DateTime의 fomatter는 잘 인식이 안되서 SimpleDateFormat을 사용한다.


val fmt = DateTimeFormat.forPattern("yyyy-MM-dd'T'HH:mm:ssXXX")


다음 예제는 SimpleDateFormat과 JodaTime을 이용해 UTC로 리턴하는 예이다.


def getUTCDateTime(dateTime: String): DateTime = {
val dateFormat = new SimpleDateFormat("yyyy-MM-dd'T'HH:mm:ssXXX")
dateFormat.setTimeZone(TimeZone.getTimeZone("UTC"))
new DateTime(dateFormat.parse(dateTime), DateTimeZone.UTC)
}


println(getUTCDateTime("2017-12-11T07:00:00+09:00"))의 결과는 2017-12-10T22:00:00.000Z이다.

Posted by '김용환'
,


0.10.1.0에서 특정 노드에서 다음 카프카 에러 발생


복제가 실패하는 에러가 나온다.


 Error in fetch kafka.server.ReplicaFetcherThread$FetchRequest@5db63c3b (kafka.server.ReplicaFetcherThread)

java.io.IOException: Connection to 1 was disconnected before the response was read

        at kafka.utils.NetworkClientBlockingOps$$anonfun$blockingSendAndReceive$extension$1$$anonfun$apply$1.apply(NetworkClientBlockingOps.scala:115)

        at kafka.utils.NetworkClientBlockingOps$$anonfun$blockingSendAndReceive$extension$1$$anonfun$apply$1.apply(NetworkClientBlockingOps.scala:112)

        at scala.Option.foreach(Option.scala:257)

        at kafka.utils.NetworkClientBlockingOps$$anonfun$blockingSendAndReceive$extension$1.apply(NetworkClientBlockingOps.scala:112)

        at kafka.utils.NetworkClientBlockingOps$$anonfun$blockingSendAndReceive$extension$1.apply(NetworkClientBlockingOps.scala:108)

        at kafka.utils.NetworkClientBlockingOps$.recursivePoll$1(NetworkClientBlockingOps.scala:137)

        at kafka.utils.NetworkClientBlockingOps$.kafka$utils$NetworkClientBlockingOps$$pollContinuously$extension(NetworkClientBlockingOps.scala:143)

        at kafka.utils.NetworkClientBlockingOps$.blockingSendAndReceive$extension(NetworkClientBlockingOps.scala:108)

        at kafka.server.ReplicaFetcherThread.sendRequest(ReplicaFetcherThread.scala:253)

        at kafka.server.ReplicaFetcherThread.fetch(ReplicaFetcherThread.scala:238)

        at kafka.server.ReplicaFetcherThread.fetch(ReplicaFetcherThread.scala:42)

        at kafka.server.AbstractFetcherThread.processFetchRequest(AbstractFetcherThread.scala:118)

        at kafka.server.AbstractFetcherThread.doWork(AbstractFetcherThread.scala:103)

        at kafka.utils.ShutdownableThread.run(ShutdownableThread.scala:63)


로그 내용을 보면 다음과 같다.


33676:[2018-01-18 12:54:53,992] INFO Partition [__consumer_offsets,34] on broker 1: Shrinking ISR for partition [__consumer_offsets,34] from 3,2,1 to 1 (kafka.cluster.Partition)

33687:[2018-01-18 12:55:06,164] INFO Partition [__consumer_offsets,34] on broker 1: Expanding ISR for partition [__consumer_offsets,34] from 1 to 1,2 (kafka.cluster.Partition)

33689:[2018-01-18 12:55:06,262] INFO Partition [__consumer_offsets,34] on broker 1: Expanding ISR for partition [__consumer_offsets,34] from 1,2 to 1,2,3 (kafka.cluster.Partition)

33691:[2018-01-18 12:55:23,963] INFO Partition [__consumer_offsets,34] on broker 1: Shrinking ISR for partition [__consumer_offsets,34] from 1,2,3 to 1 (kafka.cluster.Partition)


https://issues.apache.org/jira/browse/KAFKA-4477  


0.10.1.1에서 픽스 되었다고 한다.      

Posted by '김용환'
,


배열에서 맨 앞 또는 뒤의 엘리먼트를 제거하고 싶을 때가 있다. slice를 사용하면 좋다.


배열의 마지막 엘리먼트를 제거하고 싶다면 다음과 같다. 


scala> val a = Array(1,2,3)

a: Array[Int] = Array(1, 2, 3)


scala> a.slice(0, a.size - 1)

res15: Array[Int] = Array(1, 2)


scala> a.slice(1, a.size - 1)

res17: Array[Int] = Array(2)


또는 dropRight 또는 drop을 사용할 수 있다. 


scala> a.dropRight(1)

res21: Array[Int] = Array(1, 2)


scala> a.drop(1)

res24: Array[Int] = Array(2, 3)


주의할 점은 0을 사용하면 의미 없다.


scala> a.dropRight(0)

res20: Array[Int] = Array(1, 2, 3)


scala> a.drop(0)

res23: Array[Int] = Array(1, 2, 3)


Posted by '김용환'
,


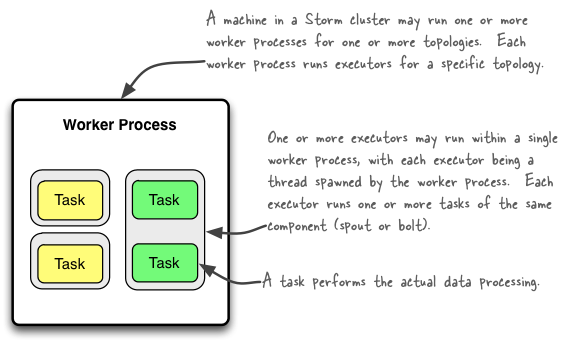
스톰(apache storm) 내부 구조에 대한 설명을 담은 글이다. 최신 1.0과 조금 다른 부분이 있자 개념은 비슷하다.


http://www.michael-noll.com/blog/2012/10/16/understanding-the-parallelism-of-a-storm-topology/


http://www.michael-noll.com/blog/2013/06/21/understanding-storm-internal-message-buffers/


1.0 기준

* 로컬 서버에서 쓰레드간 통신 : LMAX Disruptor

* 네트워크 간 서버 통신 : Netty 


스톰의 내부 큐 구조


이전 글을 보면 buffer 사이즈가 많이 나오는데.. cpu/mem을 많이 사용하지 않은채 병목이 되기 때문에 기본 값을 잘 살펴보고 buffersize를 좀 고민해봐야할 수 있다.


https://github.com/apache/storm/blob/master/conf/defaults.yaml


전체적인 흐름을 보면 알겠지만, 파이프 수도관(pipeline), 물을 담는 통(ring buffer), 수도꼭지(thread) 처럼 되어 있다. 따라서 수도꼭지와 통을 통제하는, 즉 전체적은 흐름을 통제해야 하는 back pressure 개념이 필요한데. 바로 관련 내용은 아래에 있다.


https://issues.apache.org/jira/browse/STORM-886


그래서 병목이 발생하지 않도록 내부적으로 backpressure를 추가했는데..

이게 대용량일 때 문제가 될 수 있다.


트래픽이 많아지면 backpressure을 활성화하지 않도록 해서 문제가 해결되기도 한다.

https://stackoverflow.com/questions/38198961/storm-kafkaspout-stopped-to-consume-messages-from-kafka-topic


backpressure에 대한 튜닝 내용을 살펴보면. 

http://jobs.one2team.com/apache-storms/ 글을 보면, 기본 값이 병목임을 얘기하고 있다. 


executor.receive.buffer.size (1024)

executor.send.buffer.size (1024)

disruptor.highwatermark (default 0.9)

disruptor.lowwatermark (default 0.4)


The reason why the back pressure didn’t work out of the box with the default parameters is that we have a bolt that has a pretty long processing time, and usually takes 0.1 second to process a single message. During a peak of events, the spout was fast enough to fill the buffer of these slow bolts. When we kept the default size of 1024 messages, a bolt had to process more than 1000 messages in 0.1s each, which would add up to 100 seconds before the last message gets processed. That didn’t work well with the timeout of 30 seconds for a tuple in the topology, and it caused many messages to fail.

The main parameter we had to tune was the buffer size. Based on the assumptions that we don’t want to have too many fails, and that our topology is not latency sensitive, we agreed on the limit that a tuple shouldn’t wait more than 10 seconds in that executor receive buffer. This means we don’t want more than 100 messages in the buffer, then we can go for a buffer size of 64 or 128. As a rule of thumb, we align the value of the topology.executor.send.buffer.size with the one of the topology.executor.receive.buffer.size. For us, tuning the buffer to the adapted size was sufficient to get the backpressure to work. It throttles the spout when the bolts can’t keep up the pace.

We barely touched the watermark values, these seem to make sense only if you have specific considerations like:

  • When the spout is throttling at 0.9, it’s too late, some of the tuples are still filling the buffers, lets reduce the high watermark to 0.8
  • When the spout is throttled, and the messages are dropping under 0.4, the spout has some latency to fetch data and build new messages, that causes some bolts to be idle for a small moment, lets increase the low watermark to 0.5


backpressure을 사용하고 있다면 계속 이 부분을 튜닝하면서 운영해야 할 것 같다.


성능에 중요한 영향을 미친다.

'Apache Storm' 카테고리의 다른 글

[storm] LMAX Disrupter 개념  (0) 2018.01.16
Posted by '김용환'
,