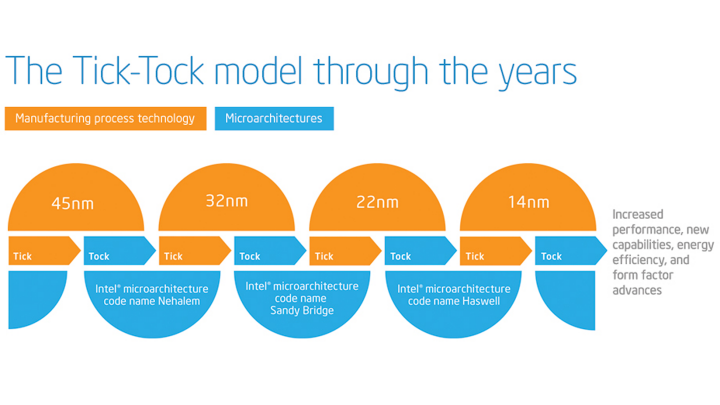
카산드라는 3.0부터는 매달 출시할 계획이라고 한다.  짝수 달은 버그 픽스를 포함하고 홀수 달은 버그만 하는 정책을 따른다고 한다. 인텔의 틱톡 모델(예전 아저씨들이 플랫폼 릴리즈를 할처럼 돌아갔다)처럼 간다고 한다. 


http://www.datastax.com/dev/blog/cassandra-2-2-3-0-and-beyond


After 3.0, we’ll take this even further: we will release 3.x versions monthly.  Even releases will include both bugfixes and new features; odd releases will be bugfix-only.  You may have heard this referred to as “tick-tock” releases, after Intel’s policy of changing process and architecture independently.

The primary goal is to improve release quality.  Our current major “dot zero” releases require another five or six months to make them stable enough for production.  This is directly related to how we pile features in for 9 to 12 months and release all at once.  The interactions between the new features are complex and not always obvious.  2.1 was no exception, despite DataStax hiring a full time test engineering team specifically for Apache Cassandra.

We need to try something different.  Tick-tock releases will dramatically reduce the number of features in each version, which will necessarily improve our ability to quickly track down any regressions.  And “pausing” every other month to focus on bug fixes will help ensure that we don’t accumulate issues faster than we can fix them.


http://www.intel.com/content/www/us/en/silicon-innovations/intel-tick-tock-model-general.html


Posted by '김용환'
,

이젠 cms를 java9에서 못 볼 듯...


http://openjdk.java.net/jeps/214


DefNew + CMS       : -XX:-UseParNewGC -XX:+UseConcMarkSweepGC
ParNew + SerialOld : -XX:+UseParNewGC
ParNew + iCMS      : -Xincgc
ParNew + iCMS      : -XX:+CMSIncrementalMode -XX:+UseConcMarkSweepGC
DefNew + iCMS      : -XX:+CMSIncrementalMode -XX:+UseConcMarkSweepGC -XX:-UseParNewGC
CMS foreground     : -XX:+UseCMSCompactAtFullCollection
CMS foreground     : -XX:+CMSFullGCsBeforeCompaction
CMS foreground     : -XX:+UseCMSCollectionPassing


Posted by '김용환'
,

cassandra 3.0에서 IllegalArgumentException : Failed to add contact point 예외가 발생했다.


Caused by: java.lang.IllegalArgumentException: Failed to add contact point:  1.1.1.2

at com.datastax.driver.core.Cluster$Builder.addContactPoint(Cluster.java:851)

at com.datastax.driver.core.Cluster$Builder.addContactPoints(Cluster.java:874)

Caused by: java.net.UnknownHostException:  172.17.56.91: unknown error

at java.net.Inet4AddressImpl.lookupAllHostAddr(Native Method)

at java.net.InetAddress$2.lookupAllHostAddr(InetAddress.java:907)

at java.net.InetAddress.getAddressesFromNameService(InetAddress.java:1302)

at java.net.InetAddress.getAllByName0(InetAddress.java:1255)


코드는 매우 간단했다..


String[] contactPoints = StringUtils.split(urls, ",")

cluster = Cluster.builder().addContactPoints(contactPoints).

withQueryOptions(queryOptions).

...


확인해보니,ip 목록을 받을 때 공백문자가 있으면 java에서는 unknown error가 발생한다. 


재현 코드는 다음과 같다. 


import java.net.*;

public class Test {

public static void main(String args[]) throws Exception{

InetAddress ipAddress=null;


ipAddress = InetAddress.getByName(" 1.1.1.2");

System.out.println("getHostName:"+ipAddress.getHostName());

System.out.println("getHostAddr:"+ipAddress.getHostAddress());

}

}


$ java Test

Exception in thread "main" java.net.UnknownHostException:  172.17.56.91: unknown error

at java.net.Inet4AddressImpl.lookupAllHostAddr(Native Method)

at java.net.InetAddress$2.lookupAllHostAddr(InetAddress.java:907)

at java.net.InetAddress.getAddressesFromNameService(InetAddress.java:1302)

at java.net.InetAddress.getAllByName0(InetAddress.java:1255)


이 문제 해결을 위해 단순하게 split만 하지 않고 공백 문자가 들어와도 공백을 없애도록 코드를 수정했다.


String[] contactPoints = Arrays.stream(StringUtils.split(urls, ",")).map(String::trim).toArray(String[]::new);


Posted by '김용환'
,


 개발용으로 사용할 cassandra 3.0 설치 방법이다.  


참고 자료는 아래 링크이다. 하지만 완벽하지 않다.. 

http://docs.datastax.com/en/cassandra/3.0/cassandra/install/installRHEL.html


python 2.7 이상이어야 한다. python 2.6이면 아래를 참고한다.(cassandra 2점 대에서는 python 2.6에도 잘 동작했지만, cassandra 3점대부터는 python 2.7이 필수이다)

http://knight76.tistory.com/entry/python-26-%EC%97%90%EC%84%9C-python-279-%EC%97%85%EA%B7%B8%EB%A0%88%EC%9D%B4%EB%93%9C-%ED%95%98%EA%B8%B0


python 2.7을 확인한 후, java 8을 설치한다.


다음 cassandra를 설치한다.


$ su

/etc/yum.repos.d/datastax.repo 파일에 다음을 추가한다.


[datastax] 

name = DataStax Repo for Apache Cassandra

baseurl = http://rpm.datastax.com/community

enabled = 1

gpgcheck = 0


cassandra 바이너리와 운영 툴을 설치한다.

$ yum install dsc30

$ yum install cassandra30-tools


혹시 cqlsh를 실행할 수 없다면 pip로 cqlsh를 설치한다. 

$ cqlsh
Traceback (most recent call last):
  File "/usr/bin/cqlsh.py", line 163, in <module>
    from cqlshlib import cql3handling, cqlhandling, pylexotron, sslhandling
ImportError: No module named cqlshlib

$ python get-pip.py
$ pip install cqlsh


cassandra3의 테스트 장비 설치를 했지만 외부에서 포트 연결이 안될 수 있다. 

아래와 같이 설정을 바꾼다.  1.1.1.1에 실제 ip를 등록한다. 


$ vi /etc/cassandra/conf/cassandra.yaml

listen_address: 1.1.1.1

broadcast_address: 1.1.1.1

rpc_address: 0.0.0.0  

broadcast_rpc_address: 1.1.1.1


cassandra 서비스를 실행한다.


$ service cassandra start


cqlsh과 nodetool로 정상적으로 문제 없는지 확인한다. 


$ cqlsh

Connected to Test Cluster at 127.0.0.1:9042.

[cqlsh 5.0.1 | Cassandra 3.0.9 | CQL spec 3.4.0 | Native protocol v4]

Use HELP for help.


$ nodetool status

...


문제가 있으면 아래 로그를 확인한다.


$ tail -f /var/log/cassandra/


============


만약 2.1에서 3.0으로 업그레이드하려면 다음 내용을 참조한다.


sudo -s


rm -rf /var/lib/cassandra

rm -rf /var/log/cassandra

rm -rf /etc/cassandra


yum remove -y cassandra21-2.1.12-1.noarch


yum remove python


export https_proxy=..

export http_proxy=..


wget http://www.python.org/ftp/python/2.7.8/Python-2.7.8.tar.xz

xz -d Python-2.7.8.tar.xz 

tar xvf Python-2.7.8.tar


cd Python-2.7.8

./configure --prefix=/usr/local


make

make install


cat > /etc/yum.repos.d/datastax.repo  << EOF

[datastax] 

name = DataStax Repo for Apache Cassandra

baseurl = http://rpm.datastax.com/community

enabled = 1

gpgcheck = 0

EOF


yum install -y dsc30

yum install -y cassandra30-tools


Posted by '김용환'
,

아래 카산드라 설정은 문제 없어보이지만, error를 유발하고 데몬이 뜨지 않는다.


rpc_address:0.0.0.0


에러 내용은 다음과 같다. 


INFO  23:31:56 Configuration location: file:/etc/cassandra/default.conf/cassandra.yaml

Exception (org.apache.cassandra.exceptions.ConfigurationException) encountered during startup: Invalid yaml: file:/etc/cassandra/default.conf/cassandra.yaml

org.apache.cassandra.exceptions.ConfigurationException: Invalid yaml: file:/etc/cassandra/default.conf/cassandra.yaml

at org.apache.cassandra.config.YamlConfigurationLoader.loadConfig(YamlConfigurationLoader.java:124)

at org.apache.cassandra.config.YamlConfigurationLoader.loadConfig(YamlConfigurationLoader.java:95)

at org.apache.cassandra.config.DatabaseDescriptor.loadConfig(DatabaseDescriptor.java:135)

at org.apache.cassandra.config.DatabaseDescriptor.<clinit>(DatabaseDescriptor.java:119)

at org.apache.cassandra.service.CassandraDaemon.activate(CassandraDaemon.java:543)

at org.apache.cassandra.service.CassandraDaemon.main(CassandraDaemon.java:696)

Caused by: while scanning a simple key

 in 'reader', line 962, column 1:

    rpc_address:0.0.0.0

    ^

could not found expected ':'

 in 'reader', line 964, column 1:


: 다음에 공백이 한 칸 있어야 한다. 더 이상 에러는 발생하지 않는다.


rpc_address: 0.0.0.0


Posted by '김용환'
,

[kafka] 복제(replication)

kafka 2017. 3. 17. 13:42


kafka에 복제(replication) 개념이 있고, 아래 위키에서 잘 설명하고 있다. nosql을 공부하는 사람이라면 충분히 이해할 수 있을 것이다.


동기 복제와 비동기 복제 때문에 ack관련 설정이 있기 때문에 적당히 kafka를 이해할 필요가 있을 것 같다. 


https://cwiki.apache.org/confluence/display/KAFKA/Kafka+Replication


복제 관련 운영 툴은 다음과 같다.


https://cwiki.apache.org/confluence/display/KAFKA/Replication+tools


kafka-preferred-replica-election.sh 


큰 클러스터에서 카프카는 브로커간에 리드 복제본이 균등하게 분산되게 한다. 브로커 종료가 실패하면 분산 기능이 균형을 이루지 못한다. 균등하게 분산하기 위해 카프카에 클러스터의 브로커간에 리드 복제본을 배포한다. 


kafka-preferred-replica-election.sh 툴은 주키퍼 목록을 리드 복제본이 이동되야 하는 토픽 파티션 목록으로 변경한다. 컨트롤러는 기본 복제본이 리더가 아님을 알게 되면 브로커에 기본 복제본을 파티션 리더로 지정하라는 요청을 보낸다. 기본 복제본이 ISR(in-sync replicas) 목록에 없으면 컨트롤러는 데이터를 손실하지 않도록 작업을 실패 처리한다.


$ bin/kafka-preferred-replica-election.sh --zookeeper localhost:12913/kafka --path-to-json-file topicPartitionList.json


topicPartionList.json 파일은 다음과 같다.


{"partitions": [  

    {"topic": "topic", "partition": "0"}, 

    {"topic": "topic", "partition": "1"}, 

    {"topic": "topic", "partition": "2"}, 

    {"topic": "topic2", "partition": "0"}, 

    {"topic": "topic2", "partition": "1"}, 

    {"topic": "topic2", "partition": "2"},  

  ] 


kafka-reassign-partitions.sh을 사용하면 복제본의 파티션 정책을 변경할 수 있다.


$ bin/kafka-reassign-partitions.sh --zookeeper localhost:2181 --reassignment-json-file increase-replication-factor.json --execute 


increase-replication-factor.json 파일은 다음과 같다.

 {"partitions":[{"topic":"smackTopic","partition":0,"replicas":[2,3]}], "version":1 } 


Posted by '김용환'
,


현재 git 저장소를 확인한다.


$ git remote -v


새로운 저장소로 변경한다.


$ git remote set-url origin https://github.com/xxx/aaa-project.git


확인을 위해서 다음 커맨드를 실행해 본다.

$ git pull


'etc tools' 카테고리의 다른 글

github page 웹으로 생성하기  (0) 2017.08.17
[influxdb] influxdb clustering은 무료 버전?  (0) 2017.03.23
[git] git log 범위  (0) 2016.08.24
[git] git hash 얻기  (0) 2016.08.24
artifactory 설치하기  (0) 2016.01.30
Posted by '김용환'
,


scala에서 exception 처리와 같은 구문을 처리하기 위해 null var를 사용할 때가 있다. 


이 때 주의할 점은 다음처럼 타입(제네릭 타입 포함)을 넣어야 한다. 그렇지 않으면 "conform to the expected type T" 이런 컴파일 에러가 발생한다. 


var result : String = null


또는 


var consumer: KafkaConsumer[String, String] = null

Posted by '김용환'
,


최근 kafka를 사용할 때 버전에 따라 계속 프로퍼티가 바뀐다. (더 상세히 말하면 WARN 에러가 발생할 수 있다)


따라서 최대한 org.apache.kafka.clients.producer.ProducerConfig 또는 org.apache.kafka.clients.producer.ConsumerConfig를 참조하는 것이 제일 좋다.


예시) producer config

private val props = new Properties()
props.put(ProducerConfig.BOOTSTRAP_SERVERS_CONFIG, brokerList)
props.put(ProducerConfig.KEY_SERIALIZER_CLASS_CONFIG, "org.apache.kafka.common.serialization.StringSerializer")
props.put(ProducerConfig.VALUE_SERIALIZER_CLASS_CONFIG, "org.apache.kafka.common.serialization.StringSerializer")
props.put(ProducerConfig.REQUEST_TIMEOUT_MS_CONFIG, "1000")
val producer = new KafkaProducer[String, String](props)


예시2) consumer config

val props = new Properties()
props.put(ConsumerConfig.BOOTSTRAP_SERVERS_CONFIG, brokers)
props.put(ConsumerConfig.GROUP_ID_CONFIG, groupId)
props.put(ConsumerConfig.ENABLE_AUTO_COMMIT_CONFIG, "true")
props.put(ConsumerConfig.AUTO_COMMIT_INTERVAL_MS_CONFIG, "1000")
props.put(ConsumerConfig.REQUEST_TIMEOUT_MS_CONFIG, "1000")
props.put(ConsumerConfig.AUTO_COMMIT_INTERVAL_MS_CONFIG, "1000")
props.put(ConsumerConfig.SESSION_TIMEOUT_MS_CONFIG, "1000")
props.put(ConsumerConfig.KEY_DESERIALIZER_CLASS_CONFIG, "org.apache.kafka.common.serialization.StringDeserializer")
props.put(ConsumerConfig.VALUE_DESERIALIZER_CLASS_CONFIG, "org.apache.kafka.common.serialization.StringDeserializer")


0.10.1 이전 버전 만 해도 consumer api에 zookeeper설정과 zookeeper timeout 설정이 있었지만, 


broker 목록으로 다 통일되었다. 


zookeeper 목록은 커맨드에서나 쓴다. 


Posted by '김용환'
,

[spark] dataframe 예제

scala 2017. 3. 15. 20:46


dataframe 예제이다.


scala> val df = Seq(("one", 1), ("one", 1), ("two", 1)).toDF("word", "count")

df: org.apache.spark.sql.DataFrame = [word: string, count: int]


scala> df.show()

+----+-----+

|word|count|

+----+-----+

| one|    1|

| one|    1|

| two|    1|

+----+-----+


scala> df.printSchema

root

 |-- word: string (nullable = true)

 |-- count: integer (nullable = false)


주의할 점은 where절 같이 비교하는 동등 비교를 하고 싶을 때 =만 넣으면 동작되지 않는다.


scala> df.filter(df("word") = "two" && df("count") = 1).show

<console>:29: error: value update is not a member of org.apache.spark.sql.DataFrame

       df.filter(df("word") = "two" && df("count") = 1).show

                 ^

<console>:29: error: value && is not a member of String

       df.filter(df("word") = "two" && df("count") = 1).show

                                    ^


filter에 ===를 넣어야 conditional 처럼 사용할 수 있다. 


scala> df.filter(df("word") === "one" && df("count") === 2).show

+----+-----+

|word|count|

+----+-----+

+----+-----+


scala> df.filter(df("word") === "one" && df("count") === 1).show

+----+-----+

|word|count|

+----+-----+

| one|    1|

| one|    1|

+----+-----+


scala> df.filter(df("word") === "two" && df("count") === 1).show

+----+-----+

|word|count|

+----+-----+

| two|    1|

+----+-----+


not equals문은 =!= 이다. 


 scala> df.filter(df("word") =!= "two" && df("count") === 1).show

+----+-----+

|word|count|

+----+-----+

| one|    1|

| one|    1|

+----+-----+


개수를 얻고 싶으면 count를 호출한다.


scala> df.filter(df("word") =!= "two" && df("count") === 1).count

res36: Long = 2


배열로 얻으려면 collect함수를 호출한다.


scala> df.filter(df("word") =!= "two" && df("count") === 1).collect

res37: Array[org.apache.spark.sql.Row] = Array([one,1], [one,1])


group by가 가능하고 max, min, mean, sum, count를 사용할 수 있다. 


scala> df.groupBy($"word").max().show

+----+----------+

|word|max(count)|

+----+----------+

| two|         1|

| one|         1|

+----+----------+


scala> df.groupBy($"word").min().show

+----+----------+

|word|min(count)|

+----+----------+

| two|         1|

| one|         1|

+----+----------+


scala> df.groupBy($"word").mean().show

+----+----------+

|word|avg(count)|

+----+----------+

| two|       1.0|

| one|       1.0|

+----+----------+


scala> df.groupBy($"word").sum().show

+----+----------+

|word|sum(count)|

+----+----------+

| two|         1|

| one|         2|

+----+----------+


scala> df.groupBy($"word").count().show

+----+-----+

|word|count|

+----+-----+

| two|    1|

| one|    2|

+----+-----+


describe 기능이 있다. 


scala> df.describe()

res67: org.apache.spark.sql.DataFrame = [summary: string, word: string ... 1 more field]


scala> df.describe().explain

== Physical Plan ==

LocalTableScan [summary#469, word#470, count#471]


table에 저장해서 sql처럼 사용할 수도 있다.


scala> df.registerTempTable("df")

warning: there was one deprecation warning; re-run with -deprecation for details


scala> sqlContext.sql("select word, count from df")

res43: org.apache.spark.sql.DataFrame = [word: string, count: int]


scala> sqlContext.sql("select word, count from df").show

+----+-----+

|word|count|

+----+-----+

| one|    1|

| one|    1|

| two|    1|

+----+-----+


scala> sqlContext.sql("select word, count from df where word=\"one\" and count=1").show

+----+-----+

|word|count|

+----+-----+

| one|    1|

| one|    1|

+----+-----+


case cass를 이용해 dataframe을 생성할 수 있다. 


scala> case class Person(name: String, age: Int)

defined class Person


scala> val people = Seq(Person("Jacek", 42), Person("Patryk", 19), Person("Maksym", 5))

people: Seq[Person] = List(Person(Jacek,42), Person(Patryk,19), Person(Maksym,5))


scala> val df = spark.createDataFrame(people)

df: org.apache.spark.sql.DataFrame = [name: string, age: int]


scala> df.show

+------+---+

|  name|age|

+------+---+

| Jacek| 42|

|Patryk| 19|

|Maksym|  5|

+------+---+


특정 파일의 포맷도 읽을 수 있다. 


scala> val df = spark.read.format("com.databricks.spark.csv").option("header", "true").load("Cartier+for+WinnersCurse.csv")


scala> val df = spark.read.orc(path)


scala> val df = spark.read.parquet(path)
Posted by '김용환'
,