[scala] mkString 예제

scala 2017. 3. 13. 19:34


필드 출력을 위해  간단히 \t 단위로 하고 싶을 때 문자열에 \t를 줄 수 있다. 


scala> s"aa\tbb\tcc"

res34: String = aa bb cc


\t를 너무 많이 입력하는 것이 귀찮을 때 mkString을 사용할 수 있다. 


scala> List("aa", "bb", "cc").mkString("\t")

res32: String = aa bb cc


Posted by '김용환'
,


scala/특히 spark에서 작업하다가 혼동되는 게 flatmap이다.


먼저 map을 살펴보면 컬렉션이 Opion 타입이라면 List(Option) 작업을 강제로 진행해야 한다. 


scala> List(Some(1),Some(2),None).map{case Some(x) => x*2  case None => 0 }

res21: List[Int] = List(2, 4, 0)


컬렉션 flatMap을 사용하기만 하면 Option을 모두 정리한다.


scala> List(Some(1),Some(2),None).flatMap(x => x)

res27: List[Int] = List(1, 2)


Posted by '김용환'
,


forall은 술어함수 p에 대해서 전체가 참이면 true를 리턴한다. 아니면 false를 리턴한다.


scala> List(1,2,3,4,5).forall(x => x>2)

res11: Boolean = false


비슷함 함수로는 exists로서 술어라면 하나라도 참이면 true를 리턴하고 아니면 false를 리턴한다.


scala> List(1,2,3,4,5).exists(x => x>2)

res12: Boolean = true


Posted by '김용환'
,


# linkedin

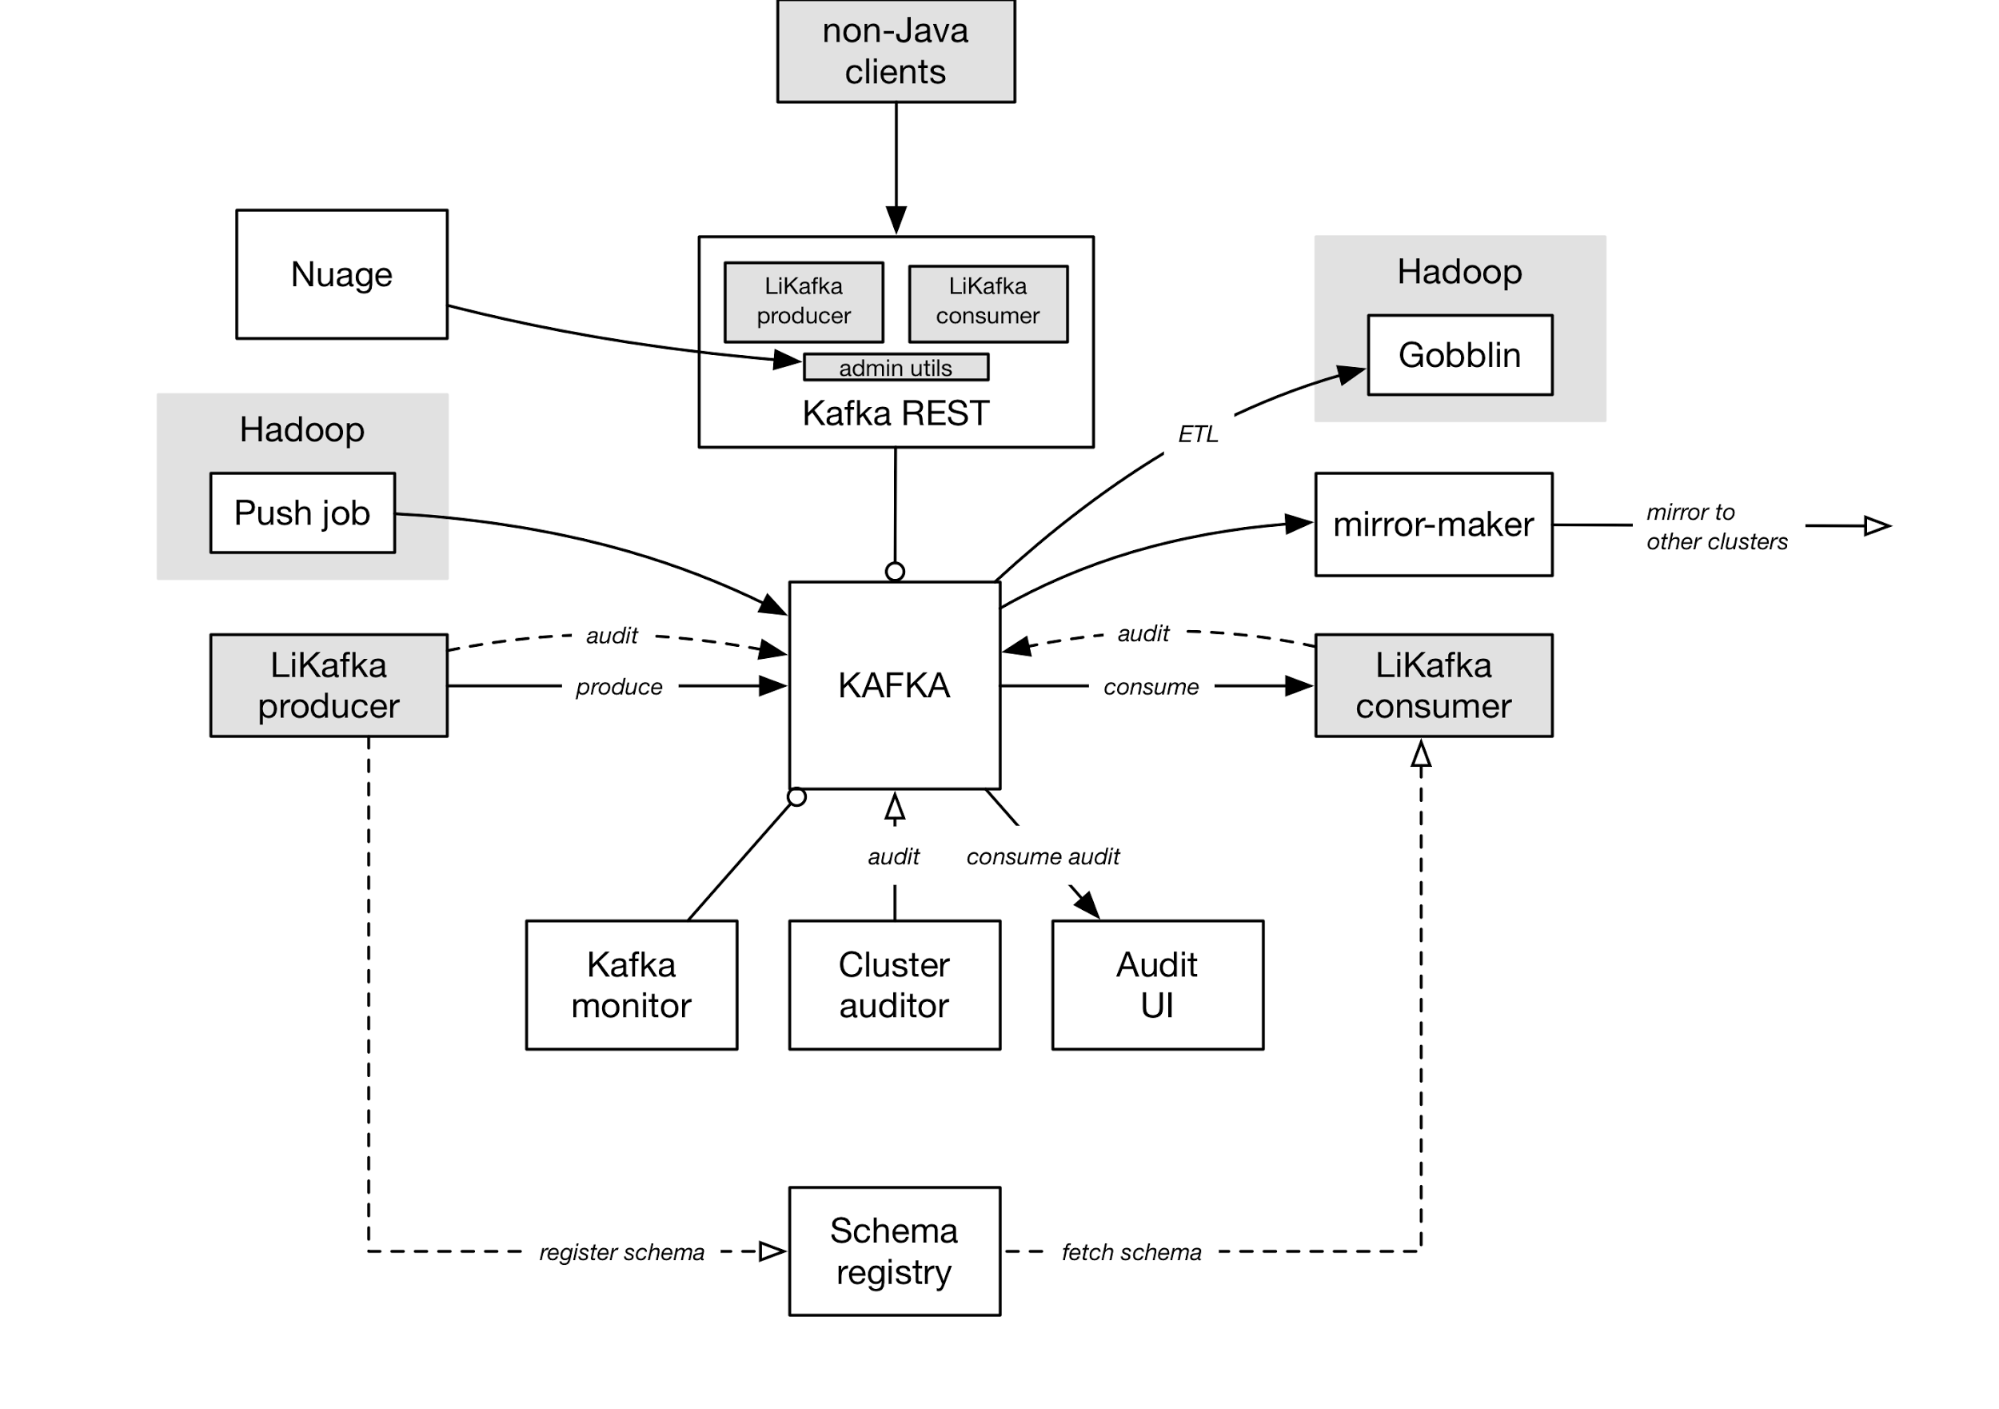
linked 기술 블로그에 따르면 kafka를 중앙 pub/sub 구조의 큐로 잘 사용해 피드 시스템을 처리하고 있다. 재미있는 것은 avro도 사용하고 있다는 점이다. 


https://engineering.linkedin.com/blog/2016/04/kafka-ecosystem-at-linkedin


이미지 : https://content.linkedin.com/content/dam/engineering/site-assets/images/blog/posts/2016/04/KafkaEcosystem1.jpg


#uber


카프카 데이터 피드를 사용해 분당 수백 번의 승차 정보를 로그 데이터로 저장한 후, 해당 데이터를 Amazon S3에 대량 로드한다. 로컬 데이터 센터의 변경 데이터 로그를 스트리밍한다. json 데이터를 수집한 후 spark-hadoop(paquet)를  사용한다.


https://www.datanami.com/2015/10/05/how-uber-uses-spark-and-hadoop-to-optimize-customer-experience/


#  twitter


하루 50억 세션을 실시간으로 처리하려면 카프카를 스트림 처리 인프라로 사용해야 한다.


https://blog.twitter.com/2015/handling-five-billion-sessions-a-day-in-real-time


# netflix


카프카는 실시간 모니터링 및 이벤트 처리를 위한 넷플릭스의 데이터 파이프 라인의 백본이다.


http://techblog.netflix.com/2013/12/announcing-suro-backbone-of-netflixs.html


# spotify


https://www.meetup.com/ko-KR/stockholm-hug/events/121628932/?eventId=121628932


# yahoo


https://yahooeng.tumblr.com/post/109994930921/kafka-yahoo

Posted by '김용환'
,


특정 로그 파일(birthday.log)을 logstash를 통해 kafka로 보내려고 한다.


이미 logstash, kafka가 설치되어 있다고 가정한다.


# logstash 설정


input {
file {
type => "birthday_log"
path => [
"/home/www/googleplus/birthday.log"
]
}
}

output {
kafka {
codec => plain { format => "%{host} %{message}" }
topic_id => "%{type}"
request_required_acks => 1
broker_list => "server-ip:9092"
}
}


# kafka에서 보기


$ /usr/local/kafka/bin/kafka-console-consumer.sh --topic birthday_log --zookeeper zk-server-ip:2181


Posted by '김용환'
,


Akka에서 ActorSystem을 정의할 때, 영어 대소문자, 숫자와 -,_만 된다.(-와 _는 앞에 있으면 안된다)


Exception 나는 경우

val system = ActorSystem("MonitoringTest ")
val system = ActorSystem("-MonitoringTest-")


Exception 내용이다. 


java.lang.IllegalArgumentException: invalid ActorSystem name [MonitoringTest ], must contain only word characters (i.e. [a-zA-Z0-9] plus non-leading '-' or '_')


문제가 발생하지 않는 경우의 예

val system = ActorSystem("MonitoringTest")


val system = ActorSystem("MonitoringTest1-")


Posted by '김용환'
,

spring 3.2.2부터 Scheduled에 String 문자열로 간단한 문자열 형태를 받을 수 있어 크론 잡을 실행할 수 있었다. 


https://github.com/spring-projects/spring-framework/blob/master/spring-context/src/main/java/org/springframework/scheduling/annotation/Scheduled.java


/**

* Execute the annotated method with a fixed period in milliseconds between the

* end of the last invocation and the start of the next.

* @return the delay in milliseconds as a String value, e.g. a placeholder

* @since 3.2.2

*/

String fixedDelayString() default "";


http://docs.spring.io/spring-framework/docs/current/javadoc-api/org/springframework/scheduling/annotation/Scheduled.html#fixedDelayString--


spring 3.2.2부터 fixedDelayString, fixedRateString, initialDelayString 을 사용할 수 있다. 


https://github.com/spring-projects/spring-framework/blob/3.2.x/spring-context/src/main/java/org/springframework/scheduling/annotation/ScheduledAnnotationBeanPostProcessor.java


즉, 아래와 같은 코드를 사용할 수 있다. 

@Scheduled(fixedDelayString="10")


@Scheduled(fixedRate = 10)


annotation 레벨에서 fixedDelayString을 사용하려면 다음 테스트 코드를 사용해 테스트해 볼 수 있다.


private AnnotationConfigApplicationContext ctx;

@Test

public void ScheduleTest() throws InterruptedException {

  ctx = new AnnotationConfigApplicationContext(TestScheduleClass.class);


  Thread.sleep(10);

  assertThat(ctx.getBean(AtomicInteger.class).get(), greaterThanOrEqualTo(1));

}


@Configuration

@EnableScheduling

private static class TestScheduleClass {

  public TestScheduleClass() {}


    @Bean

  public AtomicInteger counter() {

    return new AtomicInteger();

  }


  @Scheduled(fixedDelayString="10")

  public void run() {

    new Integer(10);

    int a = counter().incrementAndGet();

    System.out.println("xxxx : " + new Date() + "," + a);

  }

}


간단한 property 또는 아주 간단한 spel(예, properties 파일에서 읽은 설정) 등이 될 것이다.


private static final String delay = "new Integer(10)";

@Scheduled(fixedDelayString=delay)


@Scheduled(fixedDelayString="${fix.Delay}")


그러나, @Scheduled에 fixedDelayString에 SPEL을 사용하려면 에러가 발생한다.


@Scheduled(fixedDelayString="#{new Integer(10)}")


예외는 다음과 같다.


Caused by: java.lang.IllegalStateException: Encountered invalid @Scheduled method 'run': Invalid fixedDelayString value "#{new Integer(10)}" - cannot parse into integer

at org.springframework.scheduling.annotation.ScheduledAnnotationBeanPostProcessor$1.doWith(ScheduledAnnotationBeanPostProcessor.java:259)

at org.springframework.util.ReflectionUtils.doWithMethods(ReflectionUtils.java:495)

at org.springframework.util.ReflectionUtils.doWithMethods(ReflectionUtils.java:502)

at org.springframework.util.ReflectionUtils.doWithMethods(ReflectionUtils.java:473)

at 


spring 3.x에서는 @Scheduled에 spel을 사용할 수 없다.


따라서 @Schedule에 spel을 사용하려면 Spring 4.3.0을 써야 한다. (SPEL 처리하는 아래 Resolver가 추가되었다..)


https://github.com/spring-projects/spring-framework/blob/master/spring-beans/src/main/java/org/springframework/beans/factory/config/EmbeddedValueResolver.java


@Scheduled(fixedRate = 6000, initialDelayString = #{ T(java.lang.Math).random() * 10 } )


Posted by '김용환'
,


Play2(scala) + Kafka producer/consumer 예제이다. 


kafka는 이제 분산 파일 큐이고 여러 consumer가 동시에 동일한 데이터를 받을 수 있다. 


관련 예제를 소개한다. 


1) Producer


topic은 "aa"로 결정한다.

package worker

import org.apache.kafka.clients.producer.{KafkaProducer, ProducerConfig, ProducerRecord}
import java.util.{Date, Properties}

import scala.util.Random

class KafkaProducerWorker(brokerList: String, topic: String) {
private val rnd = new Random()
private val props = new Properties()
props.put(ProducerConfig.BOOTSTRAP_SERVERS_CONFIG, brokerList)
props.put(ProducerConfig.KEY_SERIALIZER_CLASS_CONFIG, "org.apache.kafka.common.serialization.StringSerializer")
props.put(ProducerConfig.VALUE_SERIALIZER_CLASS_CONFIG, "org.apache.kafka.common.serialization.StringSerializer")

val producer = new KafkaProducer[Integer, String](props)

def send(events: Int) {
val runtime = new Date().getTime()
val key = rnd.nextInt(100)
val msg = runtime.toString
val data = new ProducerRecord[Integer, String](topic, key, msg)
producer.send(data)
}
}


2) consumer

package worker

import java.util
import java.util.Properties
import java.util.concurrent.{ExecutorService, Executors}

import org.apache.kafka.clients.consumer.{ConsumerConfig, KafkaConsumer}

class KafkaConsumerWorker (val brokers: String,
val groupId: String,
val topic: String) {

val props = new Properties()
props.put(ConsumerConfig.BOOTSTRAP_SERVERS_CONFIG, brokers)
props.put(ConsumerConfig.GROUP_ID_CONFIG, groupId)
props.put(ConsumerConfig.ENABLE_AUTO_COMMIT_CONFIG, "true")
props.put(ConsumerConfig.AUTO_COMMIT_INTERVAL_MS_CONFIG, "1000")
props.put(ConsumerConfig.SESSION_TIMEOUT_MS_CONFIG, "30000")
props.put(ConsumerConfig.KEY_DESERIALIZER_CLASS_CONFIG, "org.apache.kafka.common.serialization.StringDeserializer")
props.put(ConsumerConfig.VALUE_DESERIALIZER_CLASS_CONFIG, "org.apache.kafka.common.serialization.StringDeserializer")

val consumer = new KafkaConsumer[String, String](props)
var executor: ExecutorService = null
consumer.subscribe(util.Collections.singleton(this.topic))

def run(): Unit= {
Executors.newSingleThreadExecutor.execute(new Runnable {
override def run(): Unit = {
while(true) {
val consumerRecords = consumer.poll(Integer.MAX_VALUE)

println("size : " + consumerRecords.count())
while(consumerRecords.iterator.hasNext) {
val record = consumerRecords.iterator.next() println(s"topic = ${record.topic()}, partition = ${record.partition()}, " + s"offset = ${record.offset()}, key = ${record.key()}, value = ${record.value()}\n")

}
}
}
})
}

def shutdown() = {
if (consumer != null) consumer.close();
if (executor != null) executor.shutdown();
}
}


3) conumer 추가 - ApplicationTimer

@Singleton
class ApplicationTimer @Inject() (clock: Clock, appLifecycle: ApplicationLifecycle) {

private val start: Instant = clock.instant
Logger.info(s"ApplicationTimer demo: Starting application at $start.")

Logger.info(s"Starting Kafka Consume Worker")
private val kafkaConsumerWorker = new KafkaConsumerWorker("localhost:9092", "1", "aa")
kafkaConsumerWorker.run()

appLifecycle.addStopHook { () =>
kafkaConsumerWorker.shutdown()
Logger.info(s"Stopping kafkaConsumerWorker.")

val stop: Instant = clock.instant
val runningTime: Long = stop.getEpochSecond - start.getEpochSecond
Logger.info(s"Stopping application at ${clock.instant} after ${runningTime}s.")
Future.successful(())
}
}


4) producer web call

@Singleton
class AsyncController @Inject()(counter: Counter, actorSystem: ActorSystem) (implicit exec: ExecutionContext) extends Controller {

def index = Action.async {
getFutureMessage(1.second).map { msg => Ok(counter.nextCount().toString + " " + msg) }
}

val kafkaProducerWorker = new KafkaProducerWorker("localhost:9092", "aa")

private def getFutureMessage(delayTime: FiniteDuration): Future[String] = {
val promise: Promise[String] = Promise[String]()
actorSystem.scheduler.scheduleOnce(delayTime) {
kafkaProducerWorker.send(1)
promise.success("Hi!")
}
promise.future
}
}


결과를 보려면 $ curl http://localhost:9000으로 테스트한다.


size : 1

topic = aa, partition = 0, offset = 1680, key = 3, value = 1489127790823


size : 1

topic = aa, partition = 0, offset = 1681, key = 71, value = 1489127833413


size : 1

topic = aa, partition = 0, offset = 1682, key = 17, value = 1489127836895

Posted by '김용환'
,


// 맨 처음(머리) 엘리먼트

scala> val h = myArray.head 

h: Int = -5 


// 맨 처음(머리) 엘리먼트를 Option으로 생성

scala> val ho = myArray.headOption 

ho: Option[Int] = Some(-5) 


// 마지막 엘리먼트를 제외한 모든 엘리먼트를 포함

scala> val h = myArray.init 

h: Array[Int] = Array(-5, -4, -3, -2, -1, 0, 1, 2, 3, 4) 


// 마지막 엘리먼트

scala> val la = myArray.last 

la: Int = 5 


// 마지막 엘리먼트를 옵션으로 생성

scala> val la = myArray.lastOption 

la: Option[Int] = Some(5) 


// 맨 처음 엘리먼트를 제외한 모든 엘리먼트를 포함

scala> val t = myArray.tail 

t: Array[Int] = Array(-4, -3, -2, -1, 0, 1, 2, 3, 4, 5) 

Posted by '김용환'
,


// -5부터 5까지 정수 타입의 범위를 선언한다

scala> val myArray = (-5 to 5).toArray 

myArray: Array[Int] = Array(-5, -4, -3, -2, -1, 0, 1, 2, 3, 4, 5) 


// N개의 엘리먼트를 삭제한다

scala> val d = myArray.drop(3) 

d: Array[Int] = Array(-2, -1, 0, 1, 2, 3, 4, 5) 


// 술어 함수가 true인 모두 엘리먼트를 삭제한다

scala> val dw = myArray.dropWhile(_<2) 

dw: Array[Int] = Array(2, 3, 4, 5) 


// 마지막 N개의 엘리먼트를 삭제한다

scala> val dr = myArray.dropRight(4) 

dr: Array[Int] = Array(-5, -4, -3, -2, -1, 0, 1) 


// 처음 N개의 엘리먼트를 얻는다

scala> val t = myArray.take(3) 

t: Array[Int] = Array(-5, -4, -3) 


// 술어 함수가 true인 모든 엘리먼트를 얻는다.

scala> val tw = myArray.takeWhile(_<2) 

tw: Array[Int] = Array(-5, -4, -3, -2, -1, 0, 1) 


// 마지막 N개의 엘리먼트만 얻는다

scala> val tr = myArray.takeRight(3) 

tr: Array[Int] = Array(3, 4, 5) 


// A번째 인덱스부터 B번째 인덱스까지의 하위 시퀀스

scala> val sl = myArray.slice(1,3) 

sl: Array[Int] = Array(-4, -3) 

Posted by '김용환'
,